Set up Auto-Pay
Schools that accept online payments can enroll payers in Auto-Pay, offering a convenient automatic payment method that helps reduce the likelihood of late payments.
There are two types of Auto-Pay plans: Auto-Pay based on payment plans and Auto-Pay based on incidentals
-
Auto-Pay based on payment plans covers all charges included within a designated payment plan.
-
Auto-Pay based on incidentals applies to charges that fall outside of any payment plan.
Note: Incidental Auto-Pay is currently available only as a limited release through the Early Adopter Program (EAP).
To get started with Auto-Pay, log into Billing management, hover over Billing in the navigation and select Settings. Finally select Auto-Pay from the in-page navigation.
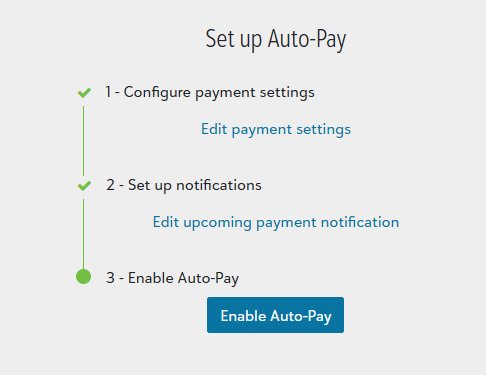
 1. Configure payment settings
-
Select Configure payment settings under Auto-Pay.
-
Select an available payment processor.
-
Choose whether to accept Credit cards, ACH payments (i.e., electronic check, direct debit), or both.
-
If accepting credit cards, determine whether a credit card payment Convenience fee is appended to the charge.
-
Choose if the Convenience fee is posted to the general ledger.
-
Click Save.
2. Set up notifications
Auto-Pay requires two notifications to be sent to payers: a notification issued
-
The Auto-Pay notifications cannot be disabled once Auto-Pay is active.
-
Only one notification can be created for each Auto-Pay notification type.
Select Set up notifications to customize the upcoming payment and enrollment confirmation notifications.
Read more about creating notifications.
Tip: It is recommended that you include the instructions for putting Auto-Pay on hold in the email to payers.
3. Enable Auto-Pay
Once the payment settings and notification are configured, select Enable Auto Pay, followed by Yes, to allow payers to enroll to Auto-Pay.
Payers enroll in Auto-Pay via the Current bill page. Payers do not see the Auto-Pay section on the Current bill until Auto-Pay is enabled in the system settings.
Once set up, payers can enroll in Auto-Pay from their current bill or payment plan page and Billing clerks can administrate Auto-Pay from users' billing profile.