Exercise: Manually Trigger the Integrated Application Workflow from within an Infinity Application
In the previous two exercises (Exercise: Create an Integrated Workflow Project with Visual Studio 2010 and Exercise: Manually Triggering the Integrated Application Workflow from within an Infinity Application), we created a very simple workflow and deployed the workflow into the Windows Server AppFabric infrastructure. We placed the .xamlx and binaries to the appropriate locations within the Workflow Service application's folders. We verified the workflow service within INETMGR and viewed the MajorGiving.xamlx service end point within a web browser. Deploying the workflow service to IIS is just one piece of the puzzle to "wire up" our integrated application workflow service within an Infinity application, such as Blackbaud CRM. In this exercise, we will create a catalog item known as a WorkflowSpec (using the SDK template) which will register our major giving xamlx workflow service into the Infinity platform.
All Infinity Integrated Application Workflow workflows will consist of at least two major Visual Studio projects:
-
A workflow service project using the "Integrated Workflow Project" template from the SDK. We created this project in the previous exercises.
-
A standard Infinity catalog project using the "Catalog Project" template from the SDK.
We created #1 above, so now we need to create #2. The Catalog Project is a standard Infinity SDK project type that you should be very familiar with since it is the way that all Infinity catalog specs are implemented. You may want to use an existing catalog project if you already have one that contains the specs that your workflow will be interacting with. In this exercise, we start from scratch to make a new catalog project.
You can use Visual Studio 2010 or Visual Studio 2008 to create the catalog project. We will use Visual Studio 2008 to create the catalog project.
Instructions
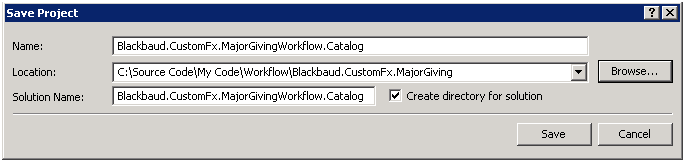
Step 1 - Save and close the Blackbaud.CustomFx.MajorGiving solution within Visual Studio 2010.
Step 2 - Create a new catalog project using Visual Studio 2008.
-
Open Microsoft Visual Studio 2008.
-
Select File\New Project from the main menu in Visual Studio 2008.
-
Select the Catalog Project template and name the project Blackbaud.CustomFx.MajorGivingWorkflow.Catalog.

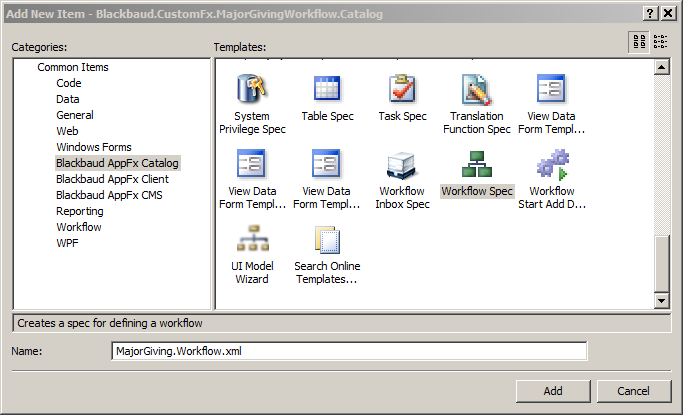
Step 3 - Add a new catalog item named "Workflow Spec" to the catalog project.
-
Right-click our new catalog project and select Add\New Item… from the popup menu.
-
Select Blackbaud AppFx Catalog from the list of categories on the left side of the Add New Item dialog window.
-
Select Workflow Spec as the item template in the middle pane of the dialog window.
-
Name the spec file: MajorGiving.Workflow.xml.
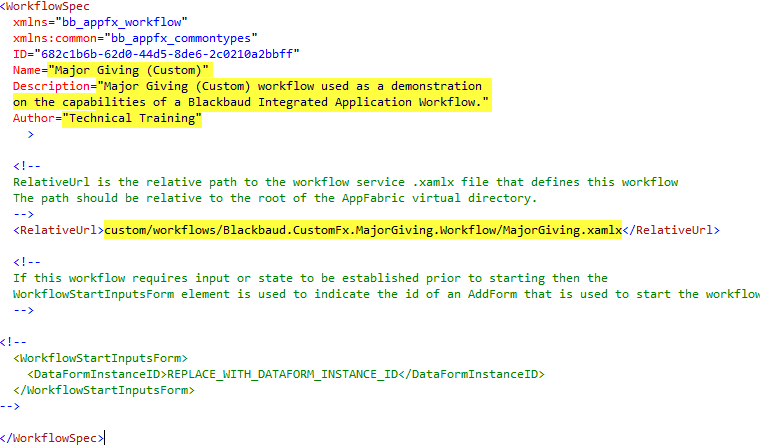
Step 4 - Replace the Author, Name, and Description attributes.
-
Provide the value "Major Giving (Custom)" for the Name attribute of the WorkflowSpec.
-
Provide the value "Major Giving (Custom) workflow used as a demonstration on the capabilities of a Blackbaud Integrated Application Workflow." for the Description attribute of the WorkflowSpec.
-
Provide the value "Technical Training" for the Author attribute of the WorkflowSpec.
See the example spec below.
|
Property |
Value |
|---|---|
| Name |
Major Giving (Custom) |
|
Description |
Major Giving (Custom) workflow used as a demonstration on the capabilities of a Blackbaud Integrated Application Workflow. |
|
Author |
Technical Training |
Step 5 - Specify the value RelativeUrl XML element to our deployed MajorGiving.xamlx on the workflow server.
- Specify in the RelativeUrl element the path to the MajorGiving.xamlx file on the workflow server, relative to the root of the virtual directory:
|
XML Attribute |
Value |
|---|---|
|
RelativeUrl |
custom/workflows/Blackbaud.CustomFx.MajorGiving.Workflow/MajorGiving.xamlx |
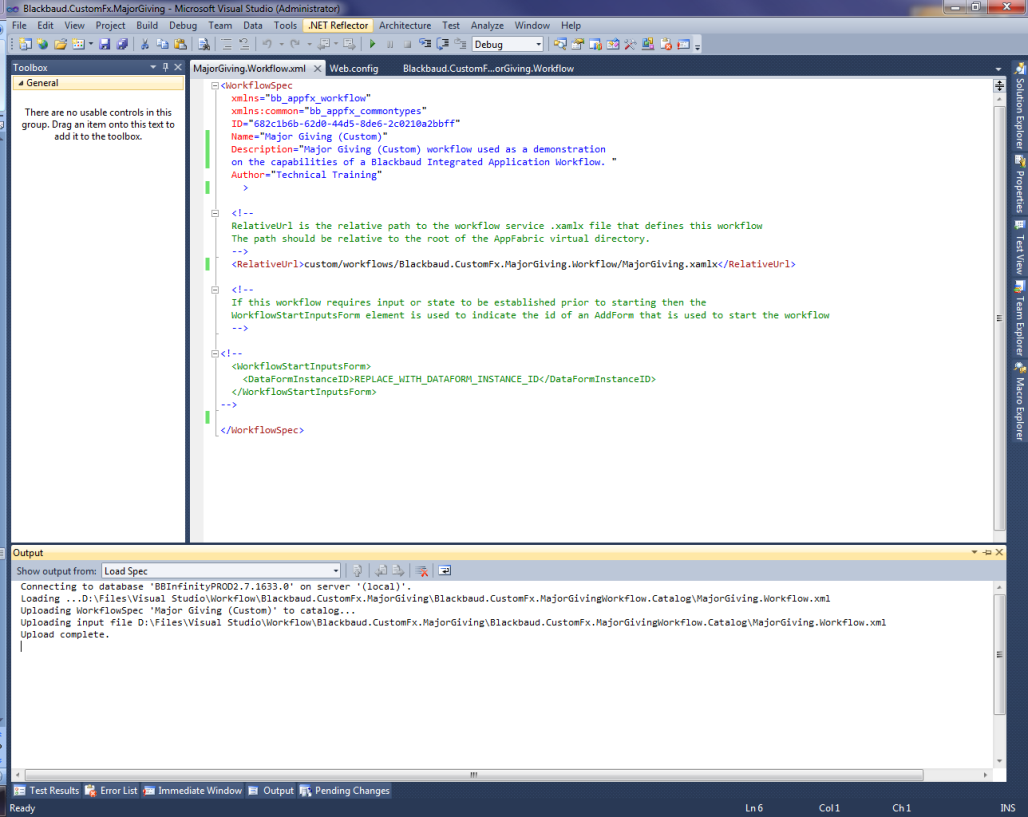
Step 6 - Save and load the spec.
We will continue to edit this spec at a later point in the exercises. For now, however, go ahead and save and load the spec using the LoadSpec utility in Visual Studio. Select Tools\Load Spec from the Visual Studio main menu.
Step 7 - Trigger the workflow behind the scenes with a stored procedure.
Now we have registered a workflow definition in the Workflow Catalog. We just need a way to start the workflow. You can use a variety of mechanisms to start a registered workflow, and we will learn about them in the following exercises. For now, let's just use the quickest and dirtiest way to start our workflow so that we can see it in action and verify that all the moving parts work correctly.
In SQL Server Management Studio, connect to your Infinity database and issue this SQL, using the ID in your workflow spec:
Note: Be sure to replace the GUID within the SQL script below with the ID form your new WorkflowSpec. Be sure to verify the database name within your environment before you run the T-SQL script.
USE BBInfinity  -- VERIFY THAT YOU ARE POINTING TO THE CORRECT DB
GO
exec dbo.USP_BBWORKFLOW_WORKFLOW_INSTANCE_START_WITH_DATAFORMITEM_INPUTS
            @WORKFLOWSPECCATALOGID = '682c1b6b-62d0-44d5-8de6-2c0210a2bbff';
Step 8 - Review the workflow logs to examine the workflow instance progress.
-
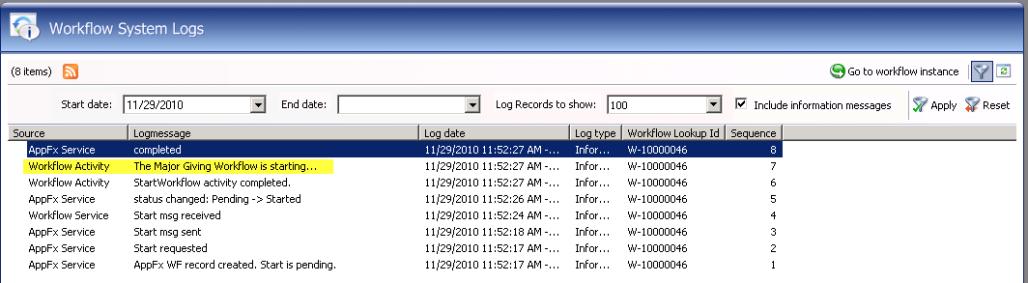
Let’s open our Infinity application, such as Blackbaud CRM, and navigate to the Workflow functional area and click the Workflow logs task.

By default, the Workflow System Logs page only shows errors and warnings.
-
Select the filter, select today's date for the start date drop-down list box, select the Include information messages checkbox, and limit the results to 100 records. In the figure below, the yellow highlight denotes the log entry for our Major Giving Workflow.
Step 9 - View the workflow service using the AppFabric Dashboard.
The AppFabic Dashboard is a feature within Internet Information Services (IIS) Manager that monitors .NET 4 WCF and WF services with monitoring and/or persistence enabled. The AppFabric Dashboard provides a centralized gateway to view and manage the health of WF and WCF services deployed locally or to a server farm. It exposes real-time data from the Persistence database and historic data from the Monitoring database, and it allows you to "drill down" to examine instance and WCF Call metrics in greater detail. The structure of the AppFabric Dashboard and its supporting pages mimics the natural progression you follow when diagnosing and solving a problem with your .NET Framework 4 application. It is designed to give you summary information initially and then break that summary information down into categories of WF service instances and tracked WCF events. From the summary information, you can use the supporting child pages to find specific instance information. AppFabric tracks the execution of workflows from one activity to another and surfaces this information in the dashboard. This is useful in troubleshooting issues and understanding the flow of execution for a given workflow instance.
For more information on the AppFabric dashboard, see What is the AppFabric?.
-
To view the AppFabric dashboard, open Internet Information Services (IIS) Manager.
-
Locate your web server and select the Blackbaud workflow application. In the example below this application is named "bbwf."
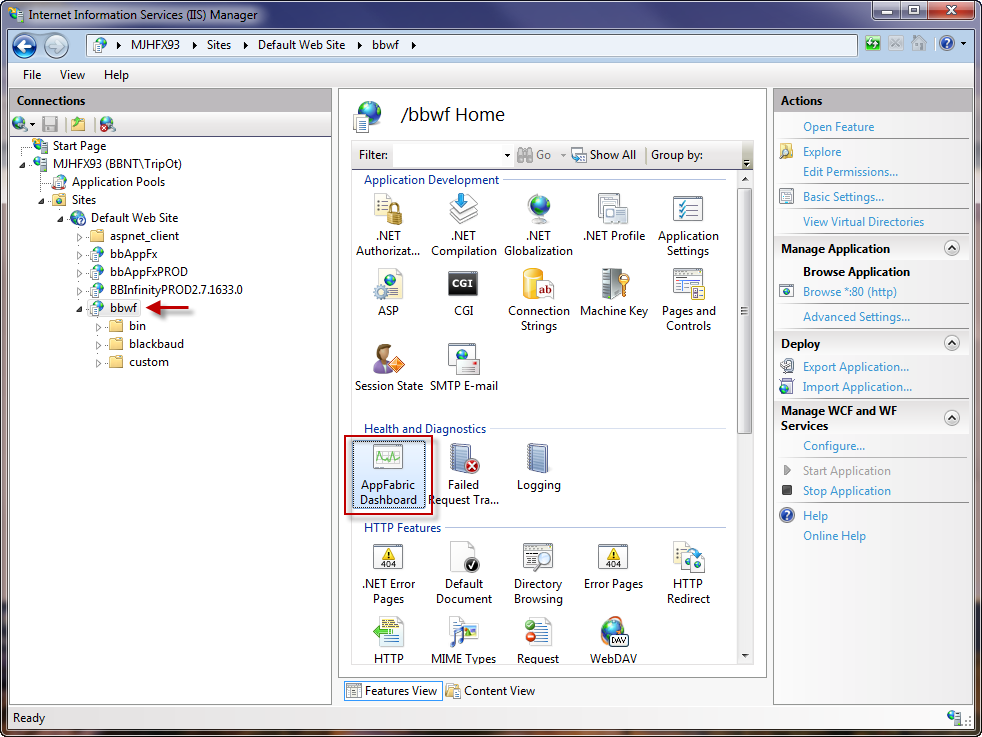
With the application selected, open the AppFabric Dashboard page by clicking the AppFabric Dashboard icon. When the page loads you will most likely see a status action icon displayed immediately below the Applications and Services counters. It displays Gathering data… while the page gathers the data to display. In the lower right section of the screen you will see a repeating status bar moving from left to right as the data is fetched. If there is a problem while accessing the data, you will see a static icon message displaying Error(s) encountered above where the Gathering data… message was previously displayed.
After the information is gathered, it is grouped and displayed in three primary dashboard metric sections: Persisted WF Instances, WCF Call History, and WF Instance History.
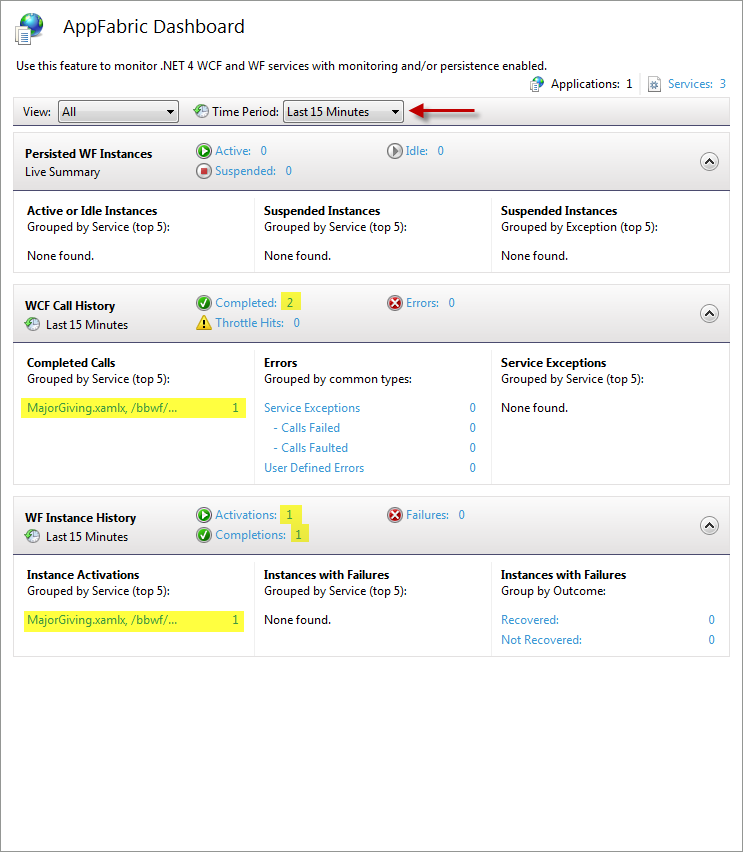
The WF Instance History section displays historical statistics derived from tracked workflow instance events stored in one or more Monitoring databases. It can draw data from several monitoring databases, if the server or farm uses more than one monitoring database for services deployed at the selected scope.
|
Summary Metric |
Description |
|---|---|
|
Activations |
Count of instances that were started but that may or may not have completed during the selected time period. |
|
Failures |
Count of instances that experienced failures during the selected time period. An instance that experienced failures may still be able to complete if it was persisted and resumed. |
|
Completions |
Count of instances that completed during the selected time period. |
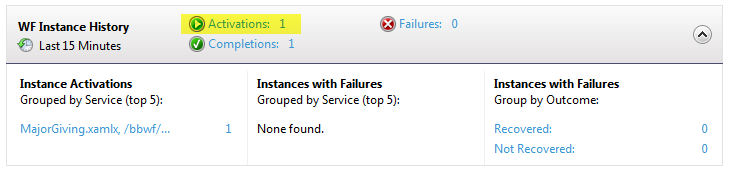
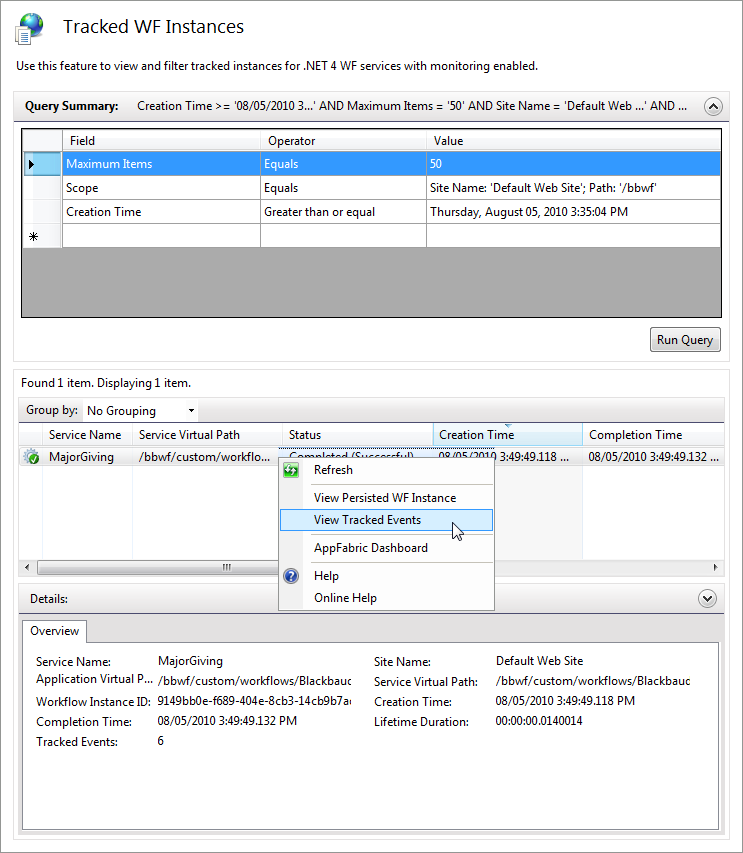
With the AppFabric Dashboard open, review the WF Instance History section of the dashboard. By setting the time period to the last 15 minutes, you can see that we have 1 workflow instance activation and 1 workflow instance completion. Click the Activations link (yellow highlight) to drill into the details of the instance.
You can use the Tracked WF Instances page to view historical events related to monitored workflow instances. To open the Tracked Events page, click any of the metrics or instances in the WCF Call History section, or by clicking on the Tracked Events action in the right-hand pane of IIS Manager. You can use the Tracked Events page to examine events generated by WCF and WF services. These events are collected by the Event Collection service and written into the Monitoring database.
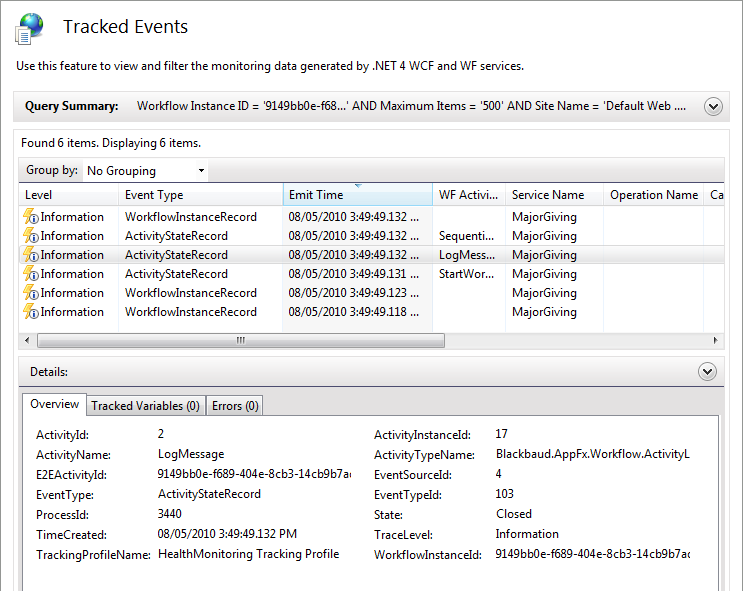
Tip: Use the workflow designer within Visual Studio 2010 to manipulate the Activity's DisplayName property. This makes activity logging within the AppFabric Dashboard easier to follow.
Step 10 - View the workflow instance.
From within the Workflow functional area, click the Workflow logs task to open the Workflow System Logs page.
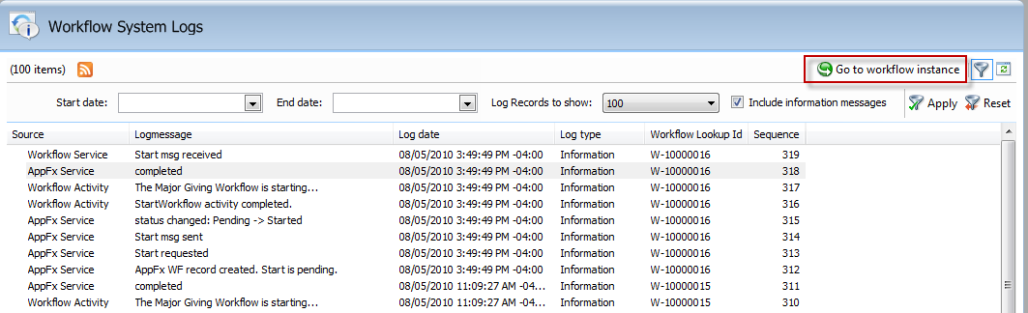
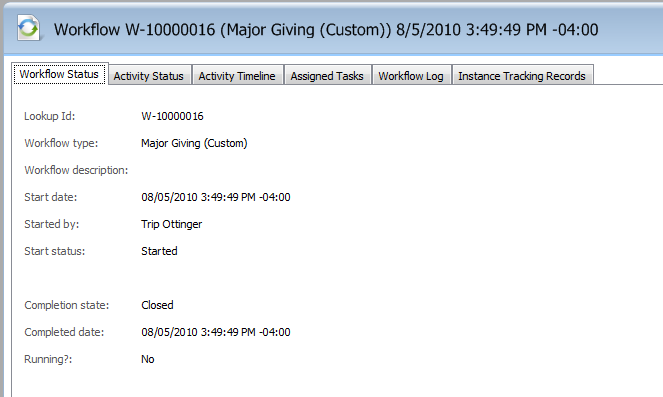
Select an entry in the grid and click the Go to workflow instance action to navigate to the Workflow Instance Information Page.
Step 11 - Save the Visual Studio 2008 catalog project.