From here, you can customize public pages associated with your alert. If you do not customize a page, the default version is used where applicable.
 What do I need to know about configuring action alert pages?
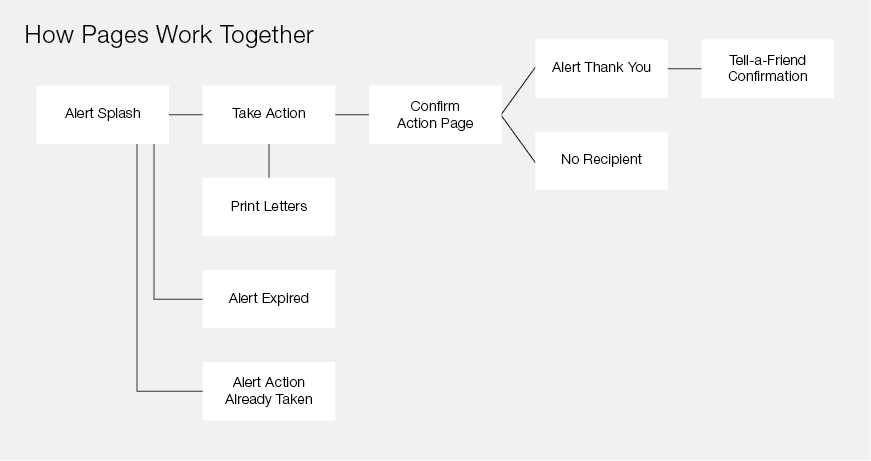
This diagram illustrates how the pages can flow together for an Action Alert, depending on which pages are configured for use:
The following table provides details and guidelines about each page:
| Page | Page Details |
|---|---|
| Take Action Page |
This page can display after a user responds to an alert, or be linked to from a Splash page. Users provide Contact information here such as name and email, and complete custom questions. They edit or approve the message being sent to targets (depending on how editing options are configured on the Alert Message process page). You can customize the Description at the top of the page. If you enabled Layouts and Themes on the Design Alert process page, you can select and customize a layout, such as editing the text of section headings, toggling the display of certain sections, and customizing the submit button. See Edit the Take Action Page . |
| Alert Splash Page |
A Splash Page displays to constituents just before the Take Action page. If you leave this page undefined (blank), constituents following a link to an alert are sent directly to the Take Action page. Use this page to explain the issue, why action is important, what stage the decision is in, and so on. You can make the page more compelling by using text, bullet points, graphics, links to other pages, and other components (such as a survey or a campaign). Make sure you include a link in the Splash Page to the corresponding Take Action page! |
| Confirm Action Page |
(For Two Step Alerts only) This controls the second page of a Two Step alert. On this page, advocates select the target recipients of the alert (and delivery options if enabled). You can only modify the default text on this page. The targets shown to constituents are chosen on the Select Targets page. |
| Print Letters Page | If you set the Advanced Options process page to allow advocates to print copies of their messages, this page displays after they send emails or faxes. They can then print or download the messages. You can modify the default text. |
| Alert Already Taken Page | If you set the Advanced Options process page to prevent Multiple Responses, this page displays to anyone who follows a link to the alert and has already taken action. This is a good place to show results for the issue and to display other active alerts. |
| Alert Thank You Page |
Depending on how you configure the Thank You Page Options process page, this page displays to advocates who have just taken action. While you can simply save the default text, it is recommended that you compose a more appealing message using formatting, personalization, and links to other websites.
You can insert the Social Media Sharing component that contains a string of social site
icons (like |
| No Recipients Page | This page displays to anyone who follows a link to the alert but for whom there are no available targets — for example, if the constituent does not live in any of the states to which this alert is restricted (the state restriction is configured on the Advanced Options process page). You can modify the default text. |
| Alert Expired Page | This message displays to anyone who follows links to this alert after it expires or is unpublished. This is a good place to explain the impact of your organization’s efforts, show results for the issue, and/or display other active alerts. It is always recommended that you link back to a live page from this page. |
| Tell-a-Friend Confirmation Page | Depending on how you configure the Thank You Page Options process page, this page displays to advocates who have taken action and completed a Tell-a-Friend form to forward the alert to others. While you can simply save the default text, which includes a link to your site home page, it is recommended that you compose a more appealing message and possibly include links to other areas of your site. |
Configure Action Alerts pages
Do the following to configure any of the pages, using the guidelines in the table above. For full details about the special customizations available for the Take Action page, see Edit the Take Action Page.
-
Select the Customize Page link in the Actions column for the page that you want to configure.
-
Compose your page using the full features of the standard HTML Editor.
-
When you are finished:
-
Select Preview to save your edits and preview them in a separate window.
-
Select Save to save your edits, complete the customization, and return to the list of customizable pages.
Tip: To discard unsaved edits, select Reset or Cancel (without selecting Preview or Save). You will be returned to the WYSIWYG Editor or to the list of pages, respectively.
You can insert the Social Media Sharing component that contains a string of social site icons (like
![]()
![]()
![]()
![]() ) on this page to place this Share with friends link that your constituents can
select to quickly and easily post a comment on their social pages. The pre-formatted post (or, tweet)
contains a link back to your site page that their friends can visit to pursue the same activity. Refer to
Inserting a Social Sharing Opportunity Link on a Site Web Page.
) on this page to place this Share with friends link that your constituents can
select to quickly and easily post a comment on their social pages. The pre-formatted post (or, tweet)
contains a link back to your site page that their friends can visit to pursue the same activity. Refer to
Inserting a Social Sharing Opportunity Link on a Site Web Page.
-
Repeat this process for any additional page you wish to customize. Each page that you customize (and save) is flagged with a green checkmark in the Custom Content Status column of the Configure Pages page.
-
When you are done, select Save or select Next to save and go to the next process page: Preview Alert.