Create Cash Awards and Payments
-
Navigate to the Applications area.
-
In the Applications tab, find the application to be awarded and go to the Application View.
Note: Applications must be Approved before payments can be created.
-
Click on the ellipsis button next to the workflow level and select Create award.
-
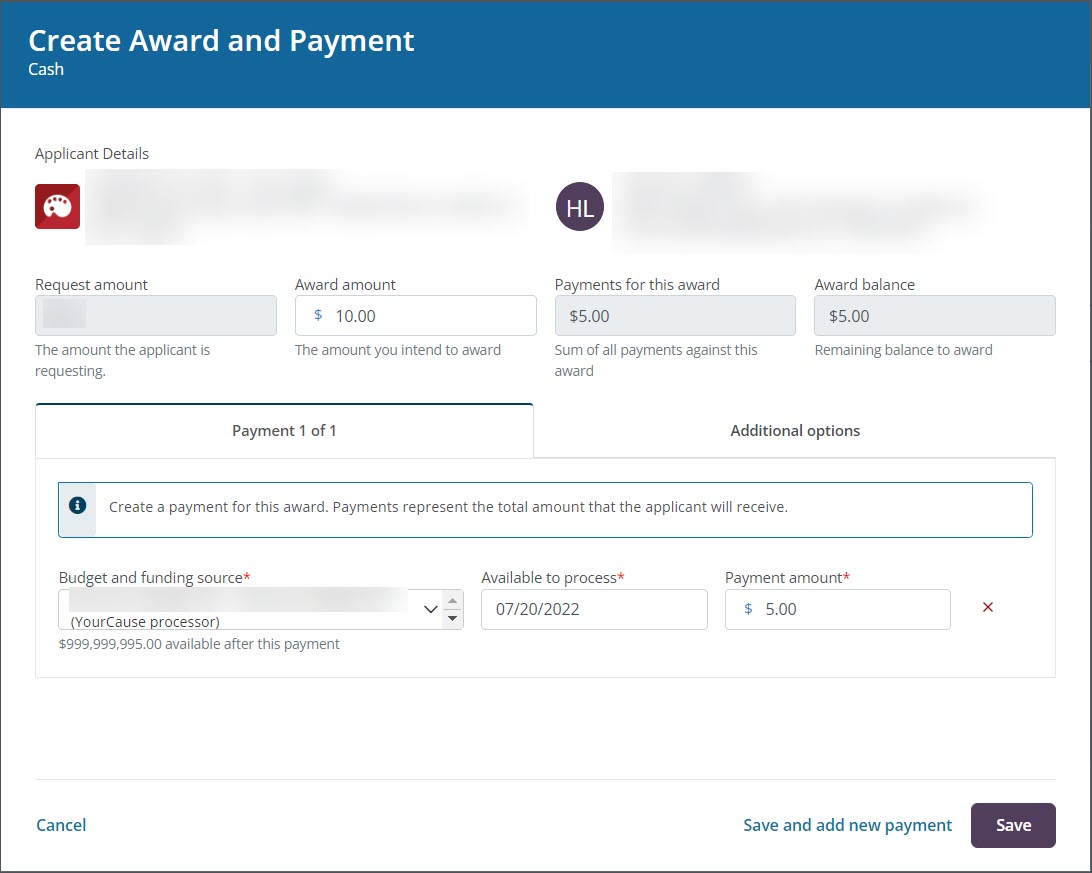
In the Create Award and Payment screen, provide the following information.
-
Enter the amount you to intend to award in the Award amount field.
-
In the Payment 1 of 1 tab, specify the details for your first payment.
 Budget and funding source
-
Select the budget and funding source combination to use for payment.
Note: Only budgets that are available in the program cycle will appear. If you need to add a new budget to the cycle, you can do so by editing the program's details. Learn more.
Tip: The amount that is available in the budget after this payment will be shown in the budget's details in the Budget and funding source field. It is best practice to apply a budget that can cover the payment in full. For more information about exceeding a budget, see How do I handle payments that exceed the budget?.
 Available to process
-
Specify the date that the payment will be available to process.
Note: Payments can be sent to processing for disbursement on or after the date specified. For more information, see View Payments Available for Processing.
 Payment amount
-
Enter the payment amount.
Note: The amount shown in the Payments for this award field at the top of the screen will adjust when a value is entered in the Payment amount field as it shows a sum of all payments against this award.

Warning: If the payment amount entered is equal to or greater than $500,000 for domestic applicants or $100,000 for international applicants, you will receive an alert stating the payment is subject to review by Blackbaud. This is to protect your organization against fraudulent activity. Learn more.
-
-
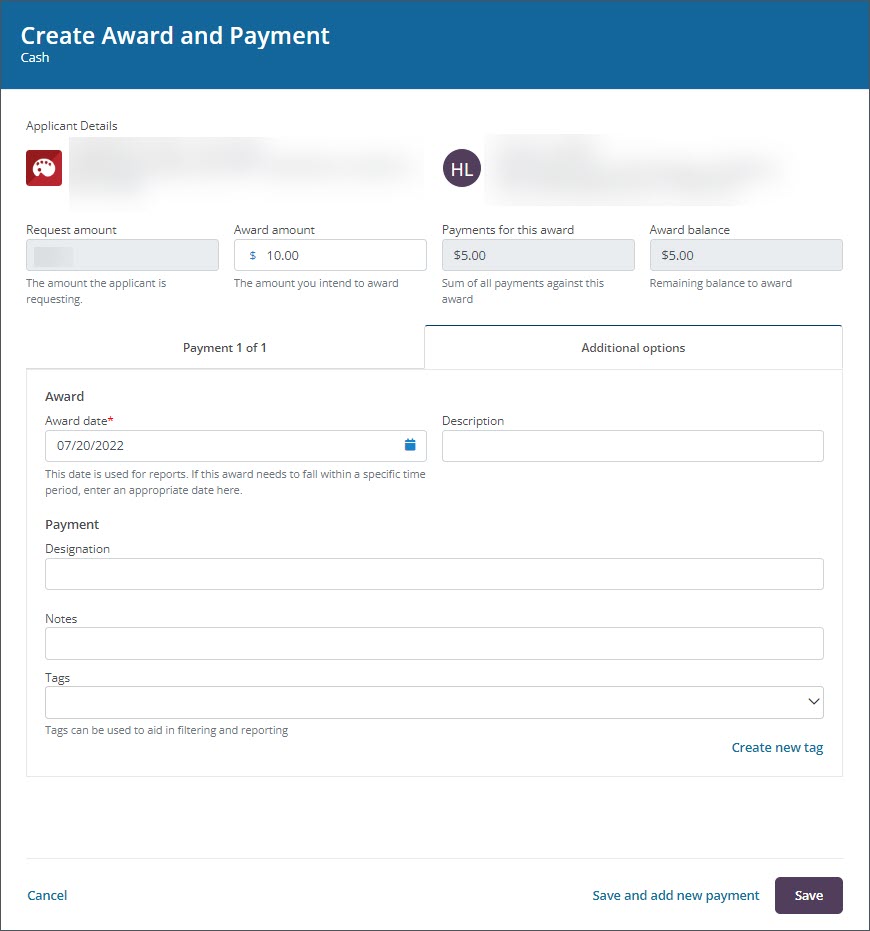
In the Additional options tab, update the following details if needed.
 Award date
-
Enter the award date if it differs from the date you create the award.
Note: This date is used for reporting. You can change it if it needs to fall within a specific time period.
 Award description
-
Optional - Add a description for the award.
Note: This is visible to Grant Managers in the Awards tab of the Application View and can be pulled into Ad Hoc reports. The award's description is not shown to applicants.
 Designation
-
Optional - Provide a Designation.
Note: This allows the payment to be designated for a specific purpose.
 Notes
Notes
-
Optional - Add a note.
 Tags
Tags
-
Optional - Add any tags.
Note: Tags can be used in filtering and reporting. If the tag you need does not exist, click on Create new tag to add it. Tags can also be managed in the Settings > System Tags area.

-
-
When the payment details are complete, click on one of the following options to continue.
-
Save - Create the payment.
Note: When you are ready to process the payment, you will either add it to a batch (recommended) or send it directly to processing.
-
Save and add a new payment - Create the payment and begin adding another payment to the award.
Note: This option will only appear if there is a remaining balance on the award, as shown in the Award balance field. This field is calculated from the values in the Award amount and Payments for this award fields.
-
Frequently asked questions
 Why can't I create an award for an application?
If the Create award action is unavailable, it's recommended to check the following settings to troubleshoot the issue.
-
Ensure the application has an Approved status.
-
In the workflow level or sub-level, ensure that the Allow user to create and edit awards and payments permission is enabled.
-
Review the budgets and funding sources assigned to the current program cycle to ensure they're applicable to the organization. For example, payments to Private Organizations must be made by the client so your cycle is required to have at least one client-processed budget available to create awards.