Setup Questions about Checkout
Planning
 How can I plan for this change?
Note: The new requirements only apply to forms that are published and actively accepting transactions. Start with forms that will be active from March to June 2025. This may decrease the forms you need to address.
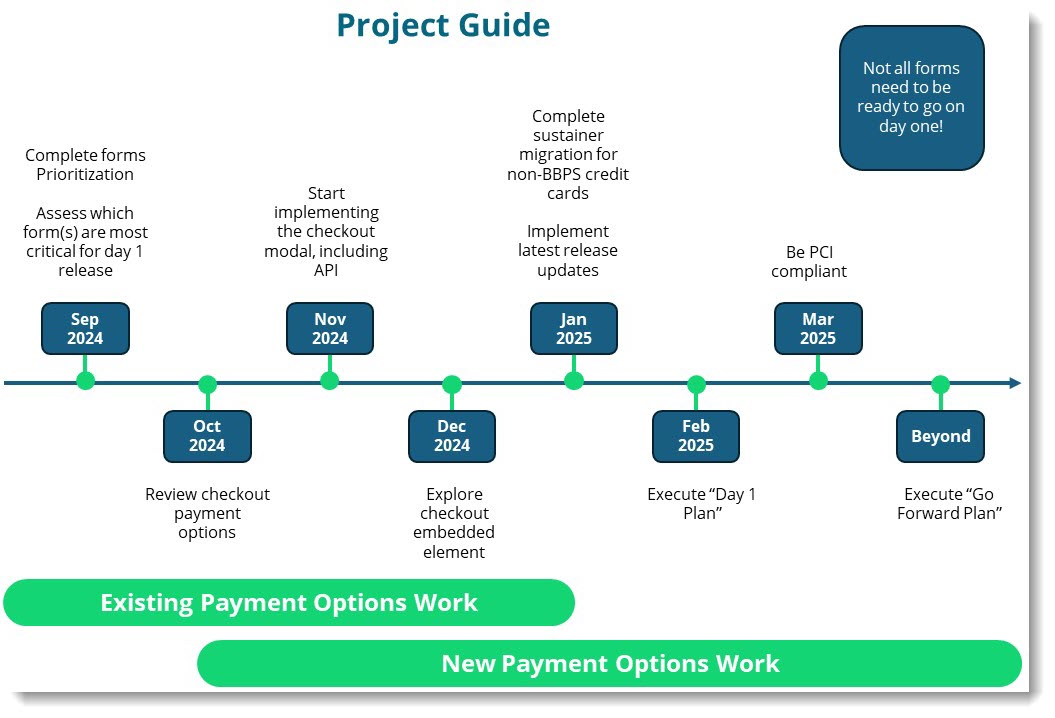
Reviewing and updating your forms is a big job, but it doesn't have to be overwhelming. Use the project guide below start making a plan that works for you. We recommend the following approach.
Identify your needs. Make a list or calendar of campaigns, events, and communications you know you are expecting from March through June 2025. What donation forms do you need for those? These are the priority.
Identify forms to prioritize those that require action. Use the Donations by Form report to identify forms that apply to the March through June 2025 priorities. Unpublish or archive unneeded forms.
Tip: New eLearning, Auditing Active Donation Forms, is now available.
If you do not have Blackbaud Merchant Services and Blackbaud Payment Services accounts, create them. See Get Started with Blackbaud Merchant Services.
Tip: New eLearning, Understanding Secure Payment Processing / Blackbaud Luminate Online, is now available.
Complete the steps in Update Your Checkout Experience.
Tip: Add a new checkout data element without removing the existing Payment Type data element. When both data elements are present and the selected merchant account supports the new checkout, only the Checkout element is used. Having the Payment Type data element present allows you to roll back changes more easily if you decide you are not ready for the switch.
If you have API forms, update your corresponding shadow form and adjust your code to call the new checkout API methods. See the Checkout overview in the API docs for more details.
Digital Wallets
 How do I set up Apple Pay?
If you have a non-custom secure domain, either secure2.convio.net, secure3.convio.net or secure8.convio.net, you do not need to take action. Once your forms are set up with checkout, Apple Pay automatically displays as an option on compatible Apple devices.
If you have a custom secure domain, complete the one-time verification process. You must complete this process even if you previously set up Apple Pay to work in legacy Blackbaud Checkout, as the verification file contents have changed.
Using FTP access, place the Apple Pay verification file (new checkout version) at the following path on your website:
[DOMAIN]/.well-known/apple-developer-merchantid-domain-association.Note: If this is your first time setting up Apple Pay, create the
.well-knownfolder at the root level of your site. Folders that begin with a period (.) are hidden by default — if you don't see yours, check your FTP application's instructions for steps to view hidden folders.From the Blackbaud Merchant Services Web Portal, under Settings, Payment Domains, add and verify your domain.
Repeat for each domain and subdomain where Apple Pay should appear.
Note: Apple Pay displays 24 to 48 hours after a form processes its first payment, so if this is a new form, complete a credit card payment through the form, then wait 24 to 48 hours to check your form from a compatible Apple device to confirm that Apple Pay appears during checkout.
For more information, see Payment Domains.
 How do I set up PayPal and Venmo?
To accept PayPal and Venmo through your forms, connect your PayPal Business and Blackbaud Merchant Services accounts in the Blackbaud Merchant Services Portal. See Get Started with PayPal in the Blackbaud Merchant Services Help.
Note: PayPal is not yet available for recurring payments.
Modal vs Embedded
 What should I consider when choosing between using the modal or embedded version of checkout?
First, be aware that the embedded version that sits inline with your Luminate Online form is only available when the merchant account uses Blackbaud Merchant Services. If you do not use Blackbaud Merchant Services, you must use the modal version.
Overall, consider whether you want to offer a checkout experience to primarily capture gifts quickly. If you are wanting to offer fields for honor/memorial, or to capture full constituent information, you may want to use the embedded version which sits inline on your form amid the standard or usual fields that you want to offer.
 How do I add the modal or embedded checkout to a donation form?
Select Fundraising, Donation Management, and All Donation Forms.
Edit a donation form on the list.
Select Design Donor Screens and Edit the Donation Form screen.
Under Select data elements to include in this form, select Checkout modal or Checkout embedded and Add. Do not remove the Payment Type element.

Position the data element where you want it in the form by selecting the element name and using the Order arrows.
Select Save Order and Edit Selected.
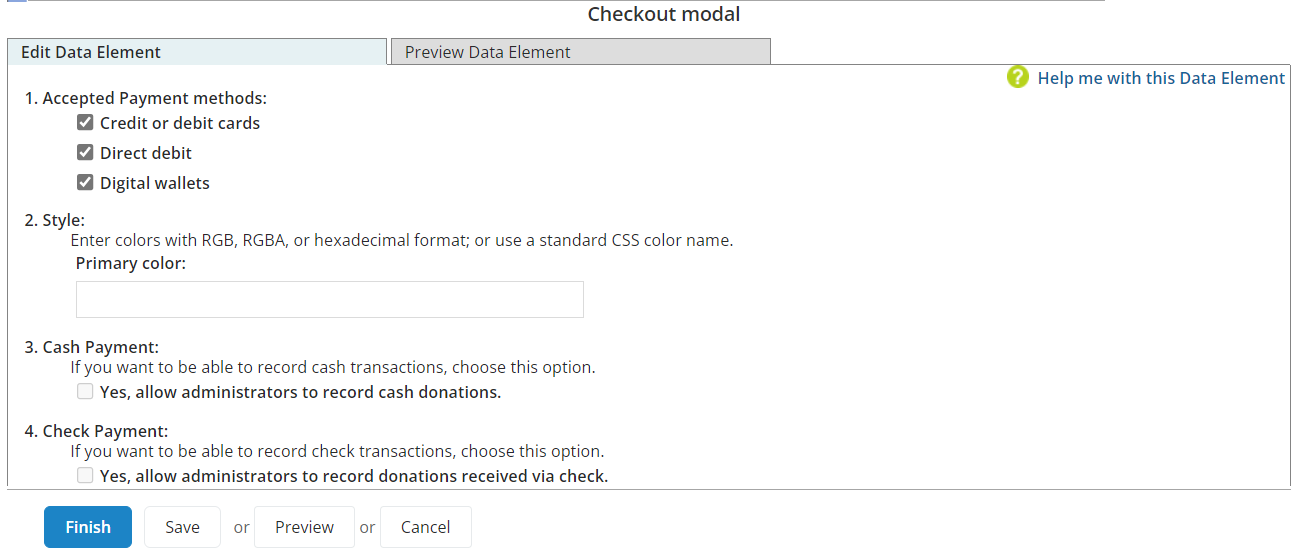
Select your checkout configurations and Preview or Save your changes. Below is an example of the options in the modal element.

General
 How do I associate a merchant account with a donation form or TeamRaiser?
Each donation form belongs to a campaign, and each campaign is associated with a Luminate Online merchant account.
To change the merchant account on a donation form:
Select Fundraising and Donation Management.
Edit a campaign on the list.
Open Choose Financial Options and select a merchant account
Save your changes.
TeamRaisers are associated with a donation form, and the donation form is associated with a donation campaign. That donation campaign is assigned a merchant account. To change the merchant account on a TeamRaiser, change the merchant account on the associated donation campaign.
To change the donation form associated with a TeamRaiser:
Select Fundraising and TeamRaiser.
Edit a TeamRaiser on the list.
Open Select Fundraising Options and select a Donation Form.
Save your changes.
 If the campaign is where we change the checkout merchant account, does that mean all live forms need to be updated first?
Yes, all live donation forms need to be updated. First, prioritize your live donation forms, then update lower priority forms.
 If I update a campaign for checkout, but only update one active form in that campaign, do the other active forms under the campaign still work using the old payment method?
No. When a campaign is updated to use the new checkout, all forms associated with that campaign must also use the new checkout. Add either the Checkout modal or Checkout embedded element to the form.
 In my Luminate Online merchant account, why can't I see the credit card options so that I can select specific credit cards?
The new checkout automatically supports all credit cards, so you no longer need to select specific cards during configuration of your Luminate Online merchant account. We have removed these options from the configuration options.
