Update your Checkout Experience for Donation Forms
Note: The full requirements of PCI 4.0 were enforced March 31, 2025. Your organization has its own PCI audit date to comply with the requirements. To ensure Blackbaud's compliance before our audit, we ran an Auto-Compliance Migration Script from May 1-16th to enforce updated payment processing. The script updated all unchanged forms with the checkout modal, potentially causing layout and processing changes. This script did not update API forms, which you must manually update. See Auto Migration FAQs.
Warning: Card transactions must use the new checkout to meet Payment Card Industry standards.
The new checkout feature has end-to-end transaction management in Blackbaud Merchant Services, more payment methods such as Apple Pay and Google Pay, and an improved user experience.
Training: eLearnings are available at Level Up with Luminate Online. You can also catch a recording of a workshop webinar to walk through payment changes.
To create a Blackbaud Merchant Services account, see Get Started with Blackbaud Merchant Services.
Note: To enable Canadian support, upgrade your Participant Center. No further action is necessary.
Tip: See also our Checkout FAQs.
Identify active donation forms
PCI v4 requirements that take effect March 2025 only apply to active forms. Focus on donation forms that will be published and accepting donations from March through June 2025.
Make a list of your campaigns, events, and communications from March through June. What forms do you need for those? Use the Donations by Form report to identify forms that apply to those priorities. Unpublish forms that are not a priority.
-
Select Fundraising and Donation Management.
-
Select Donation Reports, Donations by Form, and Go.

-
By default, the report returns all forms in the results list. You can change filters or proceed to the last section Configuration Summary. Name and submit the report.
-
Initially, the report status shows as Queued. Select Refresh Report List until the status changes to Completed.

-
Download the report for a .csv file that you can sort, filter, and search to identify forms needing attention.

-
Archive or unpublish any unnecessary forms.
Create a new Payment Capability in Luminate Online
Note: Only advanced site administrators with Merchant Account Self Provisioning permission have access to complete this step.
Use the following steps to link your Blackbaud Merchant Services account to your Luminate Online payment configurations.
Note: Your existing Blackbaud Merchant Services account will continue to work. You will need to create a new Luminate Online Payment Capability for the new checkout process in Luminate Online using the steps below. Existing Blackbaud Merchant Services merchant accounts were duplicated on your behalf to use the same name but appended with "Checkout." These new gateways are the PCI-v4-compliant accounts that you'll select during this process.
-
Select Setup and Product Configuration.
-
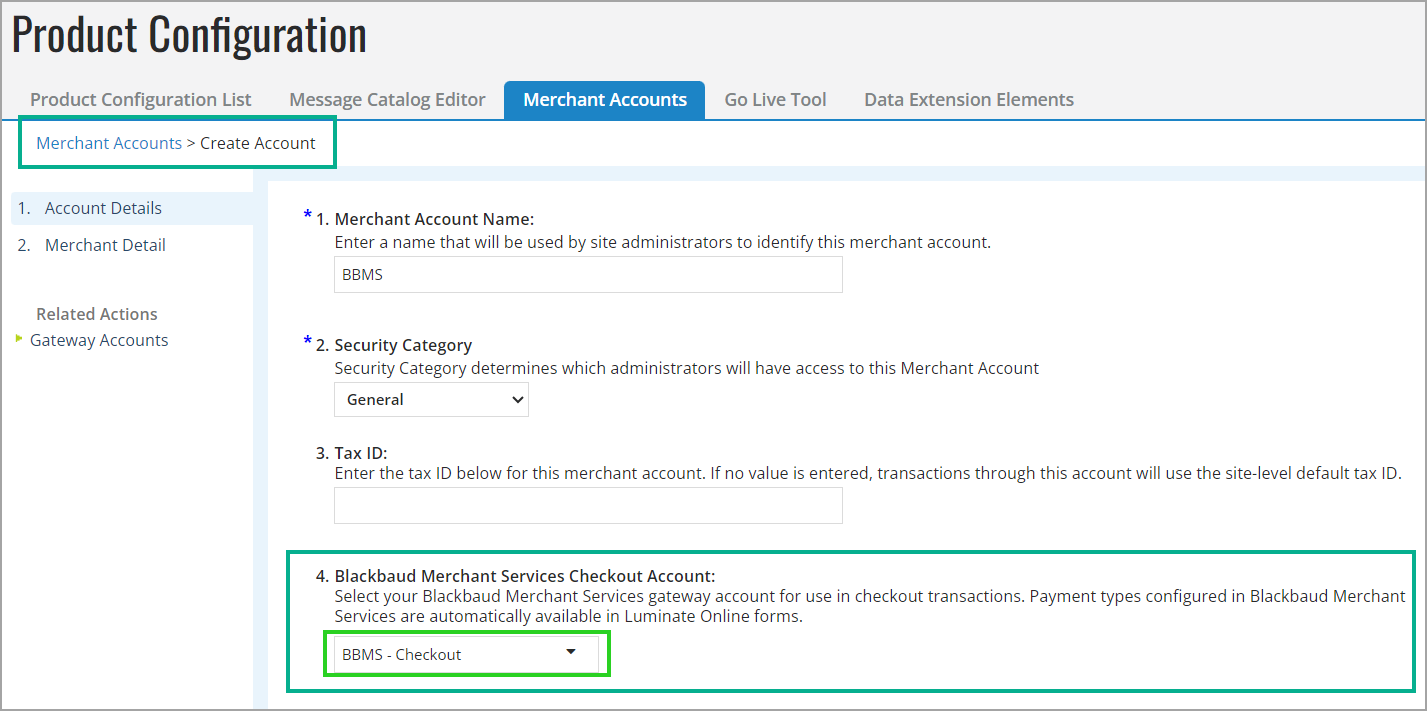
In Merchant Accounts, select Create Account.
-
Name the account and select the "Checkout" gateway under Blackbaud Merchant Services Checkout Account, then Save. Do not select options in the Legacy options section.
-
Select Next.
-
Select Support recurring transactions if desired, and Finish.
Add checkout to your form
-
Select Fundraising and Donation Management.
-
Select Online Giving.

-
Select All Donation Forms, find a form in the list, and select Edit.

-
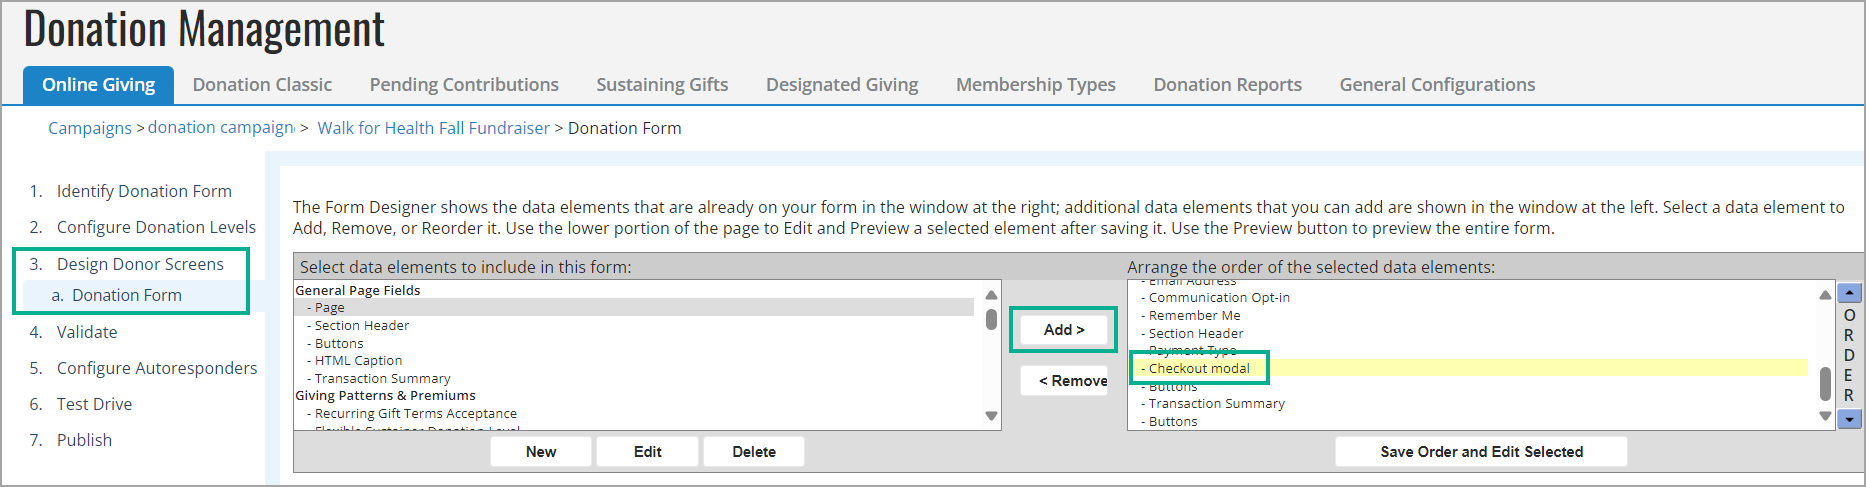
On the left, select Design Donor Screens.
-
Find the Donation Form, then select Edit.
-
For an existing form, under Select data elements to include in this form, select either Checkout modal or Checkout embedded, and Add. New forms automatically include the Checkout modal element, so you can go to the next step.
Note: Do not add Captcha data elements to forms with a checkout data element. The checkout data elements include reCAPTCHA v3.
-
Use the Order arrows to move the checkout element above or below other data elements on the form.
Note: On multi-page forms, we recommend placing the checkout element on the last page of the donation form.
Tip: Do not remove the existing Payment Type data element. When both data elements are present and the selected merchant account supports the new checkout, only the Checkout element is used. Having the Payment Type data element present allows you to roll back changes more easily if you decide you are not ready for the switch.
-
Select Save Order and Edit Selected.
-
Review the Accepted payment methods and, if desired, enter style options to match your organization's branding.
Checkout modal example

Checkout embedded example

-
To offer offline payments of cash or check on this form, select the Cash Payment or Check Payment options.
-
If a Captcha data element is on your form, remove it. The new checkout automatically includes this, and you must remove the previous version from your form.
-
Preview and Save your form.
Add the new merchant account to your campaign
Warning: Before changing the merchant account on your campaign, add a Checkout data element to all active forms in the campaign. All forms in a campaign are linked to the merchant account of the campaign.
-
Go to Fundraising, Online Giving
-
In the Campaigns list, select Edit for the appropriate campaign.
Note: If your existing campaign's merchant account was configured to support Legacy Blackbaud Checkout, whether you used that feature or not, you may need to resolve the merchant account. See the Setup section in the Checkout FAQs.
Tip: If you created a copy of your campaign, select the copied campaign.
-
Select Choose Financial Options and select your new "Checkout" merchant account.
-
Save your change.
Set up Apple Pay
Tip: If you have a non-custom secure domain, secure[2, 3, or 8].convio.net, you do not need to complete these steps. Apple Pay automatically displays on compatible Apple devices from 24 to 48 hours after any first payment is processed on the form.
If you have a custom secure domain, complete the one-time verification process. You must complete this process even if you previously set up Apple Pay to work in legacy Blackbaud Checkout, as the verification file contents have changed.
-
Using FTP access, place the Apple Pay verification file (new checkout version) at the following path on your website:
[DOMAIN]/.well-known/apple-developer-merchantid-domain-association.Note: If this is your first time setting up Apple Pay, create the
.well-knownfolder at the root level of your site. Folders that begin with a period (.) are hidden by default — if you don't see yours, check your FTP application's instructions for steps to view hidden folders. -
From the Blackbaud Merchant Services Web Portal, under Settings, Payment Domains, add and verify your domain.
-
Repeat for each domain and subdomain where Apple Pay should appear.
Note: Apple Pay displays 24 to 48 hours after a form processes its first payment, so if this is a new form, complete a credit card payment through the form, then wait 24 to 48 hours to check your form from a compatible Apple device to confirm that Apple Pay appears during checkout.
For more information, see Payment Domains.
Update TeamRaiser fundraising options
In TeamRaiser, update the event to use a donation form that's part of a campaign that is enabled for checkout.
-
Go to Fundraising, TeamRaiser and Edit.
-
On the left, select Edit Fundraising Options.
-
Choose a donation form that is associated with a campaign using checkout.
-
Save your changes.
For more help, see Checkout in TeamRaiser.