Registration Guide for Chapters and Affiliates
You can register by selecting Claim My Nonprofit in Blackbaud Verified Network or Start a new administrator request in My Nonprofits. After you submit your application, the Support team reviews the information you provide. They approve or decline the request based on your documentation. If the admin listed for your organization is no longer with the nonprofit, the team completes the review and confirms your role before approval. Review usually finishes within 24 business hours.
Tip: This guide applies to chapters and affiliates. If your registration application is approved, you'll only be granted access to the local chapter you applied to - not the parent organization.
Prepare your documents and materials
Before registering, it's recommended to have the following documents on hand as we'll ask for these during the application process. You'll also need to know your organization's name as it's registered with the IRS and your government-issued tax ID, such as Employer Identification Number (EIN) or Registration ID.
| Required documentation | What is it? | Where can I get this document? |
|---|---|---|
| IRS determination letter | Document from the IRS that details your organization's tax-exempt status. This is also called a 501(c)(3) determination letter or exemption letter. | Nonprofit organizations in the United States should have received this document from the IRS upon registering your nonprofit. If you don't have it, see the IRS website to learn how to download or request a copy. |
| Role verification document (nonprofit letter, offer letter, directory, etc.) | Document that shows your role, position, or department within your organization. |
You can use any of the following documents to verify your role. Only one is required.
See Documents Accepted for Role Verification and Proof of Identity for formatting requirements. |
Tip: In order to be approved as an Administrator, your role verification documentation must show that you're in a financial role, on the management team, or an office leadership team member. If not, you may be added as a Manager with limited permissions instead.
Create an account in Blackbaud Verified Network or sign in to your existing account
To begin, you must have an Blackbaud Verified Network account with the email address associated with your organization. If you don't already have one, see Create Your Blackbaud Verified Network Account for instructions. Otherwise, sign in to your existing Blackbaud Verified Network account.
Complete your Administrator Request application
-
Navigate to https://nonprofit.yourcause.com. Sign in to Blackbaud Verified Network by entering your email and then log in with your Blackbaud ID (BBID) account.
-
After signing in, click on Claim My Nonprofit on your Home page.
Tip: If you're already registered as an Administrator or Manager for another organization, go to My Nonprofits and then select Start a new administrator request. For more information, see Administer Multiple Organizations .
-
You'll be taken to the Administrator Request application. Complete the steps below.
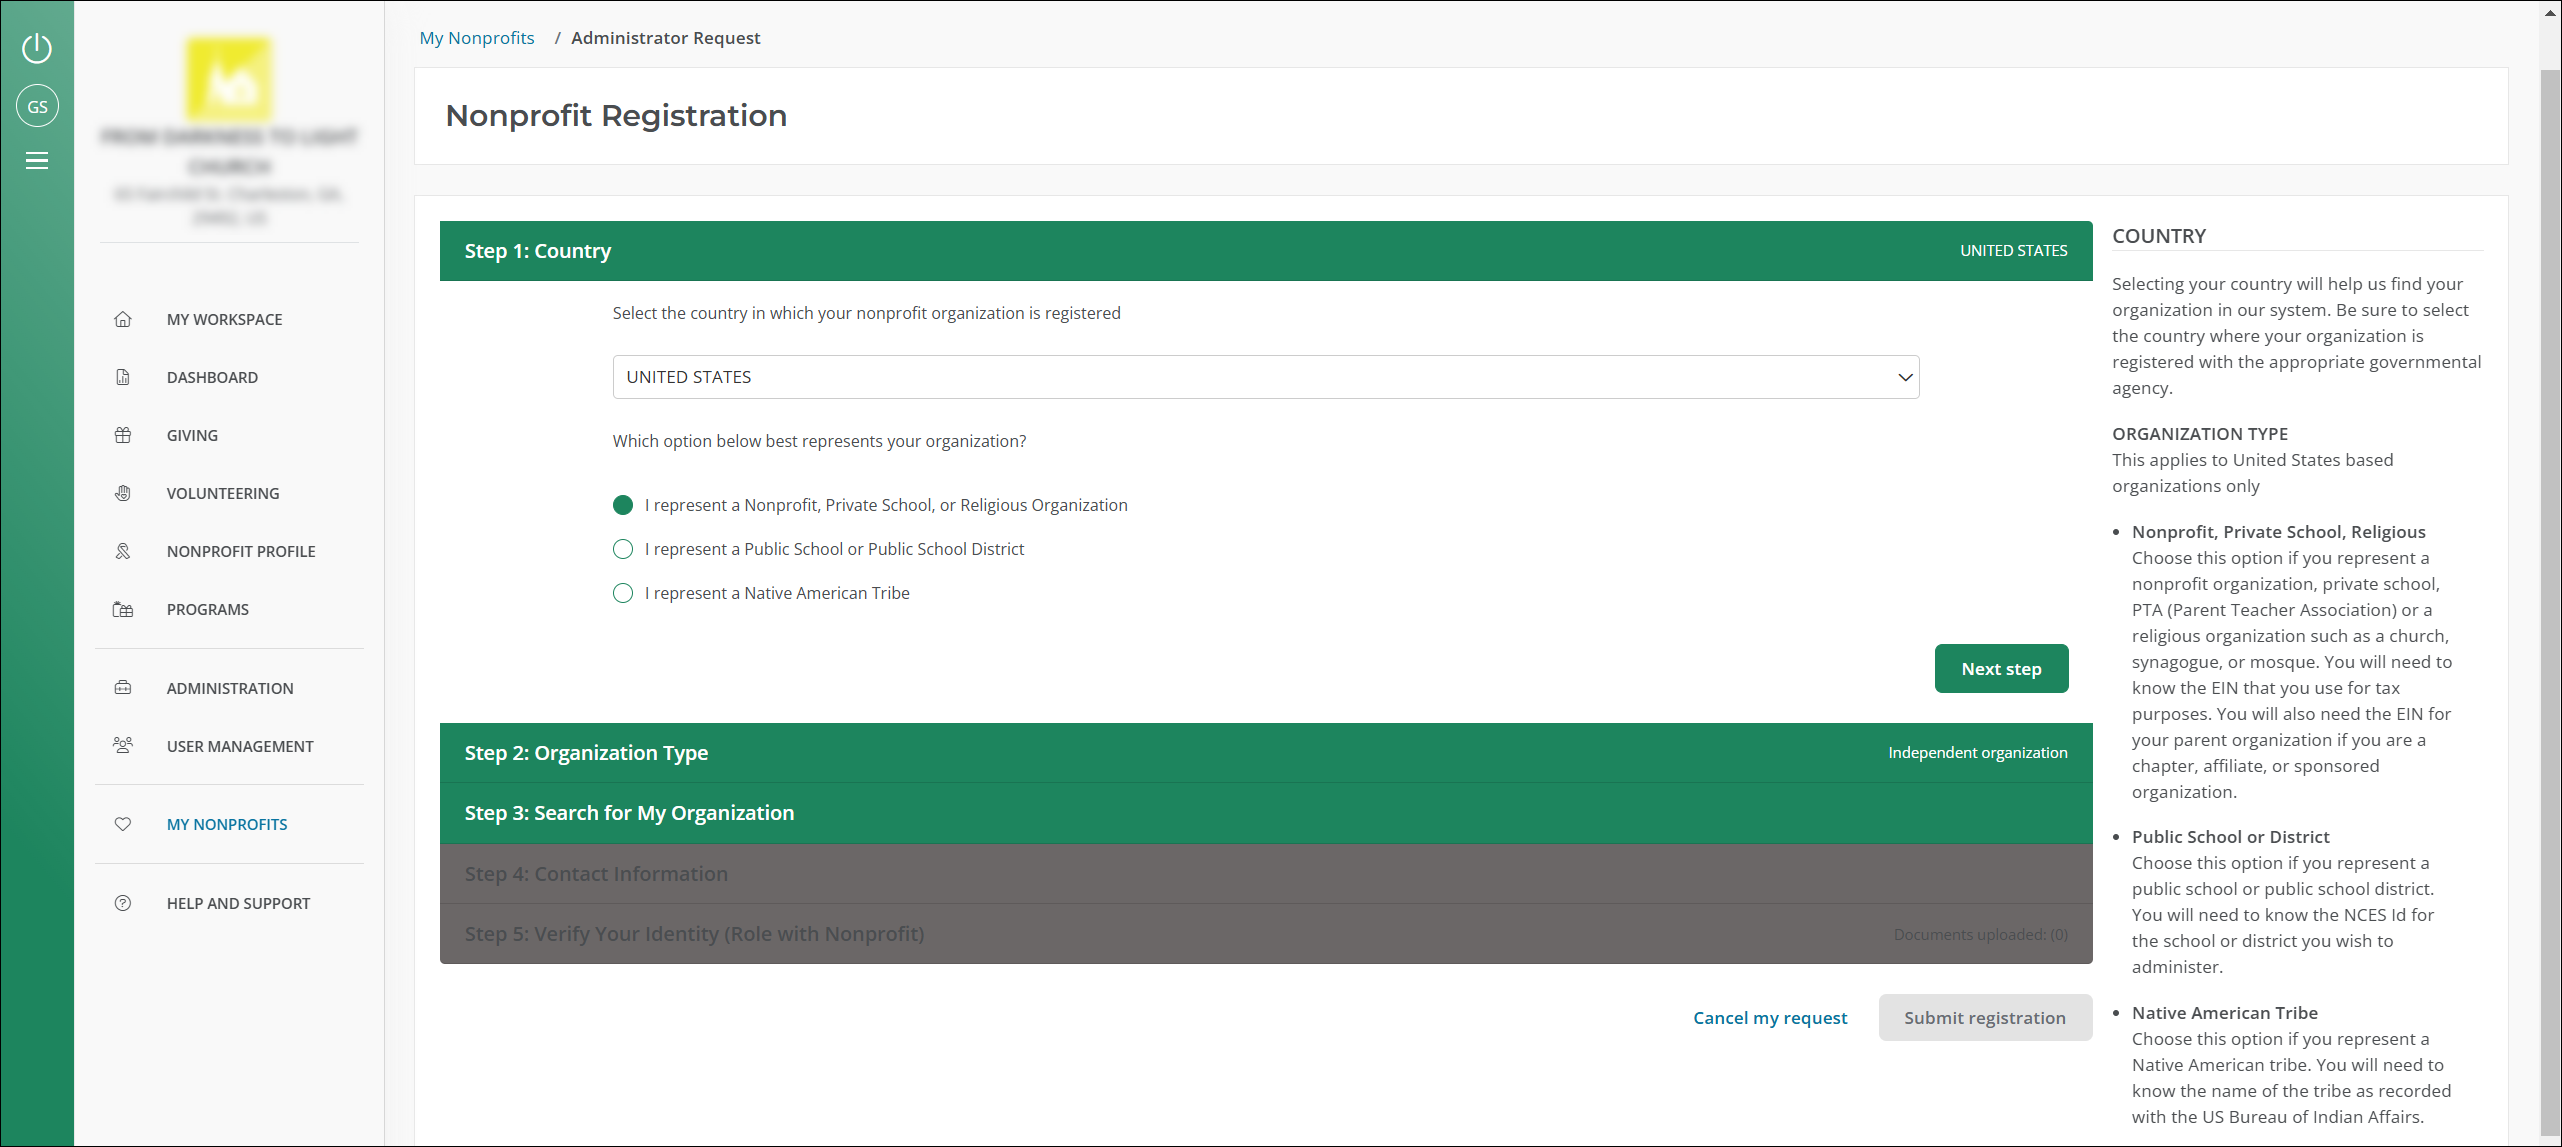
 Step 1 - Select country
-
In Step 1: Country, select the country where your organization is located, such as United States, Puerto Rico, etc.
-
Select the option that best represents your organization:
-
Nonprofit, Private School, or Religious Organization - You represent a nonprofit organization, private school, Parent Teacher Association (PTA), or religious organization such as a church, synagogue, or mosque.
-
Native American Tribe - You represent a Native American tribe. You'll need to know the name of the tribe as recorded with the US Bureau of Indian Affairs.
Tip: If you represent a public school or school district, see the Registration Guide for Public Schools and School Districts instead. If your organization is located outside of the United States, see Registration Guide for Non-US Organizations .
-
-
Select Next step to continue.
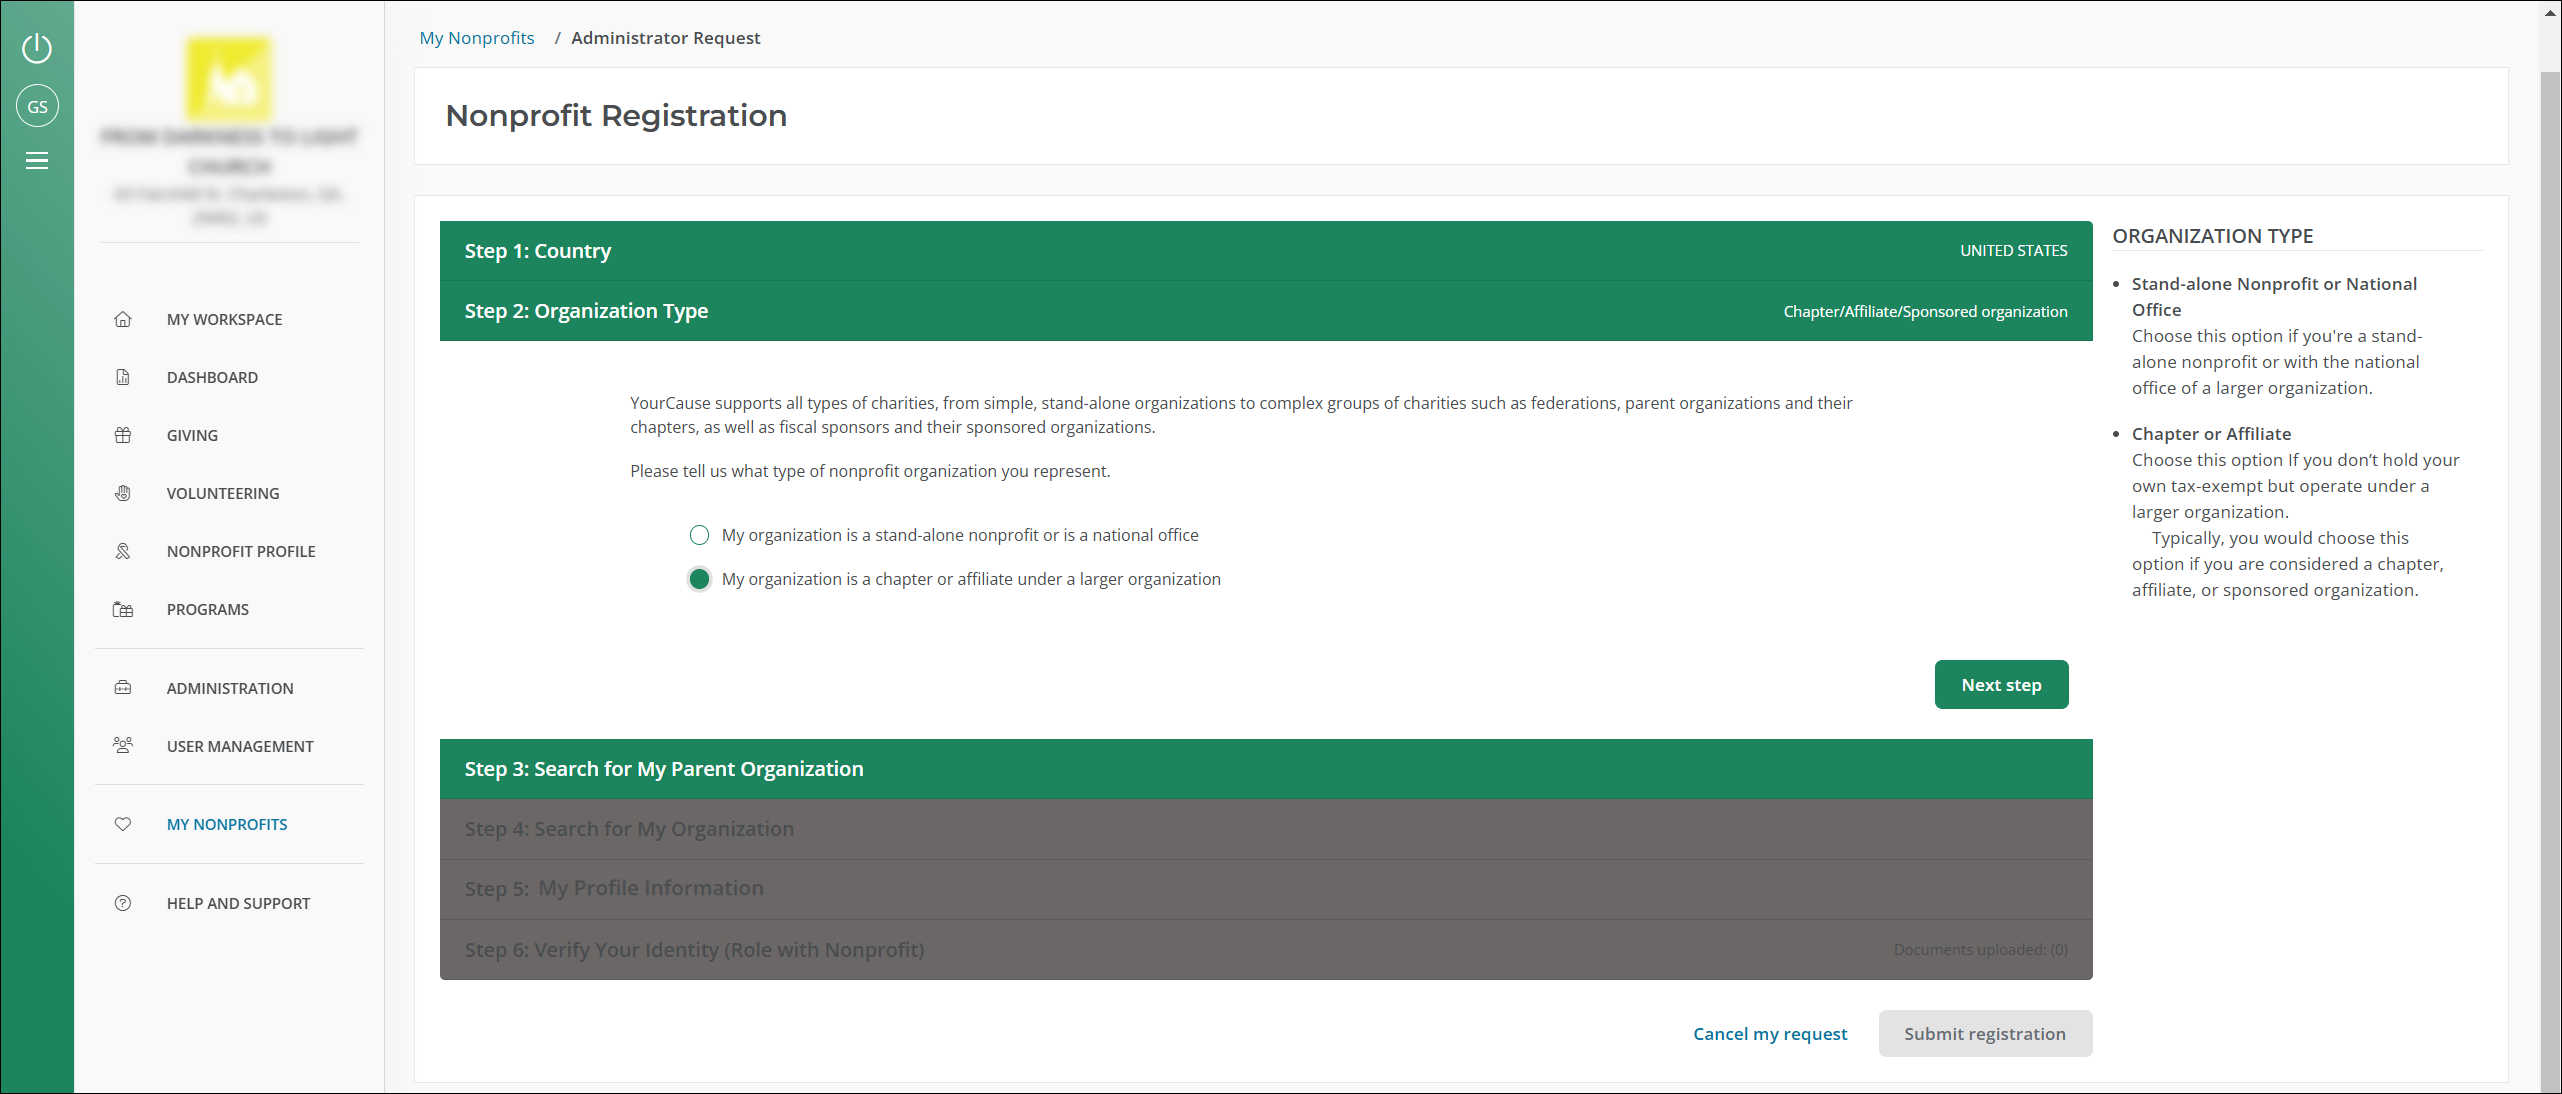
Step 2 - Choose organization type
-
In Step 2: Organization Type, select My organization is a chapter or affiliate under a larger organization.
-
Select Next step to continue.
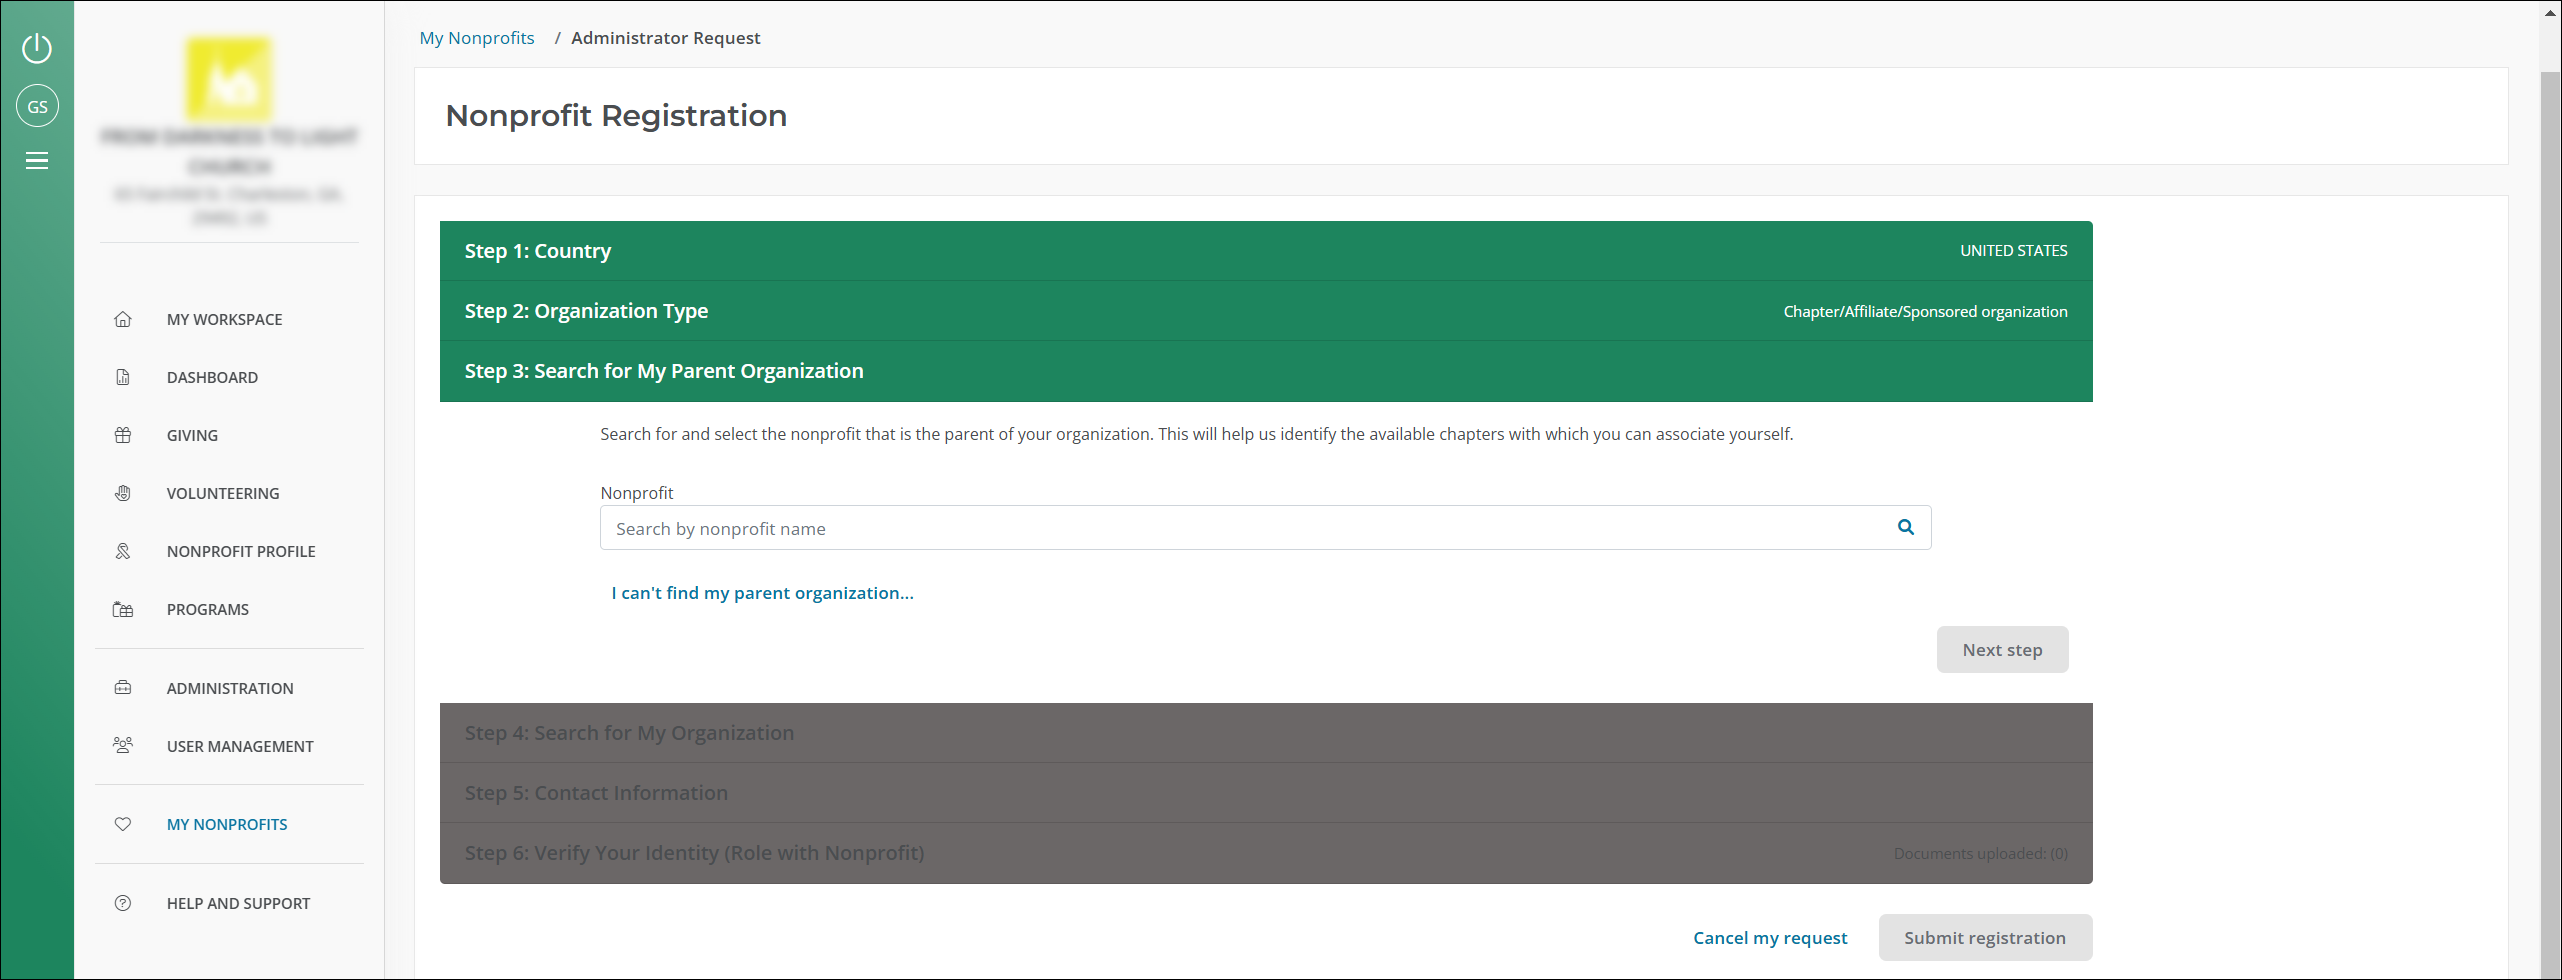
Step 3 - Search for and select your parent organization
-
In Step 3: Search for My Parent Organization, search for your parent organization using its name or government-issued tax ID (EIN, Registration ID, etc.).
Tip: If you can't find your organization, select I can't find my parent organization... to contact our team.
-
Select your organization from the results that appear.
-
Select Next step to continue.
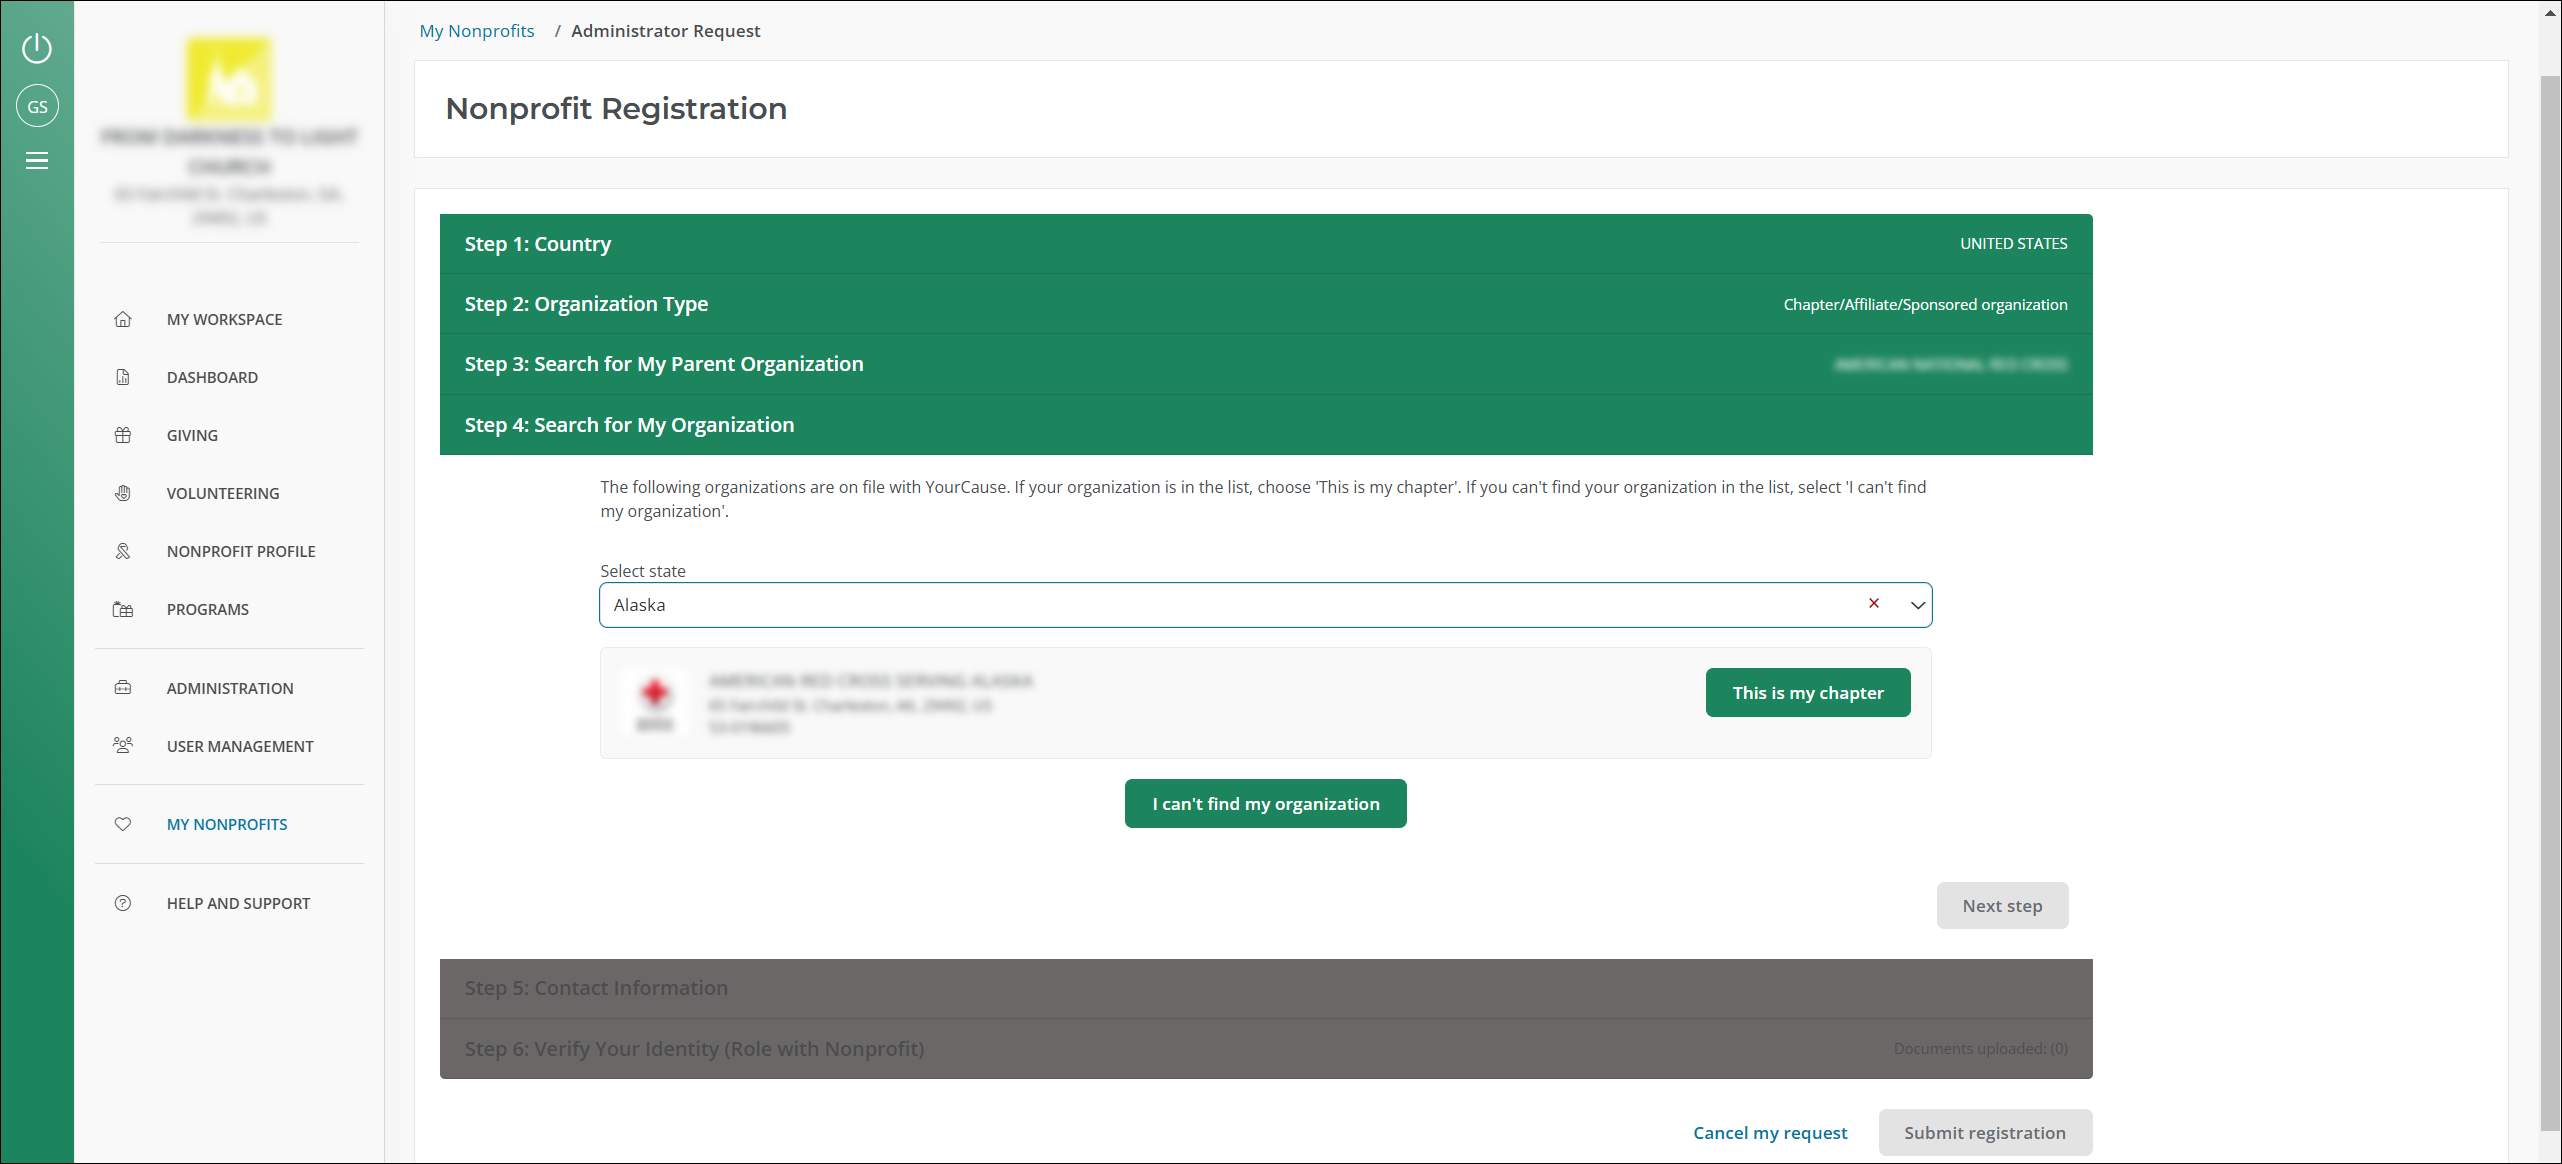
Step 4 - Search for and select your chapter or affiliate
-
In Step 4: Search for My Organization, select This is my chapter next to your chapter.
Tip: Can't find your chapter? Select your state to narrow the search results. If you still don't see it, you can then select I can't find my organization to add your chapter.
-
Select Next step to continue.
Step 5 - Add profile information
-
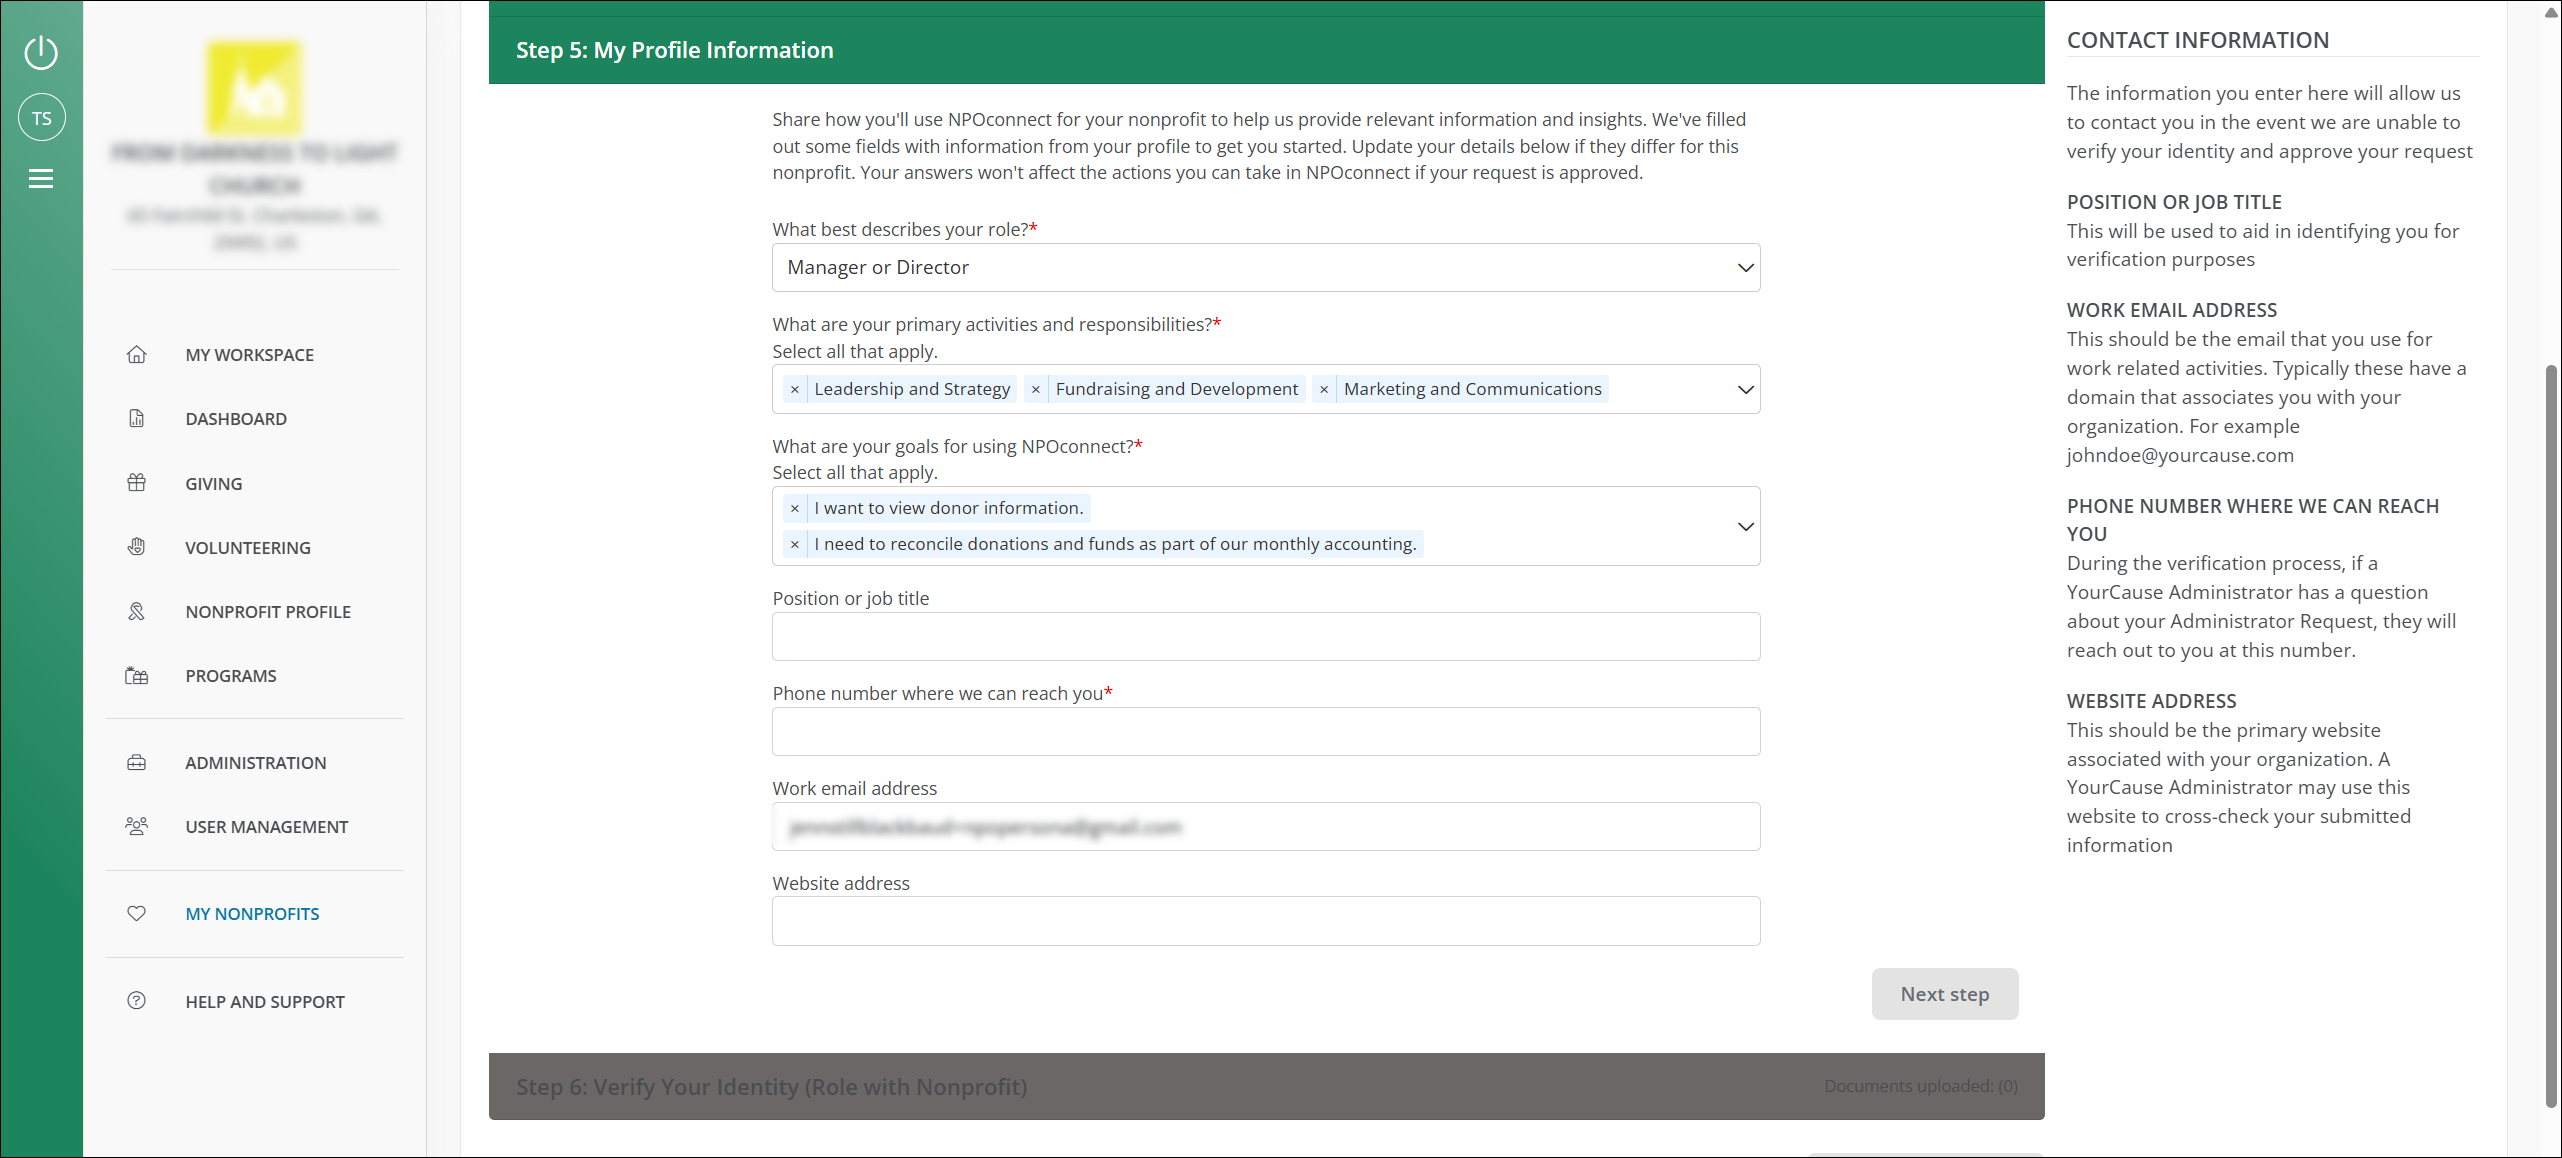
In Step 5: My Profile Information, enter the following details.
-
Profile - Share how you'll use Blackbaud Verified Network for your nonprofit by answering questions about your role, primary responsibilities, and goals. This helps us provide information and insights relevant to your nonprofit. Your answers will not impact your role or be shared with others in your organization.
Tip: We automatically add the answers you provided when creating your account or updating your profile during login. Update these details if they differ for this specific nonprofit. You can manage these answers at any time from My account and My Nonprofits. For more information, see Manage Your Profile.
-
Position or job title (Optional) - This helps verify your role when our team reviews your documentation.
-
Phone number - Our team may contact you at this number if they have a question during review.
Tip: This is required. You can't proceed to the next step until you enter this information.
-
Work email address (Optional) - This is the email associated with your organization.
-
Website address (Optional) - This is the primary website for your organization. We'll check this against your submitted information during the review process.
-
-
Select Next step to continue.
Step 6 - Upload documentation to verify your identity and role
-
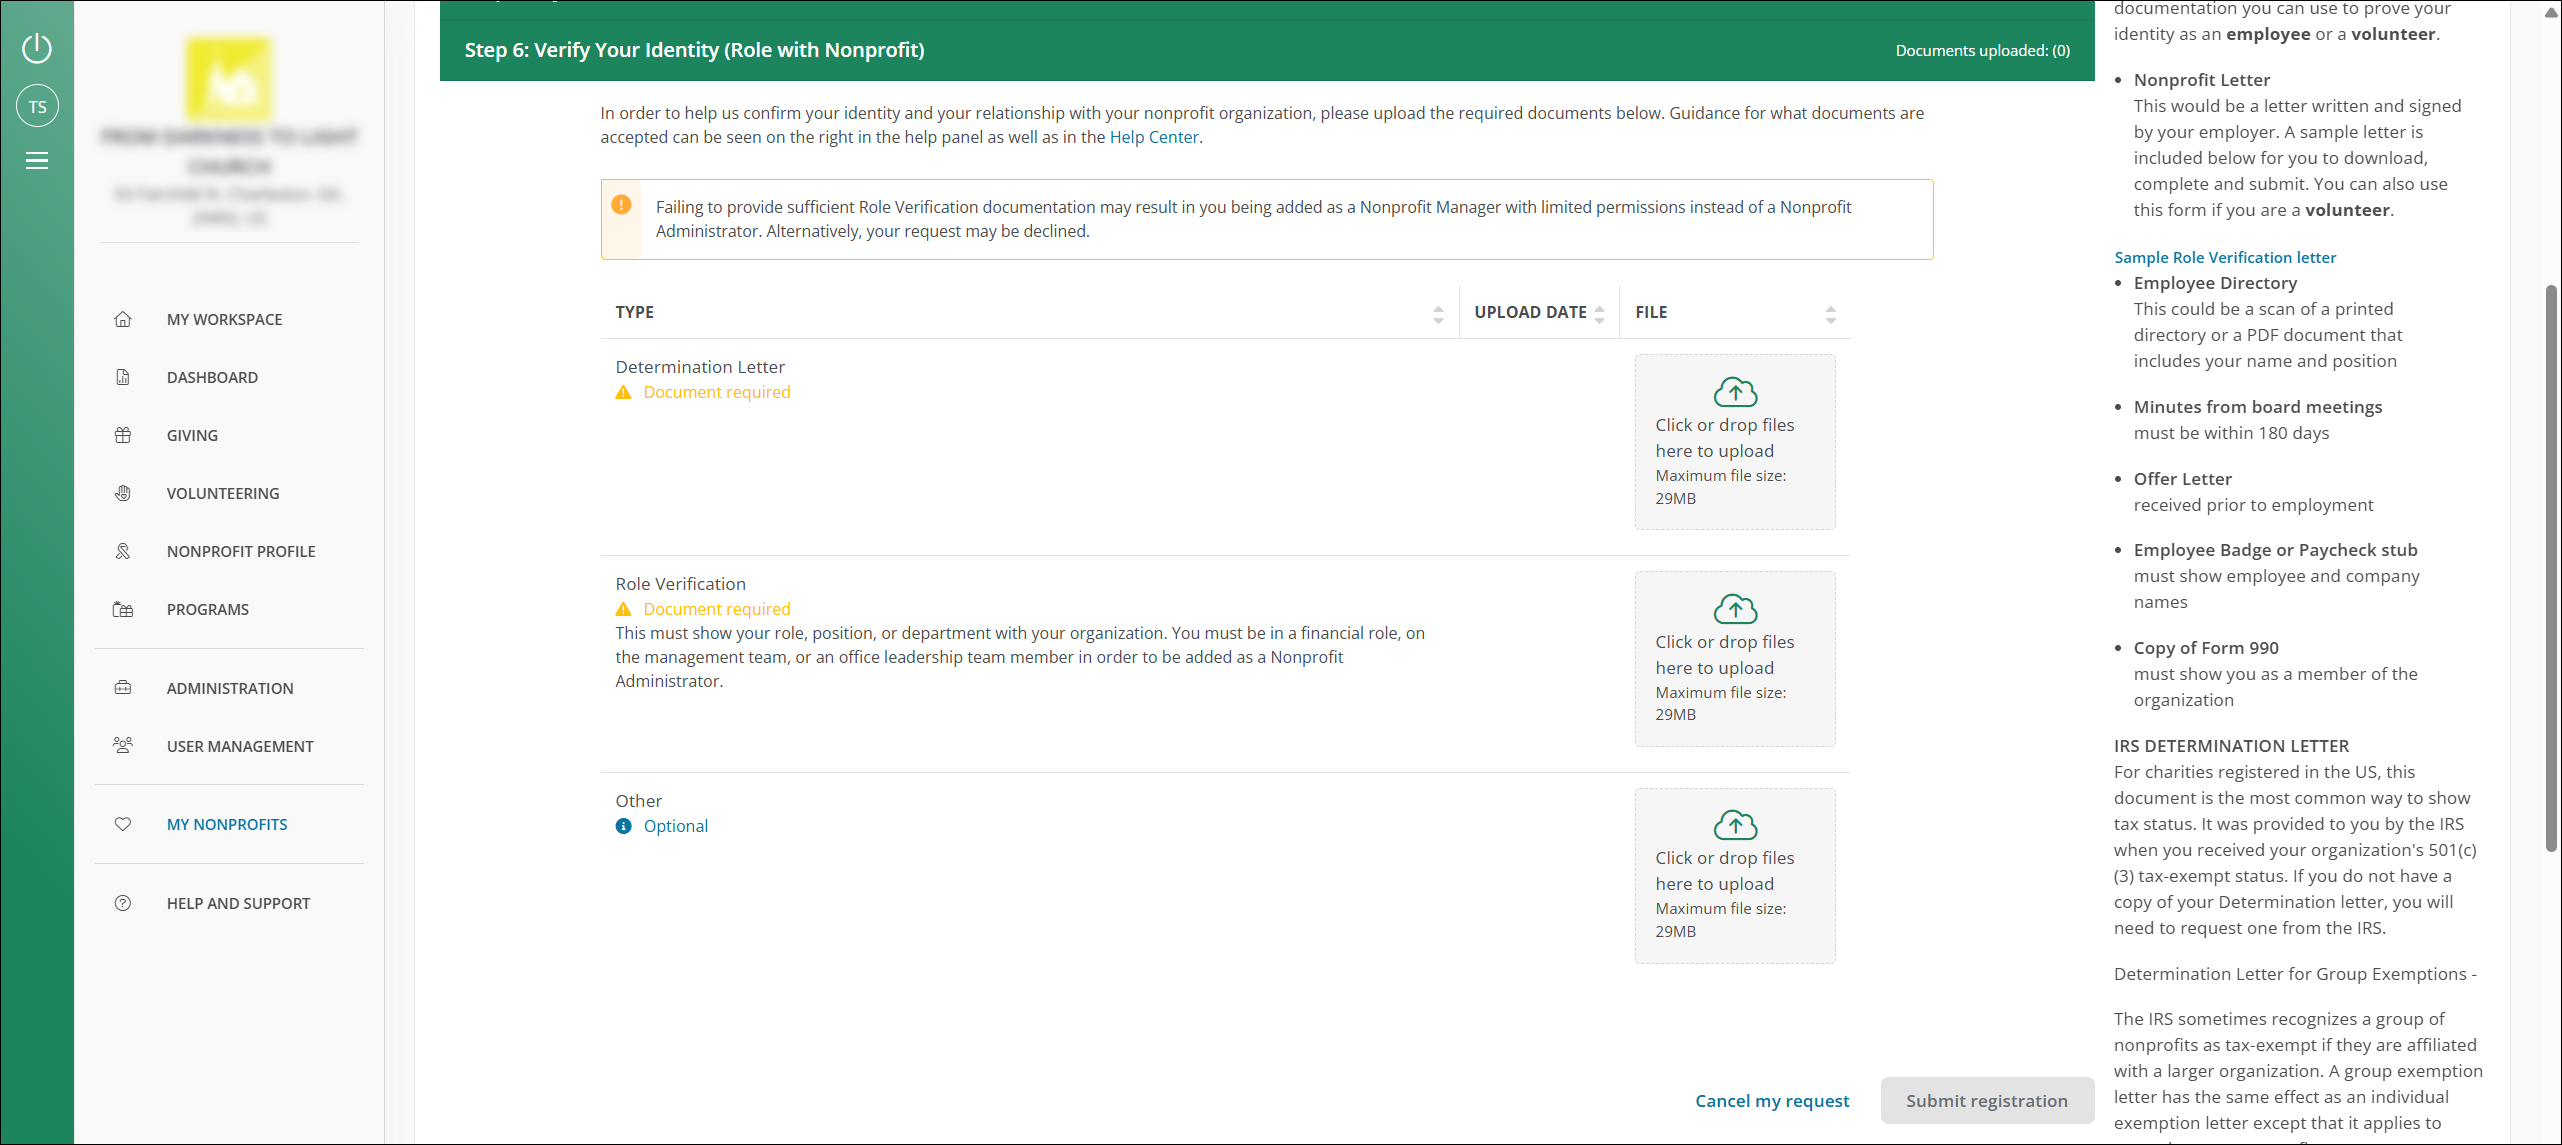
In Step 6: Verify Your Identity, upload the two documents listed below. These will be used to confirm both your organization's tax-exempt status and your relationship with the organization.
Required documentation What is it? Where can I get this document? Determination letter Document from the IRS that details your organization's tax-exempt status. This is also called a 501(c)(3) determination letter or exemption letter. Nonprofit organizations in the United States should have received this document from the IRS upon registering your nonprofit. If you do not have it, see the IRS website to learn how to download or request a copy. Role verification document (nonprofit letter, offer letter, directory, etc.) Document that shows your role, position, or department within your organization. You can use any of the following documents to verify your role. Only one is required.
-
Nonprofit Letter - A letter written and signed by your employer and one other authorized person. The letter must be on official letterhead. Volunteers or small nonprofits can use the Sample Role Verification Letter as a template.
-
Offer Letter - A letter you received before you started your job.
-
Copy of Form 990 - The form must list you as part of the organization.
-
Screenshot of the staff list - A screenshot from the organization’s website that shows your name.
See Documents Accepted for Role Verification and Proof of Identity for formatting requirements.
Tip: In order to be approved as an Administrator, your role verification documentation must show that you're in a financial role, on the management team, or an office leadership team member. If not, you may be added as a Manager with limited permissions instead.
-
-
-
After completing your application, select Submit registration. Our team will review your request and notify you by email once it's been approved.
Frequently asked questions (FAQs)
What role verification documents do you accept?
Open Documents Accepted for Role Verification and Proof of Identity for the complete list.
How long does approval take?
Review usually finishes within 24 business hours. We email you when it is complete.
What happens after I submit my request?
The Support team reviews your application and approves or declines it based on the information you provide.
Note: If the admin listed for your organization is no longer with the nonprofit, the team completes the review instead and confirms your role before approval.