Creating An Optimized Donation Form
Use optimized donation forms to increase conversions with a mobile-responsive design and a streamlined checkout experience. The designer provides a split workspace so you can configure settings and preview the donor experience at the same time.
Before you create a form, configure a donation campaign.
Launch the Optimized Donation Designer
-
Select Fundraising, and then Donation Management.
-
Select All Donation Forms, or locate a specific campaign and select Manage.
-
Select Create a donation form.
-
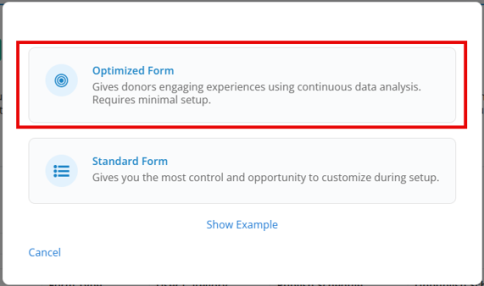
Select Optimized form to open the side-by-side designer workspace.
Build The Form
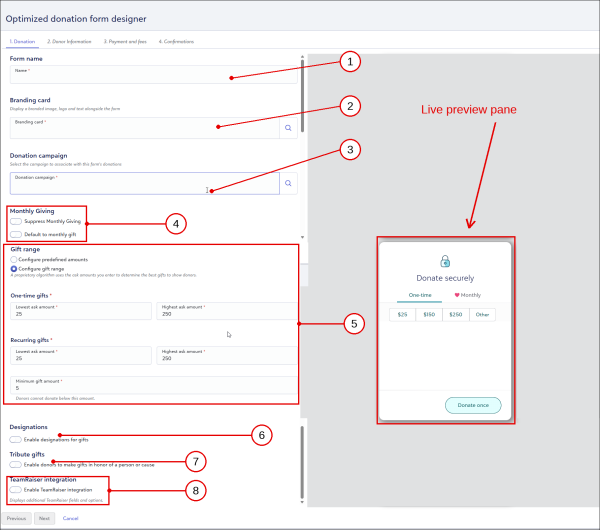
The workspace allows you to build your form on the left while previewing the live donor experience on the right. You will navigate through four sections:
Tip: Use Next and Previous to move between sections. Next acts as your guide; it becomes available only when all mandatory fields are completed without errors. If you enable optional features (such as Designations or Tribute gifts), their specific fields dynamically become mandatory. Lastly, if you select Cancel at any time, a Discard progress? warning appears to prevent accidental data loss.
Donation
Define your form's core identity, branding, and giving options.
-
Enter a Form name.
-
Assign or create a Branding card (upload your custom hero image, logo, and impact statement). For more information, learn how to manage branding cards.
-
Select your Donation campaign to process and track funds.
-
Set your Monthly giving preference (e.g., default to a monthly gift or suppress it).
-
Enter a Goal amount.
Note: This field dynamically appears only if you selected Include goal meter within your branding card settings.
-
-
Configure your Gift range (manually set predefined amounts or use the algorithm) and set a Minimum gift amount. For more information, learn how to configure gift ranges and minimum gift amounts.
-
(Optional) Enable and select specific Designations. For more information, learn how to configure designations for gifts.
-
(Optional) Enable Tribute gifts and configure notification messages. For more information, learn how to configure tribute gifts and send notifications.
-
(Optional) Select Enable TeamRaiser integration to use this form with peer-to-peer fundraising events.
When enabled, you can link this form to your TeamRaiser events to deliver a fast, in-context donation experience directly on participant pages, team pages, and event greeting screens. You can configure checkout attribution display options, donor recognition fields, and privacy controls.
For complete setup instructions, see Tutorial: Connect Optimized Donation Forms to TeamRaiser.
Donor information
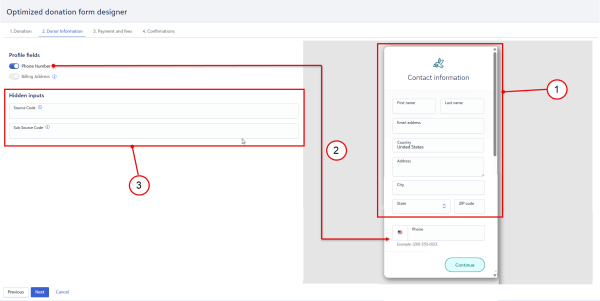
Choose which contact profile fields to collect from the donor and configure backend analytics tracking.
-
Review the required Profile fields.
Note: First name, Last name, Email address, and Billing address are permanently locked and mandatory to securely process transactions.
-
(Optional) Toggle on contact fields like Phone number.
-
Define your Hidden inputs (Source code and Sub source code) to easily track campaign analytics.
Payment and fees
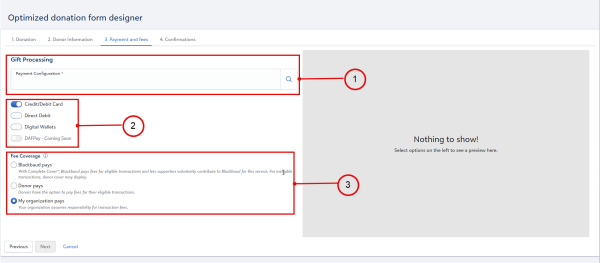
Link your preferred merchant account and configure the checkout experience.
-
Select your Payment configuration (your Blackbaud merchant account).
-
Enable Payment methods (such as Credit/Debit cards, Direct debit, or Digital wallets).
-
Select your Fee coverage preference (e.g., Blackbaud pays, Donor pays, or My organization pays). For more information, learn how to configure fee coverage.
Confirmations
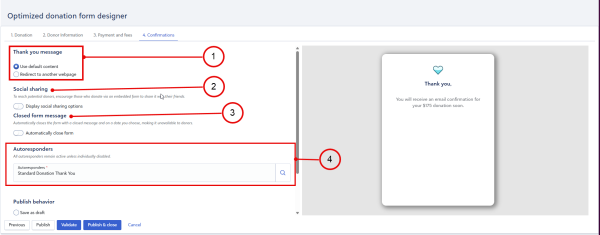
Manage the post-donation experience and email receipts.
-
Set up a Thank you message or redirect the donor to another web page URL.
-
Select Display social sharing options to add Facebook, WhatsApp, and link-copying options.
-
Configure a Closed form message to display when the form is no longer active.
-
Search, select, and edit the Autoresponders that will send the donor their email receipt. For more information, learn how to configure autoresponders.
Publish The Form
When you are ready to finish, the actions at the bottom of your workspace dynamically update based on how you want to proceed:
-
Select Save as draft to save your progress without going live (updates to Save draft and close).
-
Select Publish now to run a quick system validation and instantly make your form public (updates to Publish).
-
Select Publish on a scheduled date to automatically launch the form at a future time (updates to Schedule).
Tip: If you select Cancel at any time, the system triggers a Discard progress? warning to ensure you never accidentally lose your unsaved work.