Product Update Briefing
Blackbaud Financial Edge NXT - November 2025
Details about the "Available now" capabilities discussed in the November 2025 Product Update Briefing are below. For some features, corresponding blog posts from the Blackbaud Financial Edge NXT Community are also listed.
Video: To watch the November 2025 Product Update Briefing, register and receive the recording.
Blackbaud AI Chat
 Work smarter and faster with Blackbaud AI Chat
Note: This feature is currently part of an Early Adopter Program (EAP). We'll review and implement participant feedback to prepare for limited and general availability.
Generative AI (artificial intelligence) chat tools — like Blackbaud AI chat — are intelligent assistants that generate human-like responses based on your input. Blackbaud AI chat is designed to help make your financial tasks easier, more strategic, and more efficient. Here are some of the key ways it can support your work in Financial Edge NXT:
-
Save time with reporting – Add and customize financial reports based on the details you provide.
-
Summarize records – Quickly distill key details from records into bullet points or short summaries.
-
Get help about Financial Edge NXT features – Gain a deeper understanding about Financial Edge NXT features so you can quickly move to the next task.
We're continuously refining and expanding what Blackbaud AI can do for you based on your needs. Your feedback in the AI chat is incredibly valuable — it helps us improve the experience and build tools that truly support your work. Exciting updates are coming!
Financial Edge NXT Resource Center
 Welcome to the Financial Edge NXT Resource Center
This new tool consolidates all your resources in one place. With search functionality, you can easily find articles, help documentation, and trainings. The Resource Center displays the latest content, including newly released features and trending topics, to help you level up your skills with thought leadership, tips and tricks, and tools to boost your knowledge.
Whether you're new to Financial Edge NXT, new to your organization, or just need to refresh your skills, you can follow our guided onboarding experience and leverage basic resources to get started.
Navigation
 Menu has moved to the left sidebar!
We moved the menu to the left sidebar to improve navigation and scalability. It adjusts to your screen — expanding or collapsing as needed — so key tools stay within reach. For details, watch the demo and review Navigation.
Home Page
 Introducing the new Home page experience
The Home page has a fresh new look and feel, designed to provide a more consistent and streamlined web experience. Use it to access essential info, navigate with intuitive tiles, and take advantage of SKY add-ins for a customized experience every time you log in.
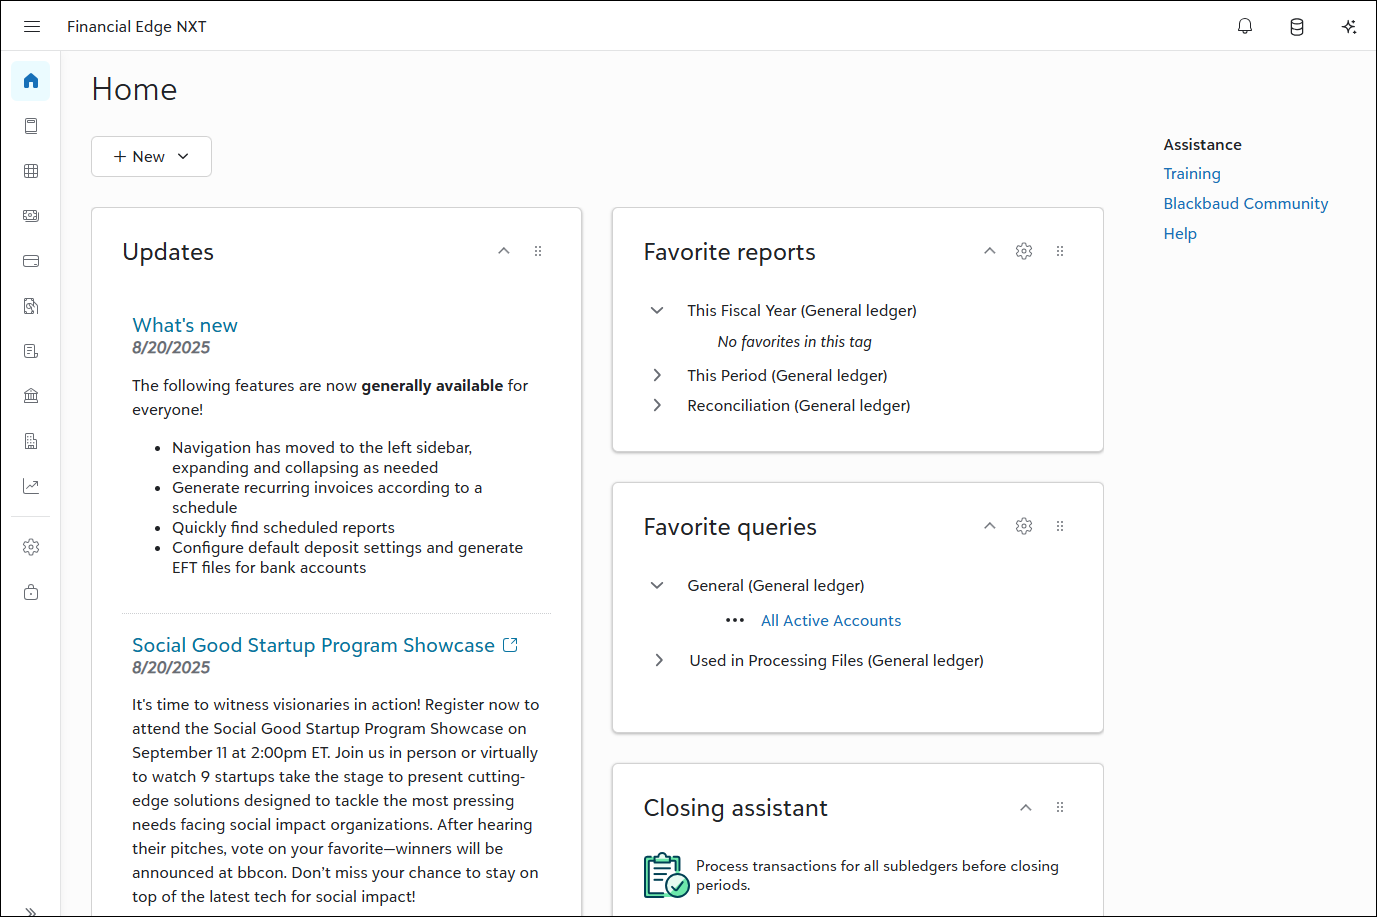
For details, watch the demo and review Home Page Tiles.
Total Web Solution
 Total web solution
As Blackbaud Financial Edge NXT shifts to a total web solution, we're moving features from database view exclusively to web view. As this shift progresses, we'll remove access to these features in database view.
To reduce the risk of service interruptions, gather feedback, and scale as needed, we're releasing these updates in waves instead of deploying everything at once.
Each feature area uses Wave dates. These indicate when a feature area will begin to turn off in database view. If your organization is included in a wave, you will no longer have access to that specific feature beginning on the date listed. It's important to know that you may receive the updates immediately or in a future release. After a wave completes, those dates are also noted.
To track feature areas and dates, see Total Web Solution.
Automated Deposits
 Seamless reconciliation with automated deposits
Note: This feature is currently part of an Early Adopter Program (EAP). We'll review and implement participant feedback to prepare for limited and general availability.
With automated deposits, Raiser's Edge NXT, Blackbaud Merchant Services (now part of Blackbaud Integrated Payments), and Financial Edge NXT work together to reduce the burden of manually reconciling a deposit to your general ledger.
After you post gifts in Raiser's Edge NXT, key details from Blackbaud Merchant Services are retrieved and display in Financial Edge NXT including gift amounts, fees, record ID, and the disbursement report. These details are used to create a deposit all within Financial Edge NXT — eliminating the need to manually reconcile disbursed payments with corresponding gift records in Raiser's Edge NXT!
Tip: At this time, only gifts disbursed through Blackbaud Merchant Services are included in the automated workflow.
Look for more updates and wider availability in a future release.
Allocations
 Add and manage allocations
As your organization's financial needs grow, you'll likely need to move — or allocate — amounts from one set of accounts, projects, classes, or grants to another. From Allocations, you can now add, edit, and delete the following allocation types:
-
Direct
-
Indirect expense
-
Indirect revenue
-
Indirect miscellaneous (misc)
You can also manage settings for rates, business rules, fee schedules, and pools to ensure consistent and accurate accounting.
For more information, see Add Allocations and Allocations Settings.
Receivables
 Receivables - new and recent features
Receivables features continue to release in waves — as small, usable increments to our United States customers first. As we progress with development and testing, we'll fully support additional locales in a future release.
-
What's recent — To review the features we've introduced in web view so far, see Receivables: What's Recent.
-
What's new — To view the newest features as they release, see What's New.
-
What's next — To review upcoming features, see What's Next.
Payables
 Product alerts
As you work with records, you may want to add an alert for yourself or another user. You can now add these alerts to product records.
For details, see Product Record.
 Add purchase orders from approved purchase order requests
When adding purchase orders, under General, choose to use a more targeted selection of purchase requests. Generate all approved requests, choose specific requests, or base your selection on a query.
For details, see Add purchase orders.
 Print multiple one-time checks
One-time check payments are helpful when you only need to write a check once (or rarely). To save time, you can now print multiple one-time checks at the same time.
For details, see Print Multiple One-Time Checks.
Payment Assistant automates and delivers vendor payments for you directly from Financial Edge NXT. With virtual card payments, accelerated ACH processing, and remote check printing, vendors are paid quickly and on time. By providing a faster, more cost-effective, and more secure way to pay invoices, you have more time to focus on your mission.
Included in your subscription cost of Financial Edge NXT, Payment Assistant is now in Limited Availability (LA). Are you interested in participating? Apply to join our LA group. During this time, we'll review and implement participant feedback to prepare for general availability.
 Key features
-
Group the invoices you need to pay into payment runs.
-
View the payment run record to track the progress of individual payments.
-
When you select to pay invoices, REPAY®, our trusted payments technology partner, contacts them to select their preferred payment method. After setup, all communication with vendors is automated for subsequent payments.
 View and download payment confirmations
On the bank draft record in the Payment Assistant tile, you can see the vendor email associated with the payment and if available, download documentation of the payment. If the vendor chose to be paid by check, a link to download the check image appears also.
Note: The payment confirmation download is not a duplicate of the payment confirmation message that a vendor receives. The vendor receives a formal communication from REPAY tailored to the payment method they chose. The confirmation you receive provides documentation of the payment only.
 Track submitted payments
You can easily track all successfully submitted payments from the Payments tab in Payables, Payment Assistant. This new view provides a helpful alternative to the payment run record, allowing you to see all payments at a glance. You can monitor the current status of each payment, download payment documentation (vouchers), and, if the vendor opted for check payment, access the check image directly. For a more targeted view, use search, and customize your columns. To share with auditors or conduct your own analysis — such as identifying which checks remain open — use export.
 Quickly identify ACH-ready vendors in payment runs
To streamline your payment process and reduce delays, EFT readiness indicators are now available when creating new payment.
When creating a payment run, you can add the EFT sharing column on the Select invoices to pay screen to instantly see which vendors have complete EFT details. If a vendor is missing some information, a Not ready link appears so you can quickly update their record. A blank field means no EFT banking details are on the vendor record. To use this feature, make sure Allow EFT sharing is enabled under Payment Assistant in Settings, Payables. This update helps you avoid payment delays by giving you clear visibility into vendor readiness before you pay.
 Expanded invoice capacity for payment runs
We’ve enhanced backend performance to support larger payment runs in Payment Assistant. Users can now include up to 2,500 invoices in a single payment run — 10x the previous recommended limit of 250. This improvement streamlines bulk processing and boosts efficiency for high-volume invoice management.
 Add multiple bank accounts for
 To give you greater flexibility and control over payment processing, this update introduces the ability to add multiple bank accounts for use in Payment Assistant payment runs.
After your organization completes Payment Assistant onboarding, those with the Payment Assistant setup security permissions can go to Settings, Payables and select Add bank account. To enter more than one new bank account, you can select Save and new between entries.
To add an account, users must submit bank-issued documentation — a voided check, a bank statement (with limited details), or a signed verification on bank letterhead. To prevent ACH returns, users should also provide their bank with REPAY’s ID: 2820959731 and request it be added to the allow list. Users can copy existing DBA information or enter new details, which are used for vendor remittance across payment types.
To confirm which accounts are ready for use with Payment Assistant, from Treasury, Bank accounts check the Payment Assistant column for accounts with a status of Enabled.
When you have multiple bank accounts set up to use with Payment Assistant, you'll choose the account to pay invoices from during the creation of a new payment run.
 Learn how to use Payment Assistant
-
Review the big picture with our Get Started with Payment Assistant tutorial.
-
Look over our additional docs, including onboarding info and FAQs in our Payment Assistant help.
Treasury
 Manual payment processing improvements
From Treasury, Bank accounts, you now generate check, EFT, and bank drafts for payments manually in a more efficient and reliable way! Payments run in the background so you can continue working without interruption. When complete, you now access them in Notifications under your top-level navigation bell, even after you close your browser.
Note: These changes don't impact Payment Assistant.
For details, review the Processing Payments Manually Tutorial and watch this demo.
 Default deposit settings and EFT files
To make processing transactions for Receivables easier, you can now set up default deposit information and generate EFT files for bank account records. From Treasury, Bank accounts, Receivables select Edit deposit details or Generate EFT File.
For details, see Receivables on Bank Account Records.
 Bank reconciliation improvements based on customer feedback
From Treasury, we improved several key areas in your bank reconciliation workflow. Based on customer feedback, these enhancements promote greater usability and findability with your reconciliation tasks.
-
Filter, search, and sort. When reconciling from a bank account record, you now have more flexible filter options. For example, you can filter based on amount and date ranges, and transaction type. Along with filters, you’ll notice more robust search and the ability to sort ascending or descending.
-
Save reconciliation (more visible action button). When reconciling from a bank account record, at the bottom of the reconcile screen, you can now select More, Save. In a future release, we plan to add other actions such as Post. This shift promotes visibility and aligns with existing button patterns.
-
Select and clear multiple transactions. From a bank register, you can now clear multiple (or all) transactions, saving time and paving the way for other tasks.
-
Add attachments. From a bank account record, you can now upload or link files as attachments, including images, PDFs, Word documents, or Excel spreadsheets.
For more information, see Reconcile Bank Accounts and Bank Account Records.
 Alignment configuration when printing checks
For more streamlined results when printing checks, you now have the ability to customize check element alignment.
For details, see Format Check Settings.
General Ledger
 General ledger settings - quickly access current periods
For faster and more visible access to current fiscal periods, we reorganized the Fiscal years setting. From Settings, General ledger, Current fiscal periods now displays separately so you can locate and close periods that no longer need to remain open. You can also edit the current and previous fiscal years or add a new one based on the current year.
For details, see Current Periods.
 Simplify your workflow and close fiscal years with the new General ledger Overview page
General ledger, Overview helps you focus on tasks that need immediate attention. Under Needs attention, process tasks such as posting transactions in out-of-balance batches or reviewing pending batches to keep your workflow moving efficiently.
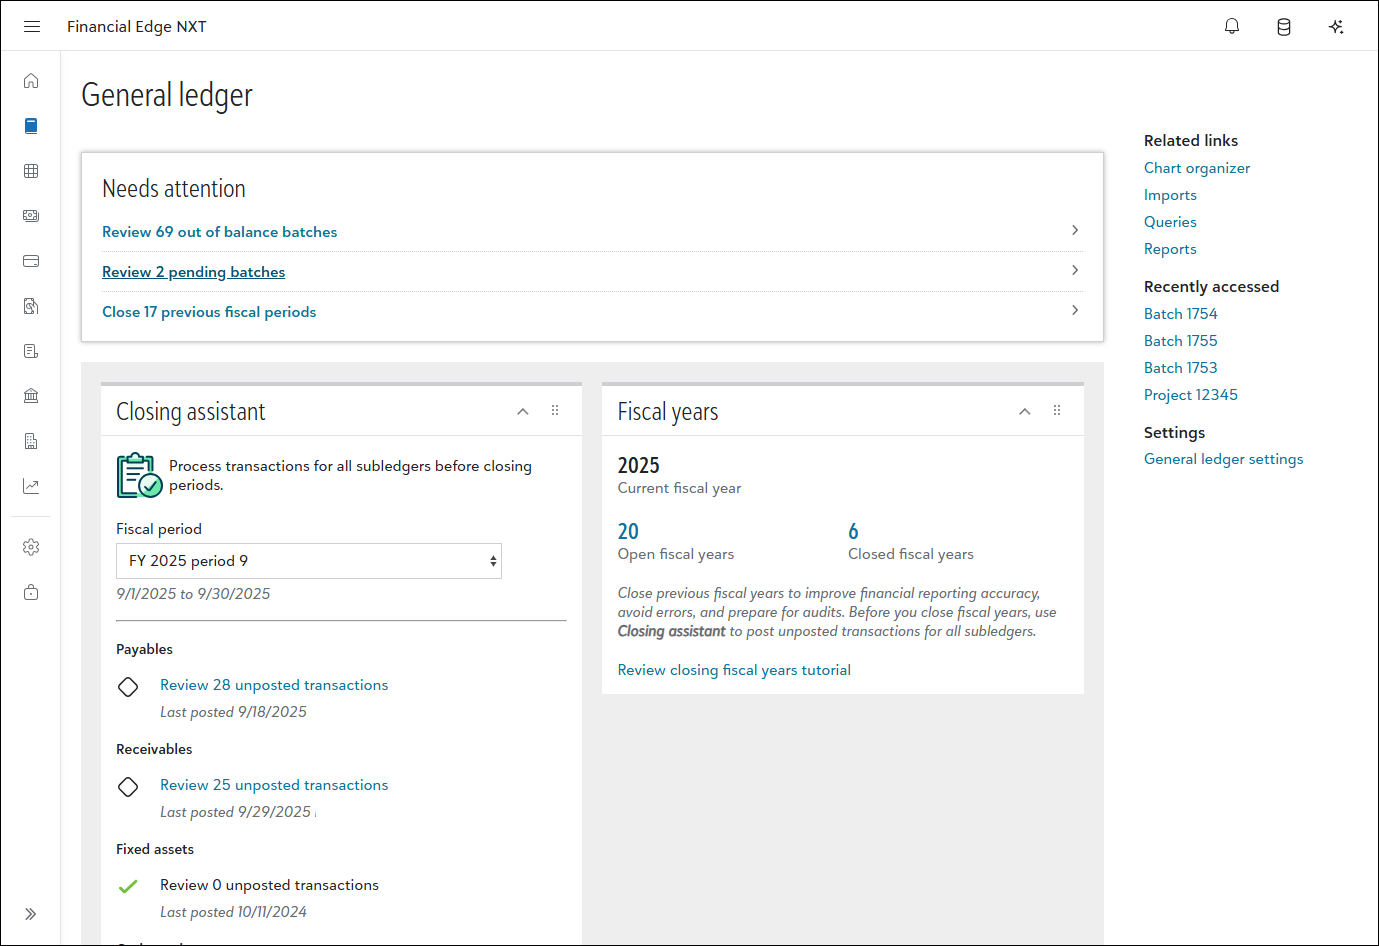
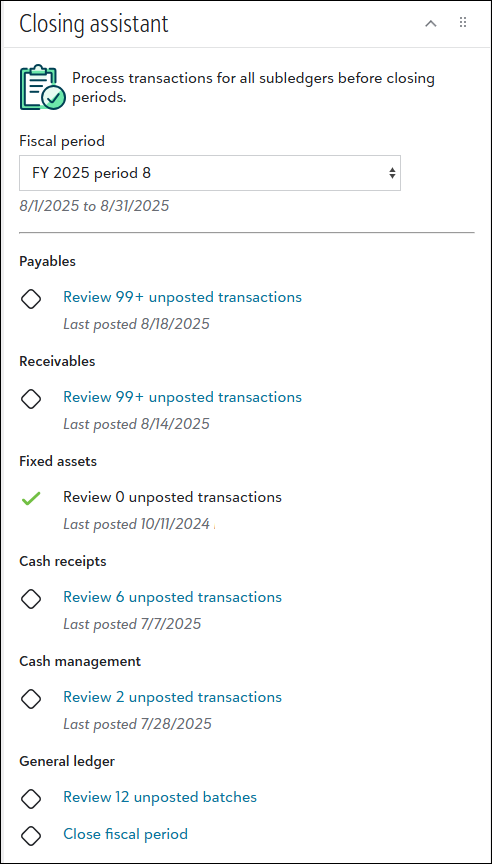
Use Closing assistant to stay on top of posting transactions for each subledger. Regularly reviewing and processing unposted batches helps maintain accurate financial records and allows you to close fiscal periods that no longer need to remain open.
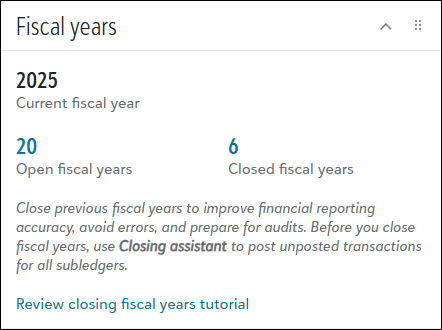
Use Fiscal years to quickly access a list of open fiscal years from Settings, General ledger and close them. Closing previous fiscal years improves financial reporting accuracy, avoids errors, and helps prepare for audits. For details, see Closing Fiscal Years Tutorial.
For details about Overview, watch the demo and review General Ledger Overview.
Journal Entry Batch
 Faster save times!
Batches associated with a high number of journal entries now save faster! Decreasing the time to save helps you accomplish your day-to-day tasks quicker and more efficiently.
 Duplicate and insert new lines
When you add or edit a journal entry batch, the placement of duplicate lines has changed. When you copy data by duplicating lines, the duplicate lines now appear below the selected lines. Previously, these appeared at the end of the batch. In addition, you can now insert blank lines. To insert, select the corresponding checkboxes, then select Insert line. For more details about journal entry batches, see Batch Records and watch this demo.
 Display journal entry transaction dates
Sort and filter the list of batches by Post date. When a batch includes more than one journal entry transaction and their dates are different, "Multiple" displays in the column. For added clarity, Date posted is now Posted on and reflects the batch run post date.
 Navigate to source details
-
From a journal entry batch record, we added new columns for Source type and Source number. Select links under these columns to view specific details, such as invoice or credit memo info.
-
From a journal entry batch record, select an account. Under Activity, select a specific period. On the Account activity page, select links under Source type and Source number to go directly to associated details.
Note: Links are only available for regular, posted batches.
 Import transactions directly from a journal entry batch record
Import transactions directly from a journal entry batch record, resulting in a more focused workflow from within the batch. With this refreshed experience, you don't need to manually assign batch numbers or navigate to different areas. You can complete the import fully within the batch.
To import, select Import transactions (or More, Import transactions) from the batch action bar. You can search for and select an existing transaction import to edit, validate, or import. You can also add a new import without leaving the batch record.
Tip: Import supports .CSV files and .TXT files (for .TXT, use only comma delimited files). Keep in mind that header records are required for all imports and if you modify the file after attaching it, you must upload it again to include the latest updates.
For details, see Batch Records and Add an Import.
Merge Records
 Merge vendors
You can now merge vendors from the Vendors list page.
For details, see Prevent and Resolve Duplicate Vendor Records.
 Merge clients
You can now merge clients from the Clients list page.
For details, see Merge Duplicate Clients.
Actions
 Add an action status
For improved tracking, add a status to the actions you create for records. For example, you might give an action a "Pending" status to indicate it still needs to be addressed.
For details, see Add Actions to a Record
Attachments
 Updates to supported file types
For security purposes, we no longer support the ability to upload .htm, .html, and .mhtml files for attachments.
For a list of supported file types, see Attachments.
Import
 New validate and import options
We improved the way you access options to validate and import files. When ready, you can validate and import in several ways.
-
From the list of imports, select Validate from an import's menu.
-
From the list of imports, select Import from an import's menu.
-
When editing an import, select either Save and validate or Save and import (depending on your parameter selections).
Tip: Depending on user permissions, you can access Import under General ledger, Receivables, Payables, Treasury, and Fixed Assets.
For more information, see Import.
 Import file enhancements
Import files are easier and more efficient to work with. You can now:
-
Create sample import files
-
Export files with data
-
Download sample import files
-
Generate exception files
-
Use additional field separators and text qualifiers when setting up import file layouts
For details, see Create Sample Import File.
Export
 Add and edit exports
Under Settings, Export, you can add and edit exports for General ledger, Receivables, Payables, Treasury, and Fixed Assets.
For details, see Export.
Query
 Limit static query output
You can now limit your static query’s output to a specific number of records.
For details, see Record processing.
 Convenient access to run a query
From a list of queries, select to run a query from the query menu which will run in the background. You’ll receive a notification when it completes.
For details, see Query.
 Query editor enhancements
From the query editor, you can:
-
Copy a link to the Results tab.
-
Search for available query fields.
For details, see Query Editor.
 Improved payment processing
To improve payment processing, filter by queries when selecting a payment method (only available for Invoice and Vendor query types).
 Export results to Microsoft Excel
To enable you to view and manage query data outside of Financial Edge NXT, if you have rights to export query results, you can export queries in XLSX format.
For details, see Query and Query Editor.
 Sales tax entity
Add the Sales tax entity field criteria to account and transaction queries. From a query with an account or transaction query type, select the Criteria tab on the query editor. Under Available fields, Transactions, select Sales tax entity to add the field criteria.
Reports
 Project distribution for cash receipts
This report lists debit and credit amounts for General Ledger projects created by cash receipt transactions and their adjustments. For example, you can show all transactions and associated debits and credits for a specific project.
For details on how to add one, see Add a Report.
 Client account activity
This report lists charges generated by clients as well as those responsible for the charges. At a glance, you also view whether clients are responsible for the charges and who generated them.
For details on how to add one, see Add a Report.
 Quickly find scheduled reports
From the Reports page, use the new Email schedule column to quickly identify and view scheduled reports. Under the column, select a report’s schedule to view and edit. Finding scheduled reports directly from the Reports page helps you make quick decisions and improves your reporting workflow.
Tip: To ensure the new column displays, select Columns from the action bar. Choose Email schedule, then select Apply changes.
For more information, see Reports and Add a Report.
Note: With Report Scheduler, you can schedule, email, and receive reports based on specific reporting permissions. Only users associated with the Queue task for the Shared components role can use Report Scheduler functionality. For more information, see Roles.
 Streamlined report generation
Note: Don't see this yet? These improvements are in Limited Availability (LA) and are releasing in waves. During the LA, we'll review and implement participant feedback to prepare for general availability.
From Analysis, Reports, generate reports in a more efficient and reliable way! Reports process in the background so you can continue working without interruption. When complete, you now access them under your top-level navigation bell, even after you close your browser.
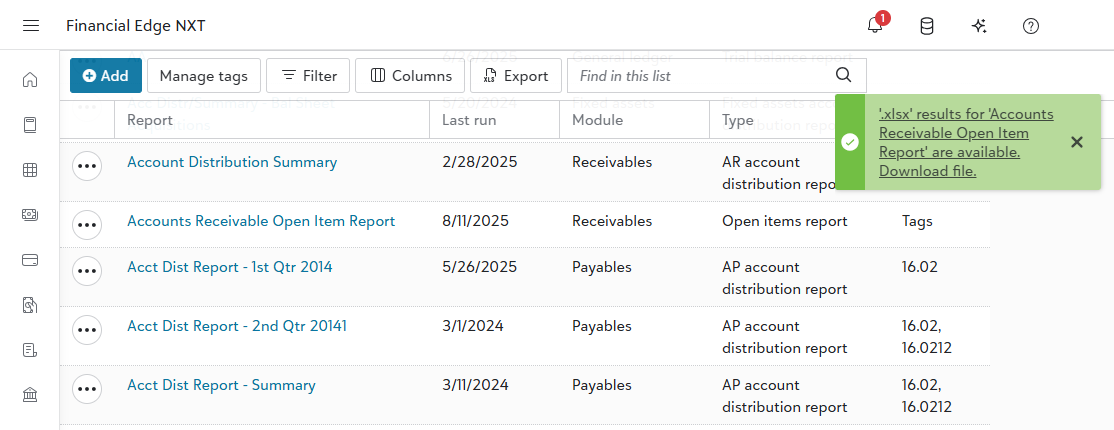
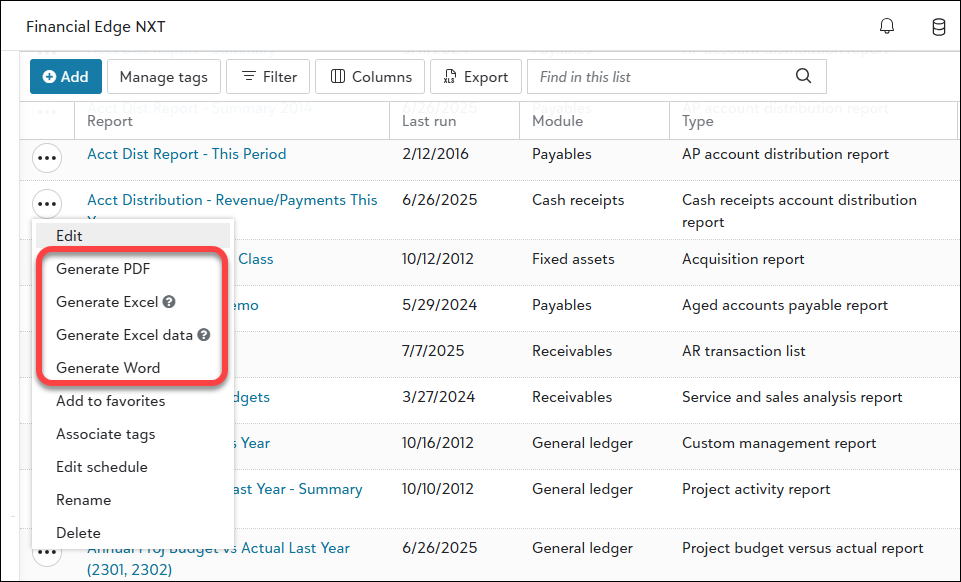
Also, report options have changed. Run and Export have been replaced with four new Generate options that streamline the report generation process, making it easier to select the format that best fits your needs.
-
Generate PDF. Generates a PDF file of the report.
-
Generate Excel. Generates an Excel file of the report that includes multiple report titles and multiple column headers.
-
Generate Excel data. Generates an Excel file of the report that includes one report title with one set of column headers. Use this for custom formulas and calculations.
-
Generate Word. Generates a Word file of the report.
Note: These improvements don't apply to validation and post reports in General ledger.
For details, watch the demo and review the Generate Reports Tutorial.
Security
 View user role permissions
To make it easier to review the permissions associated with a role for a user, admins can view the details in context. If a user doesn't have access to all tasks and permissions associated with a role, admins can select the role from the user's profile or from the Users page to see the tasks and permissions assigned to the user.
For details, see View user access for a specific role and View user role details.
 Improved descriptions for user history action types
To make it clearer who initiated a change and to provide more information about the change, we enhanced the descriptions for the following action types:
-
User deleted — we indicate if the user was removed due to 90 days of no activity after access was initially granted.
-
BBID name or email address changed — we indicate if an organization's identity provider initiated the change and if the change obfuscated data to remove personally identifiable information when the account was deleted.
For more information, see User and role audit history.
On-Demand Backups
 On-demand backups
Organizations in the public cloud (hosted by Blackbaud Cloud Operations) can request a database backup once per month. To request a backup, access the Database view options page. The On-demand backups tile displays the history of your backups and status. Select New to file the request. You'll receive an email notification when it's ready!
For details, see On-demand Backups.
SKY Developer
 Query API
We added the Available field search (Preview) endpoint which is in preview and can be changed or removed at any time
 General Ledger API
-
We deprecated the Journal entry batch (Create) endpoint and replaced it with Journal entry batch process (Create).
-
We added the following endpoints to support long-running processes:
-
We made the following changes to the Account code (List) endpoint:
-
account_code_valuehas been added as a replacement forvalue. -
You must use
account_code_valuein place ofvalueto avoid potential datatype or length issues.Note: The
valueproperty will not be deprecated, but will cause errors if the account code length exceeds the supported limit.
-
 Receivables API
The Receivables API is now generally available (GA). This API gets data related to receivables, including charges, clients, credits, and invoices. It also gets pages for receivables.