Create an Online Giving Donation Form
Before creating an Online Giving donation form, you must first set up a donation campaign. Donation campaigns control permissions, configurations, and data associated with a specific fundraising goal, such as an End-of-Year Giving initiative.
When you define campaign attributes, those values become the default settings for any donation forms created within that campaign.
Tip: To test new configurations, you can copy an existing form. Apply updates to the copied version. If the results aren’t satisfactory, you can delete the copy, and your original form remains unchanged.
Choose a form name and template
-
Select Fundraising and Donation Management.
-
Find your campaign in the Campaigns list and select Manage.

-
Select Create a Donation Form.

-
Enter a form name and select Next.
-
Choose a form template. You can preview templates and customize data elements later.

Identify the form
-
Enter an internal form name for use in searches, reports, and queries. This is never displayed to your constituents.
-
(Optional) Enter a public name visible to your constituents.
-
(Optional) Enter a description for staff use.
-
Select a security category to control who can edit and manage the form.
Add donors to a constituent group
[Optional] To add all donors using this form to a constituent group, choose Select. You may select an existing group or create a new group. By default, donors are not added to a group.
-
Add constituents to an existing group
-
Select a group.
-
Select Apply.

-
-
Add constituents to new group -
-
Enter a Group Name to distinguish it from other groups.
-
Choose or create a Group Type to associate this group with other similar ones that already exist.
-
Enter a Group Description to describe the reason for the group or its purpose.
-
Optionally set a Group Security Mode to give members of the group a set of permissions assigned to the chosen group.
-
Select Apply.
-
Designate your gift
[Optional] Allow donors to direct funds to specific causes (e.g., departments, wards, initiatives). Select a designee if applicable. See Designated giving for details.
Configure form interaction settings
-
Select if the form will be available for donations online, offline, or both.
-
Select a responsive layout to allow the form to adjust the display to the user's screen size.
-
[Optional] If you want to track how new constituents are interacting with your form, enter a source, and possibly subsource, code.
-
Select Yes, enforce verification on all API donation requests to this form to require field level validation during API donation form processing such as with the donate or addOfflineDonation methods.
Warning: Do not select this setting if you plan to use API integrations, such as TeamRaiser Facebook integration, that may need to bypass this validation.
Configure donation levels
[Optional] Donation Levels allow you to create specific and personalized donation requests and to assign different conditions and rewards to those amounts.
-
Create giving tiers with specific thresholds. For example, a Bronze donation level maybe amounts between $20 and $50, Silver between $50 and $100, and Gold anything over $100.
-
Create a Dynamic Ask to calculate a suggested donation based on a constituent's giving history.
-
Associate levels with premiums, memberships, or other perks.
Note: Donation levels must be published before they can be added to a form.
To create a new donation level:
-
Select Create a Donation Level.
-
Name the donation level.
-
Select if the donation level requirement is a fixed amount, minimum amount, or Dynamic Ask.
-
Enter the fair market value of goods or services, if any, that you are providing to constituents who donate at this level. This amount will be subtracted from the gift amount to yield the tax-deductible portion of the donation. Do not include the value of premiums as these are handled separately.
-
Select a security category.
-
If desired, assign a promotion code. If a promotion code is assigned, the donation level is only available to donors who enter the code.
-
If desired, select a group to which donors at this level will be added.
-
If desired, select a product to associate as a premium. To add an existing product as a premium, under Related Actions, select Manage Premium Associations. If the product does not yet exist in your system, select Create a New Product.
Note: Premiums aren't available on levels where donors enter their own amount. However, a donor who enters an amount equal to or greater than a fixed giving level is offered premiums associated with that level.
-
If desired, select Yes, I would like to offer membership benefits for this level. See Membership Types to learn more about this feature.
Only available if your site is has Memberships configured.
-
Save the level.

Design donation form
Now it is time to Design Donor Screens. When you began to think about creating a donation form, this is the step you probably had in mind. What will the form look like? What payment types will we accept for this form? What message should we use to encourage recurring giving? There are a huge number of options available to you and you can learn more about each under Donor Screens and Data Elements. Here we will walk through setting up a basic, standard form with a checkout modal data element.
-
Select Edit Donation Form.

-
Select either the Checkout modal or Checkout embedded data element under Select data elements to include in this form and Add.

-
Use the up and down ORDER arrows to move the element where it belongs on the page, and select Save Order and Edit Selected.

-
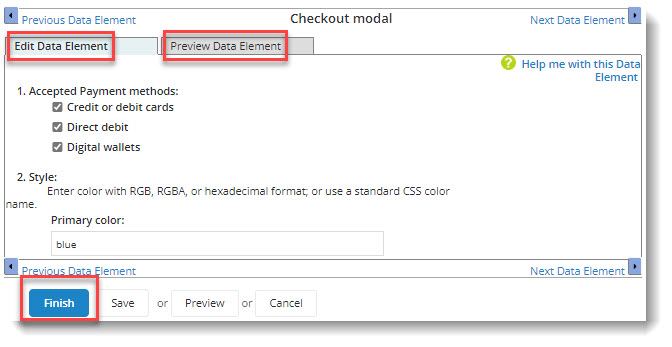
Configure element settings under Edit Data Element, select Preview Data Element to ensure it looks as expected, and select Finish.
See Checkout modal or Checkout embedded help for details.
Validate your form
If validation fails, the system will display issues and how to fix them.
Configure autoresponders
[Optional] Your donors will be automatically contacted by email when certain events happen. Some examples are thank you messages after donations are submitted, notifications of upcoming, recurring payments. You may used the default messages or Edit the autoresponder emails.
Test your form
[Optional] Test the form with a variety of constituent profiles, devices, browsers, light modes, and digital accessibility tools. Select Test to send an email with a link to the form to reviewers. Separate recipient email addresses with commas. See Blackbaud Integrated Payments Account Configurations and test credit card and account numbers.
Publish your form
-
Select when to publish and [Optional] unpublish the form.
-
[Optional] Enter a website URL to redirect visitors who try to open the form after it has been unpublished.
-
Note the donation form URL. Select the URL to view the page or copy the URL to share with others.
-
[Optional] Use the provided code to add a donate button to digital resources. When selected, this button will open the donation form.
-
Copy the first snippet and past it between the
<head></head>HTML tags in your email or website code. -
Copy the second snippet and past it between the
<body></body>HTML tags in your email or website code where you want the button to appear.
-
-
Select Finish.
