What's Recent in 2026
To help you cultivate relationships and improve fundraising efforts, Raiser's Edge NXT introduces new and enhanced features on a frequent basis. In case you need to catch up on what you missed or just want a refresher, here's a recap of what was recently released in:
AI | Constituents | Data Health | Donation Forms | Email | Event Management | Fundraisers | General Features | Gifts | Integration | Membership | Portal | Premium Features | Prospect Insights | Query |
AI
 Chat for Blackbaud AI Prompt Library now available
April 28, 2026
The Chat for Blackbaud AI Prompt Library is now available — giving you a faster, more confident path to better results in Chat.
Instead of starting from a blank window and guessing how to phrase a question, you can begin with curated, ready-to-use prompts built around real fundraising, stewardship, and operations workflows. Use them as-is or adapt them to fit your situation.
Prompts are organized by category, including analytics and reporting, constituents and relationships, donor engagement, event management, gifts and pledges, opportunity and moves management, prospecting, stewardship and retention, strategy and best practices, and general assistance.
The way you phrase a question directly affects the quality of the answer you get back. The Prompt Library removes the guesswork, so you can spend less time figuring out what to ask and more time acting on what Chat surfaces.
We'll continue to add new prompts as we expand the library and as Chat for Blackbaud AI grows. Look for the New badge to quickly spot the latest additions to the library.
Strengthen your online giving strategy with Chat for Blackbaud AI
March 31, 2026
Chat for Blackbaud AI helps you use online giving best practices to leverage donation forms features that make an impact and streamline decision-making. When you use tailored prompts, it helps you:
-
Create branding cards for Optimized Donation Forms to design consistent, compelling forms that strengthen your message.
-
Ask for online giving best practices so you can apply proven techniques that improve donor response.
-
Compare Online Express donation forms and Blackbaud Donation Forms features to understand how to transition to Standard and Optimized Donation Forms.
Note: This feature is available only if your organization enables Generative AI features and you have permission to use them.
Meet the Development Agent – Blackbaud's first Agent for Good
March 17, 2026
The Development Agent is Blackbaud’s first Agent for Good™, built to help fundraising teams deepen donor relationships and unlock new fundraising potential. Natively embedded in Raiser’s Edge NXT, the agent acts as a proactive virtual team member — supporting personalized outreach and engagement in a way that aligns with your preferences and fundraising approach.
The Development Agent is currently available in the US. Learn more about subscription options.
Unlock Smarter Fundraising with Chat for Blackbaud AI
January 27, 2026
We’re excited to introduce Chat for Blackbaud AI, powered by generative AI. This feature is designed to save you time, improve donor engagement, and make smarter, data-driven decisions — all within Raiser's Edge NXT. With AI-powered assistance, you can focus on what matters most: building stronger relationships and driving your mission forward. Instead of manually searching for answers, simply ask the AI to draft content, suggest creative ideas, or provide actionable insights based on your data and best practices.
Think of it as having a helpful assistant:
-
You provide a prompt or question.
-
The system uses AI to generate a draft, suggestion, or summary.
You don’t need any AI technical knowledge to use this tool. Just type what you need, and the system will do the heavy lifting — saving you time and helping you focus on what matters most.
Tip: Do you have more questions about Blackbaud AI? Visit the Blackbaud Trust Center to view FAQs about Blackbaud AI.
How Can This Help You?
Here are some examples of what you can do with these new features:
-
Draft an email or message:
Example “Write a thank-you email to donors.”
Bonus! Give the chat some feedback about a detail you want added.
-
Generate ideas:
Example "Suggest three creative ideas for a year-end fundraising campaign."
-
Get quick answers about your constituents:
Example “Summarize key details about [constituent name] for my next meeting.”
-
Ask questions about fundraising best practices:
Examples “What are some best practices for re-engaging lapsed donors?” or “What follow-up actions are recommended after a donor meeting?”
-
Assist with fundraiser goals:
Examples “Show me my top prospects for major gifts this quarter.” or “Show me a list of constituents to contact this week.”
-
Ask about fundraising goals:
Example “Show me a total of all gifts received for the [campaign name] campaign.”
Tip: Some answers may include a link so you can see how Chat for Blackbaud AI answered the question. For this one, you can select View list to confirm the information.
-
Ask product help questions:
And this is only the beginning — AI can assist with many more tasks as you explore.
Tip: Keep the chat open as you navigate Raiser's Edge NXT. When new information is available, the chat will update automatically with summaries. For quick inspiration, try the suggested prompts to see what AI can do for you.
Tips for Better Results
-
Be clear and specific in your prompts.
-
Include context like donor name or campaign.
-
Review and customize the AI-generated content before sending or publishing.
-
Refine responses by asking follow-up questions.
-
Use it as a starting point — your expertise makes it great!
Why It Matters
Chat for Blackbaud AI helps you:
-
Save time by reducing manual research and drafting.
-
Stay focused on strategy instead of repetitive tasks.
-
Improve donor engagement with personalized content. Work confidently knowing you can edit and refine AI-generated content to match your tone and goals.
How to get started
-
Enable generative AI features – Before you can use Chat for Blackbaud AI, your organization admin must opt in to generative AI features in your Blackbaud environment. Once enabled, the authorization applies to all current and future generative AI features across your Blackbaud products. For details, see Opt In to Generative AI Features Globally help. If you don’t opt in, your organization remains opted out by default.
-
Set permissions – Solution admins must assign the Artificial intelligence role to users who need access to chat.
-
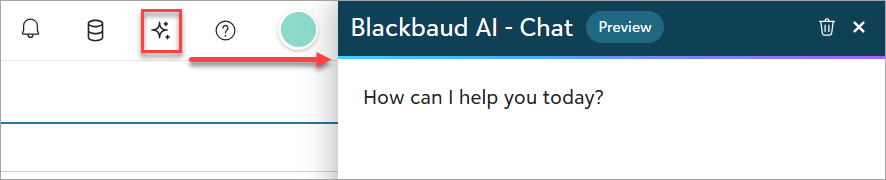
Open the chat – In Raiser's Edge NXT, select the Chat for Blackbaud AI sparkle icon from the top navigation.
-
Review the Quick Start guide – Learn how to write effective prompts, refine responses, and get better results with our step-by-step tutorial.
Frequently Asked Questions
Is my data secure?
Yes! Your data remains secure. We follow industry-standard security measures to protect your information. Access to unapproved tools is restricted, and approved tools are vetted for privacy and compliance. AI responses are customized based on your organization’s data and respect your configured security permissions. For more details, see our Blackbaud AI Terms of Use.
Do I need technical skills?
No. Just type your prompt and let the system handle the rest!
What if AI can't answer my question?
We’re always working to make Chat for Blackbaud AI more useful based on your needs. Your feedback helps us improve the experience and build tools that support your work. You can provide feedback in two ways:
-
Select the thumbs up and thumbs down icons in the Blackbaud AI – Chat and add details.
-
Submit suggestions and vote on ideas in the Raiser's Edge NXT Idea Bank under the Blackbaud AI - Chat category.
Global opt-in for generative AI
January 7, 2026
Organization admins can now enable all current and future generative AI features powered by Blackbaud AI with one global setting — giving your organization centralized control, clear compliance, and future-ready access to AI-powered tools that boost productivity and personalization.
If you don’t opt in, your organization remains opted out by default.
Learn more, including how to enable Generative AI features.
Constituents
Build email sign up forms to save time and drive engagement
Online constituent forms help you drive engagement and streamline data entry. To make it easy for constituents to update their profile, choose communication preferences, and collect additional information on your website, create a form from Online Giving, Constituent forms.
Manage fund relationships in web view
Now you can manage fund relationships directly from constituent records and fund records using dedicated fund relationship tiles. This update lets you view, add, and edit fund relationships from either side of the relationship.
Track and process constituent updates in bulk
March 17, 2026
Bulk constituent process is now available to provide clear visibility into processing progress through a detailed status view. You can now process or reject process multiple constituent updates at once in web view. The behavior varies by tab. For more information, see Bulk Constituent Processing.
Data Health
Turn Data Into Direction with New Home Page Benchmarking Tiles
January 27, 2026
We’ve added
-
The Active donor growth tile tracks changes in your active donor base, helping you understand shifts in engagement and assess the impact of outreach efforts.
-
The Revenue growth tile provides a quick view of how revenue is trending over time, helping you detect patterns and identify areas that may need attention.
-
The Revenue per donor tile shows the average contribution per donor, making it easy to monitor engagement levels and evaluate the effectiveness of fundraising strategies.
-
The Sustainer performance tile offers a snapshot of your sustainer program’s health, including counts of sustainers, non‑sustainers, and potential sustainers, along with retention and growth insights.
Together, these tiles transform the Home page into a strategic dashboard so that you can turn every metric into clear, actionable guidance.
Donation Forms
Automatically assign gift subtype from donation forms
May 5, 2026
To reduce manual updates when processing batches and improve gift classification, you can now assign a gift subtype on Standard and Optimized Donation Forms from the Hidden fields tab. After approving a batch, the gift subtype writes directly to the gift record.
Use Chat for Blackbaud AI to save time building Optimized Donation Forms
May 5, 2026
To help you build an Optimized Donation Form with less effort, Chat for Blackbaud AI provides a guided, conversational experience. From Raiser's Edge NXT, open Chat for Blackbaud AI and enter the prompt "Help me build a donation form". The chat will ask targeted questions and use the responses to shape the donation form as it is created.
Offer bill‑me‑later pledges on Standard Donation Forms
April 28, 2026
You can now offer a bill-me-later option for pledges, giving donors the flexibility to commit without providing payment during the donation form experience. This option supports pledge‑specific business processes where payment is collected later, either manually or through a separate process, while still capturing the donor’s intent and pledge amount up front.
Approve batches faster with automated package assignments
on donation formsApril 28, 2026
To reduce manual updates and help you approve batches faster, you can now assign a package on Standard and Optimized Donation Forms from the Hidden fields tab, or pass it through the form URL, to automate package assignment on the gift. After approving a batch, the package writes directly to the gift record.
Note: Campaign and Appeal now appear with Package on the Hidden fields tab.
Measure donation conversions with UTM data in Google Tag Manager
April 21, 2026
To better understand how donors reach your donation forms, you can now track UTM (Urchin Tracking Module) parameters using Google Tag Manager (GTM) and Google Analytics. When a donor opens a donation form with UTM values, GTM captures the parameters and sends them with donation form events to Google Analytics, where you can report on which campaigns, sources, and mediums lead to completed donations. This helps you connect giving activity to outreach efforts such as email and social media and evaluate campaign performance with greater confidence.
Spot trends and opportunities in Online Giving's enhanced Overview
March 31, 2026
To help your organization understand donor behavior, strengthen engagement, and create more effective donation forms, new key metrics and data analysis using Chat for Blackbaud AI are available from Online Giving, Overview.
New visualizations help you evaluate performance and take action:
-
Intelligent analysis summary is a Blackbaud AI-driven summary that highlights donor engagement and online revenue trends so you can understand what is driving results.
Note: The summary is available only if your organization enables Generative AI features and you have permission to use them.
-
Performance summary shows online giving trends that help you see where to focus your fundraising efforts.
-
Conversion rate reveals how effectively your donation forms turn visitors into donors.
-
How are you raising more? shows the revenue generated by key donation form features so you know which options make the biggest impact.
New merge fields for more personalized email greetings
February 17, 2026
When creating an email to send to constituents, you can now use two new merge fields — Primary addressee and Primary salutation — to personalize how recipients are addressed. These options help ensure greetings reflect a constituent’s preferred name or salutation rather than relying solely on a full name. To insert them, select Merge, then Donor, and choose the appropriate field. If a primary addressee or salutation isn’t defined, the email automatically falls back to the constituent’s full name, so your message is always complete and ready to send.
Event Management
Better duplicate prevention with expanded Online data review for Events
May 5, 2026
A workflow change is coming for events users in web view. Online data review is expanding to include event registrations. If you have an active web view event registration form, review and update your Online data review settings to ensure these transactions are included.
Training: See a quick overview of Online data review in this micro learning video.
Read the blog article that walks through how event registrations were handled before and how they are handled now.
Link and unlink events and campaigns in web view
You can now manage linked events directly from a campaign record, streamlining your event tracking and fundraising oversight.
Fundraisers
Prepare for outreach with Action strategies
April 21, 2026
Action strategies help fundraisers show up prepared for the outreach they’re doing next. Instead of digging through records before a call, email, or meeting, action strategies pull together the most relevant donor context for actions due today or coming soon — so fundraisers can focus on the conversation, not last-minute research.
With action strategies, fundraisers can quickly see what’s changed, what matters most right now, and how to approach the outreach. Each action includes a personalized preparation guide that surfaces recent activity, key donor signals, communication preferences and consent, and related opportunities or cultivation plans. Action strategies can also generate optional content, such as talking points, agendas, or drafts, and provide clear recommendations — like whether to proceed, pause, or cancel — based on new context.
Action strategies are available by default to fundraisers who use Work Center in accounts with access to Premium features, with no setup required for eligible users. Action strategies require Blackbaud AI to be enabled and are designed to support confident, timely outreach while keeping fundraisers in control of their relationships.
Quickly focus on opportunities by gift type
February 24, 2026
You can now filter Opportunity lists by Gift type, making it easier to see whether an opportunity is expected to result in pledges, gifts in kind, or other gift types. From Portfolio, Opportunity lists, open a list and select Filters. Under Opportunity details, choose Gift type and apply the filter.
You can also add Gift type as a column to quickly scan and compare opportunities at a glance. This helps you prioritize follow‑up without opening individual records. Select Columns, Opportunity details, choose Gift type, and apply the change.
Tip: Gift type information is sourced from the opportunity record and reflects the value shown on the Details tile.
General Features
Manage appeals from a constituent record
April 21, 2026
On a constituent record, you can link or unlink existing appeals and update certain appeal details, without impacting historical gifts or interactions. This update provides a more direct way to maintain accurate appeal associations for constituents.
Manage campaigns, funds, and appeals directly on associated linked records in web view
April 21, 2026
You can now manage campaign, fund, and appeal details directly from their associated records, making it easier to keep track of information and improve your financial oversight:
-
Linked appeals and campaigns on Fund records
-
Linked campaigns and funds on Appeal records
-
Linked appeals and funds on Campaign records
Campaigns and Funds on Action records
February 10, 2026
You can now add, edit, and remove Campaigns and Funds directly on an Action Record. This allows you to keep the action tied to the appropriate fundraising effort without leaving web view. For additional information, see Action Records.
Gifts
Manage appeal expenses in web view
You can now add, view, edit, and delete expenses directly from an appeal record. The centralized view of expenses and their associated packages helps you manage appeal-related costs more efficiently.
View and edit existing planned gifts in web view
March 31, 2026
To streamline planned giving record keeping, you can now edit the following tiles for existing planned gifts in web view:
-
Assets
-
Planned gift details
-
Planned gift vehicles (tile changes based on the vehicle selection)
-
Beneficiaries
-
Relationships
In web view you can also now view the Realized revenue tile, which includes information about the revenue linked to the planned gift.
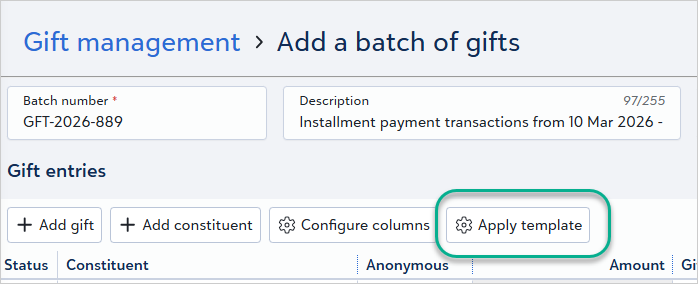
Apply a template to a batch
March 10, 2026
From the grid view, select Apply template to apply an existing batch template to quickly set up your batch, maintain consistency, and reduce data entry errors. Batch templates define which fields appear in the grid and can include default values for those fields. When you apply a template to a new or existing batch, the selected fields and default values are added automatically.
Enter gifts through new checkout
March 10, 2026
Now when you add a gift from Home or a constituent's record, back‑office gift entry uses the same checkout experience as online forms. The new checkout experience provides a modern, secure way to process payments.
Note: Update March 30, 2026: We recommend requiring the card security code (CSC) for all new credit card payments to strengthen security and safeguard your transactions. Based on your feedback, we’ve temporarily reverted back-office functionality to the original checkout for card processing. The new checkout will return in 2027, giving you time to prepare and adjust your back-office procedures. We will provide more information and an updated timeline soon.
General ledger distributions available in web view
March 3, 2026
You can now configure general ledger distributions directly on Funds records in web view for both Blackbaud Financial Edge NXT integrated and non-integrated environments.
Apply manual payments to a pledge
March 3, 2026
You can now apply manual payments to automated pledges. This enhancement lets your organization accept manual payments for open installments and update pledge schedules with more control.
Update credit card information on automated pledges in web view (for more of you)
March 3, 2026
To more easily manage payment information, now you can update credit card details for automated pledges.
Latest updates to the grid batch
March 3, 2026
As promised, we’ve made the following updates to the grid batch:
-
You can now create a constituent directly from the grid with the new Add Constituent button.
-
For more accurate gift review, split gifts display the selected campaign, fund, and appeal names instead of Split in the Campaign, Funds, and Appeals columns.
-
For faster data entry, the Campaign, Funds, and Appeals columns now begin searching for results after you enter two characters instead of three.
Grid view batch for improved data entry (generally available)
March 3, 2026
The new grid batch offers an improved workflow for adding multiple gifts to a batch, while maintaining all the functionality of the previous batch UI. From Gifts, Overview, select Add, New grid batch, or on an existing unapproved batch's record, select Edit, Edit in grid view. Now you can see and review all batch gifts in a single grid, tab through fields for faster entry, and configure the columns to add, remove, or rearrange fields on the batch. The status column is locked to allow you to easily identify and review errors that occurred when saving gifts. For more information, see Add or Edit Gifts in Grid Batch.
Updated batch fields include the constituent field, which now has an advanced search that provides additional constituent details to ensure that you're selecting the correct constituent. After you enter a constituent, select the constituent icon that to open and edit the constituent record from the flyout without having to leave the grid batch.
Under Related Links, you can access the new template functionality, which allows you to set the columns and default values for the fields on your batches. You can reuse the templates for each batch you create, allowing for a quicker workflow. For more information, see Create a Gift Batch Template.
Note: The approval process for batches is not changing. Any existing unapproved batches in your system are unaffected by the update.
Enhanced Gift List: Next Installment Date for Pledge Insights
January 27, 2026
The Gift list now includes a new Next installment date filter and column that enables more precise segmentation of pledges based on the due date of the next installment with an outstanding balance. This enhancement helps you quickly identify donors with upcoming or overdue payments, improving follow‑up and stewardship workflows. Because this date reflects the next unpaid installment, it may appear in the past when a pledge is overdue. In addition, Blackbaud AI Chat now supports questions related to the next installment date for pledges, making it easier to surface this information without navigating the interface.
Ask Blackbaud AI: Who has pledges due this month from my portfolio?
Integration
Duplicate management of constituents (Luminate Online integration)
April 21, 2026
Merges performed in Raiser’s Edge NXT web view now also merge linked Luminate Online constituent records, keeping data aligned across both systems without requiring a database view merge.
Apply consistent data processing rules with integration options
March 17, 2026
You can now manage options directly in web view for Luminate Online integration. This update lets you configure default automatic processing, address information, constituent codes, and record‑matching behavior, including duplicate‑matching criteria, so the integration works the way your organization needs it. This does not need any action on your part. For more information, see Options.
General ledger distributions available in web view (for some of you)
February 10, 2026
You can now configure general ledger distributions directly on Funds records in web view for both Blackbaud Financial Edge NXT integrated and non-integrated environments.
Enhanced Luminate Online integration available in web view
January 7, 2026
You can now manage several aspects of your Raiser's Edge and Luminate Online integration directly within Raiser's Edge NXT. While work continues on expanding web view integration, this update introduces a connection between Raiser's Edge NXT and Luminate Online, along with options for working with constituent and gift data.
Supervisor users with access to the database plugin will see the new top-level menu item labeled Luminate Online in web view. The database view plugin remains unchanged, but the web view version offers a convenient experience for completing integration tasks.
For more information, see Raiser's Edge NXT and Luminate Online.
Membership
Manage membership records without leaving web view
March 31, 2026
Create, edit and delete all membership information directly from the Membership record in Raiser’s Edge NXT web view. All tiles (Credited to, Members and cards, Gift of membership, Benefits, Custom fields, and Linked gifts) support these actions. If your organization uses Memberships, these updates appear automatically with no setup required.
Manage memberships and gifts together in web view
February 10, 2026
To help you manage memberships and gifts together, you can now link memberships directly to gifts from the gift record in web view. Use the new Memberships tile to view linked memberships, add new ones, or edit existing links without leaving the gift record.
For more information, see Gift Records.
Enhanced visibility into Membership details
February 10, 2026
You can now view all your membership information in one place. We've added six new tiles to Membership details — Credited to, Members and card details, Gift of membership, Benefits, Custom fields, and Linked gifts.
The Custom fields tile supports view, add, edit, and delete, while the other tiles are currently view‑only. If your organization uses Memberships, these tiles appear automatically with no setup required. Additional add, edit, and delete functionality for tiles will be released in future updates. For additional information, see Membership Records.
Portal
Enhanced portal experience for better engagement
March 24, 2026
To help your organization increase constituent engagement, streamline giving, and save time, portal users can now:
-
View memberships and events - Portal users can easily view their memberships and past and future events keeping them informed and engaged.
-
Give through an Optimized Donation Form – Admins can select an Optimized Donation Form for portal giving. This provides portal users with a streamlined, user-friendly experience.
-
PCI v4-compliant saved payments - Portal users can save their payments with a checkout that is dynamic, secure, and with no scheduled payments downtime.
-
Recognize your brand – The portal displays your organization’s name and logo together to reinforce brand identity and create a personalized experience.
-
Improved navigation – A redesigned left navigation makes it easier for portal users to find what they need, improving usability and overall satisfaction.
To learn how to set up and configure your organization's portal experience, see Portal.

Premium Features
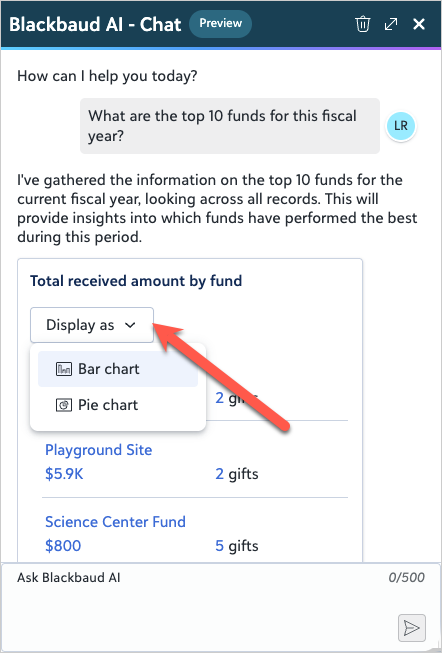
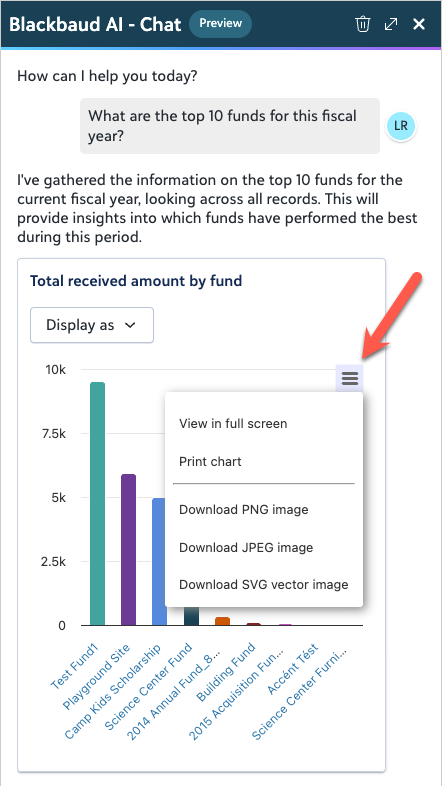
Visualize giving insights with bar and pie charts in Chat
February 17, 2026
Tip: This capability is a Premium feature. What's a Premium feature?
You can now turn common giving analysis questions into clear visuals — right in Chat for Blackbaud AI. Switch between Bar chart, Pie chart, or List view using the new Display as field, then print or download the chart image from the menu to share or save.
Why it matters
-
See cash flow at a glance. Visualize projected revenue from future pledge and recurring gift payments to better understand upcoming cash flow.
-
Spot what’s driving results. View giving by revenue or gift counts across top campaigns, funds, or appeals to quickly identify what’s performing.
-
Move faster from insight to action. Toggle views without re-running queries and share visuals instantly.
Ask Blackbaud AI: "Show me all actions assigned to me grouped by type."
Ask Blackbaud AI: "What are the top 10 funds for this fiscal year?"
Ask Blackbaud AI: "Show me projected revenue for next fiscal year." (bar chart only)
Turn benchmark insights into action with Blackbaud AI guidance (Premium feature)
February 17, 2026
Tip: This capability is a Premium feature. What's a Premium feature?
Benchmarking tiles now include a Suggest actions button that connects you to Chat for Blackbaud AI — so you can move from insight to impact faster.
Available on Active donor growth, Revenue growth, Revenue per donor, and Sustainer performance benchmarking tiles, this feature provides real‑time, personalized guidance based on your organization’s data and peer benchmarks.
With AI guidance, you can:
-
Understand how your performance trends compare to similar organizations
-
Interpret benchmark results with clear, contextual insights
-
Get tailored recommendations curated for your benchmark cohort
-
Take next steps directly from the tile, such as launching campaigns or adjusting strategies
Select Suggest actions to see your next best move and turn benchmark insights into meaningful progress.
Prospect Insights
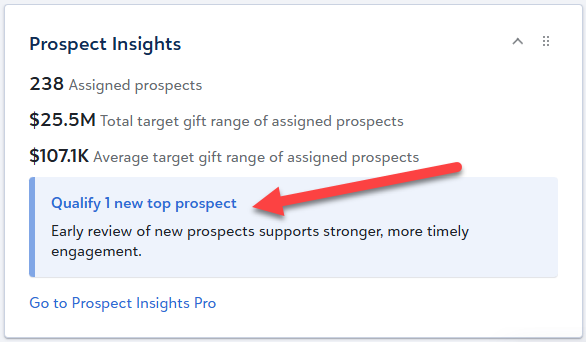
Access newly relevant Prospect Insights Pro candidates via the Home page
May 5, 2026
Now you can easily access newly relevant prospects in the Top Prospects queue by selecting the link from Prospect Insights on the Home page.
Tip: If you don't see Prospect Insights on the Home page, customize your Home page to display it. For more information, see Customize the Home Page.
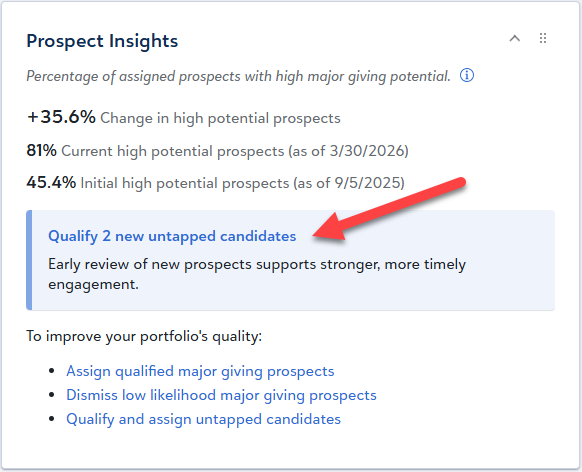
 Access newly relevant Prospect Insights candidates via the Home page
May 5, 2026
Now you can easily access newly relevant prospects in the Untapped Candidates queue by selecting the link from Prospect Insights on the Home page.
Tip: If you don't see Prospect Insights on the Home page, customize your Home page to display it. For more information, see Customize the Home Page.
 Identify prospects recently added to Prospect Insights Pro queues
April 28, 2026
Now you can quickly identify prospects in the Top Prospects queue who were added within the past 14 days by selecting Assign new top prospect from Needs attention. You can also locate prospects recently added to any Prospect Insights Pro queue using the Added within filter, which is available for all queues. See Use Filters to Find Prospects in Prospect Insights Pro.
 Identify prospects recently added to Prospect Insights queues
April 28, 2026
Now you can quickly identify prospects in the Untapped Candidates queue who were added within the past 14 days by selecting Assign new untapped candidates from Needs attention. You can also locate prospects recently added to any Prospect Insights queue using the Added within filter, which is available for all queues. See Use Filters to Find Prospects in Prospect Insights.
 Prospect Insights Pro scores refresh (for some of you)
April 21, 2026
Prospect Insights Pro's data models and projected giving and wealth information scores now use the latest available data and adaptive modeling. The refresh affects all queues, so make sure to review your best major gift prospects. Because the queues are sorted by priority, you may notice different prospects at the top of a list.
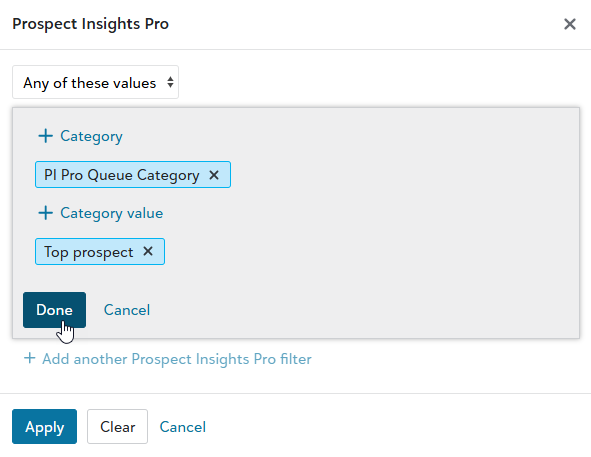
Filter Prospect Insights Candidates
March 10, 2026
To make identifying specific types of candidates easier, now you can filter Prospect Insights queues to:
-
display candidates who meet predictive giving criteria associated with a Prospect Insights model. For more information, see Prospect Insights Models.
-
show prospects who have specific constituent codes. For more information, see Constituent Codes.
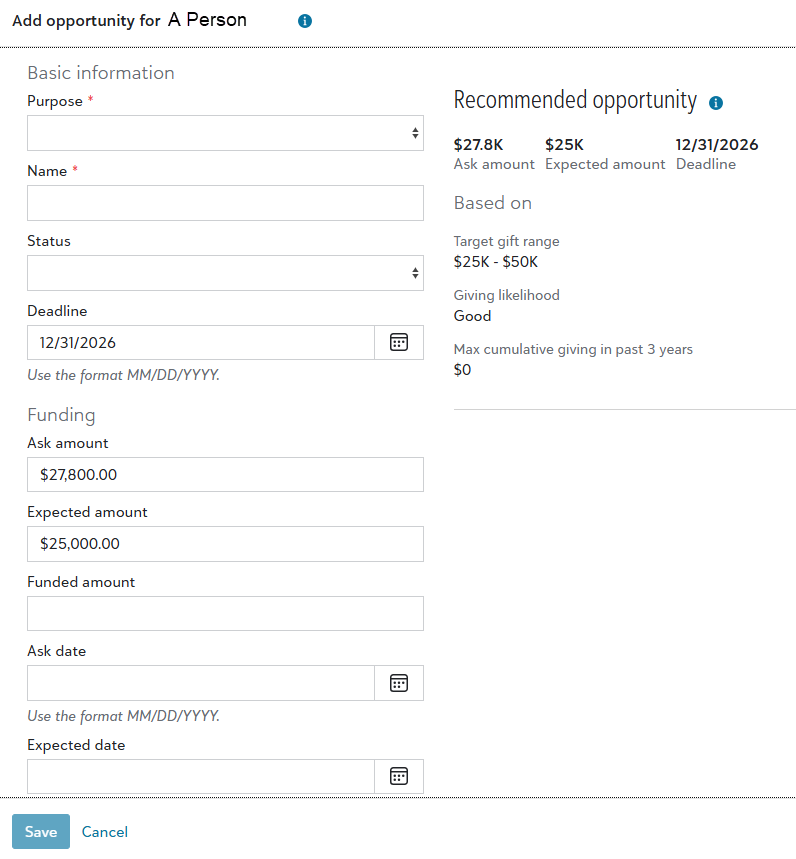
Optimize giving with Prospect Insights Pro (for some of you)
March 3, 2026
Maximize fundraising outcomes with Prospect Insights Pro's optimized opportunities. Now, when you add or edit an opportunity for a prospect in a Prospect Insights Pro queue, Prospect Insights Pro suggests gift ask amounts based on a prospect's likely gift capacity.
This capability represents the initial release of the Cultivation Assistant — an intelligent assistant that helps fundraisers move opportunities forward faster by combining Prospect Insights Pro with Blackbaud AI.
For those with Blackbaud AI - Chat enabled, you can create an action plan to support opportunities you create or edit via Prospect Insights Pro.
For more information, see Prospect Insights Pro Opportunities.
 Enhanced prospect pool segmentation with Prospect Insights Pro (for some of you)
January 13, 2026
To help you better segment prospect pools, you can now view and filter lists and queries using Prospect Insights Pro data models.
For more information, see Identify Prospect Insights Pro Candidates using Lists or Queries.
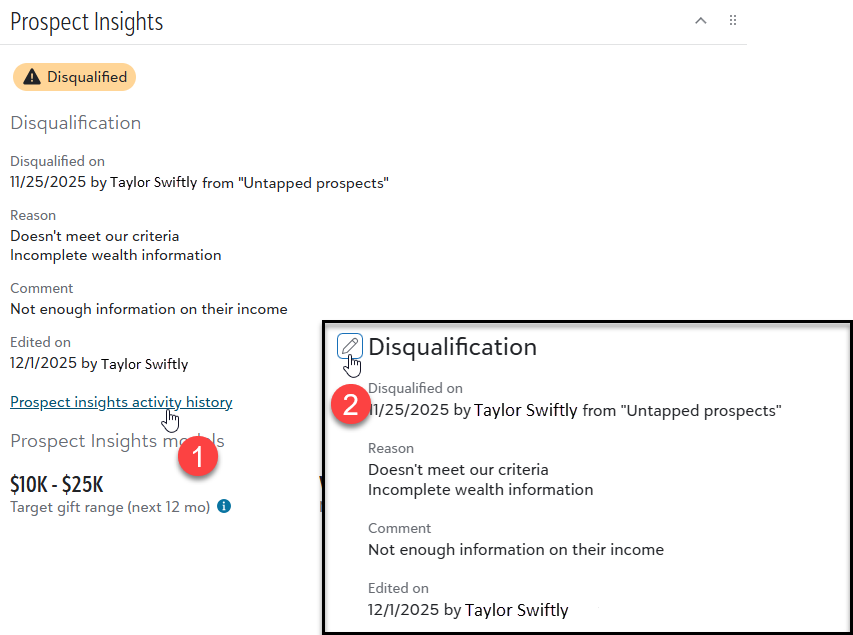
Edit Prospect Insights and Prospect Insights Pro candidate disqualification details
January 13, 2026
To help you better manage prospect disqualification actions, you can now edit their details.
To edit disqualification details:
-
Select Prospect insights activity history from a prospect's record or from the prospect's Analysis tab in Prospect Insights or Prospect Insights Pro.
-
Select edit and make the desired changes.
 Include or exclude prospects with specific fundraisers in Prospect Insights and Prospect Insights Pro queues
January 13, 2026
To make filtering prospect queues easier, now you can exclude prospects based on their fundraiser assignment using the fundraiser filter.
To filter out prospects from a queue assigned to specific fundraisers:
-
Select the fundraisers from the fundraiser filter.
-
Select Excludes any of.
-
Select Apply.
Query
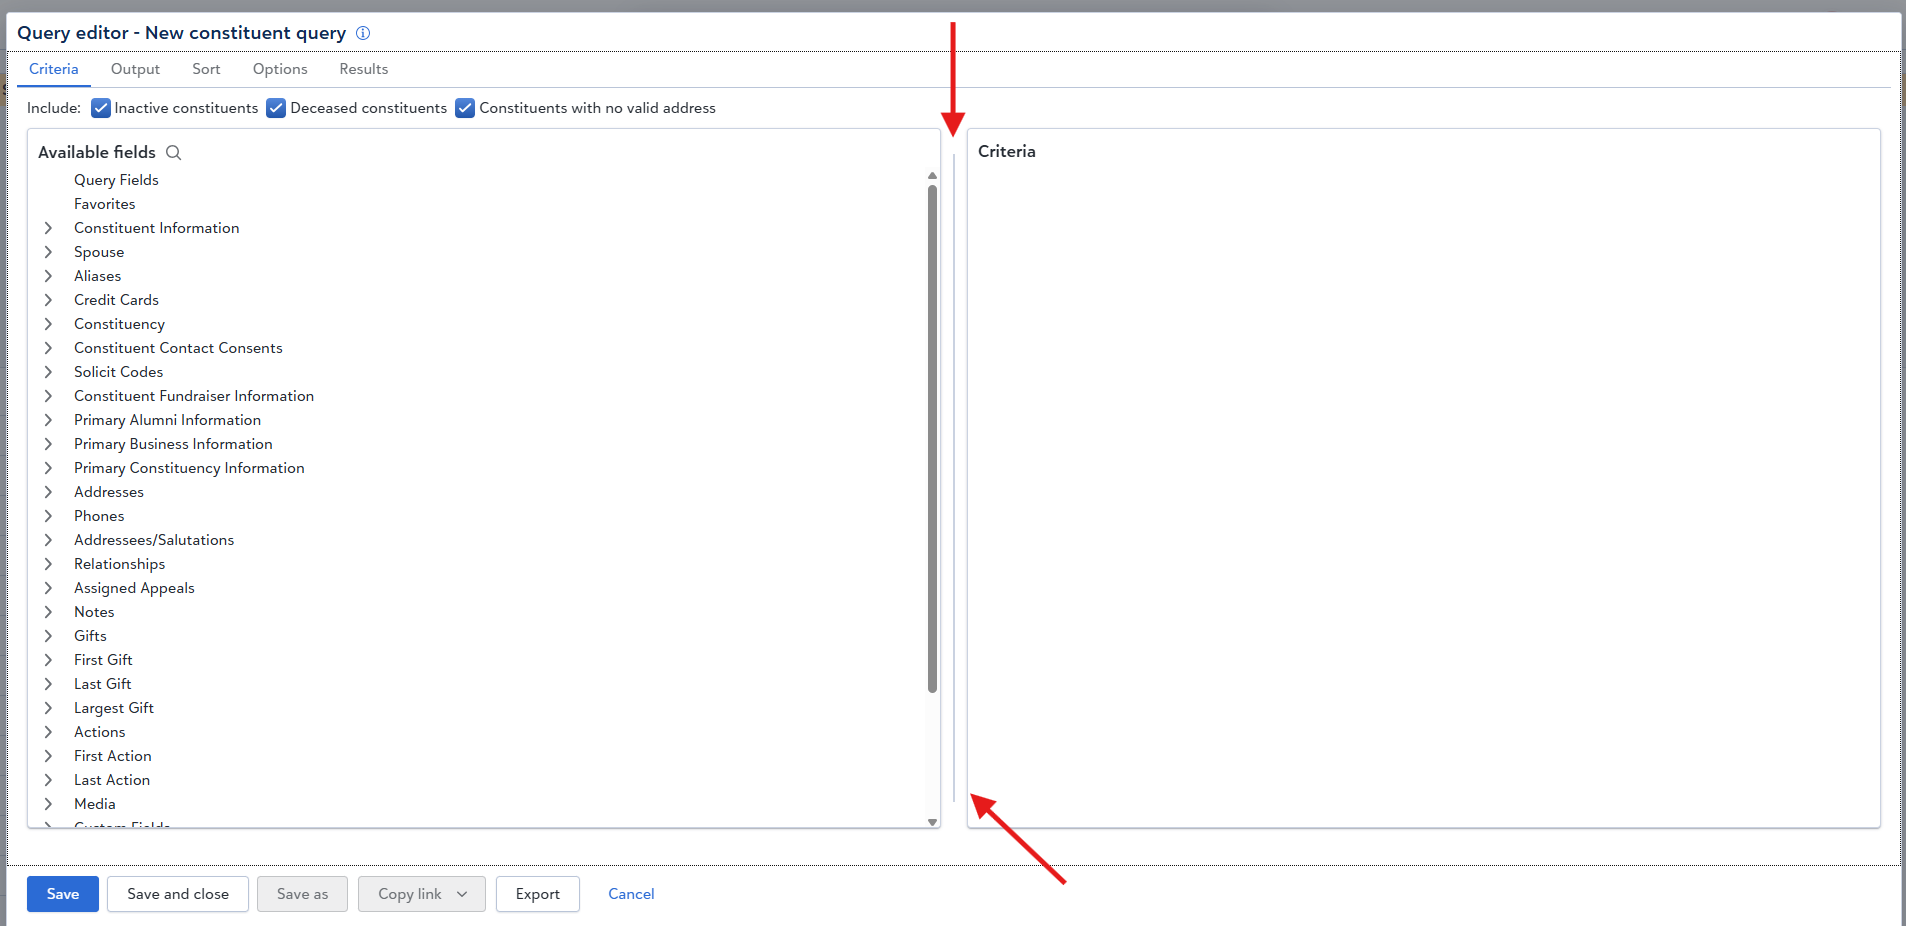
Resizable Query editor panes
March 10, 2026
You can now resize the Query editor panes to create a workspace that supports your workflow. A new grab handle appears between the panes so you can adjust the width to focus on the criteria, output, or sort information you need. You can also resize the panes with the keyboard, which supports users who prefer or require keyboard navigation.
When you adjust the pane widths, SKY UX sticky settings store your preferences for each product and each editor view. For example, Criteria, Output, and Sort store their pane widths independently. Your preferred layout appears each time you open an editor so you can stay focused on your task without reorganizing your workspace.
Updated constituent name formatting to First MI Last
March 10, 2026
We updated how queries format Name to align it more closely with natural language and to distinguish it from Sort Name. Sort Name uses the Last, First Middle format; Name and Sort Name had displayed the same information. To support multiple formats in web view Query, Name now displays First MI Last. Sort Name continues to display Last, First Middle.
How this update affects workflows
-
Use Sort Name when you need Last, First Middle for sorting or grouping.
-
Use Name when you need First MI Last for display or export.
-
Include both fields in a query when you need both formats available for review.
This update ensures that both formats are available in web view Query. Teams that prefer First MI Last can use Name, and teams that rely on Last, First Middle can use Sort Name.
Note: Queries that currently include Name may need to switch to Sort Name if the user wants to use Last, First Middle.
Enhanced visibility and expanded field options in web view Query
March 3, 2026
To make it easy to see which fields aren’t available in database view, web view queries now display a cloud icon for fields that are exclusive to web view. This visibility helps you confidently build queries that use web view–only data and benefit from additional insights you couldn’t access before.

We've added new fields from database view Export to web view Query:
-
Constituent, Sort name with import ID
-
Gift, Fund list
-
Preferred Address, Preferred Address
-
Address processing, Address
These address fields include all address lines in the same cell.
To support consistent terminology in Query, we’ve renamed the Sort key fields where needed:
-
Sort name lists Last name, First nameMiddle name
-
Sort name with import ID lists Last name, First name, Middle name, Import ID
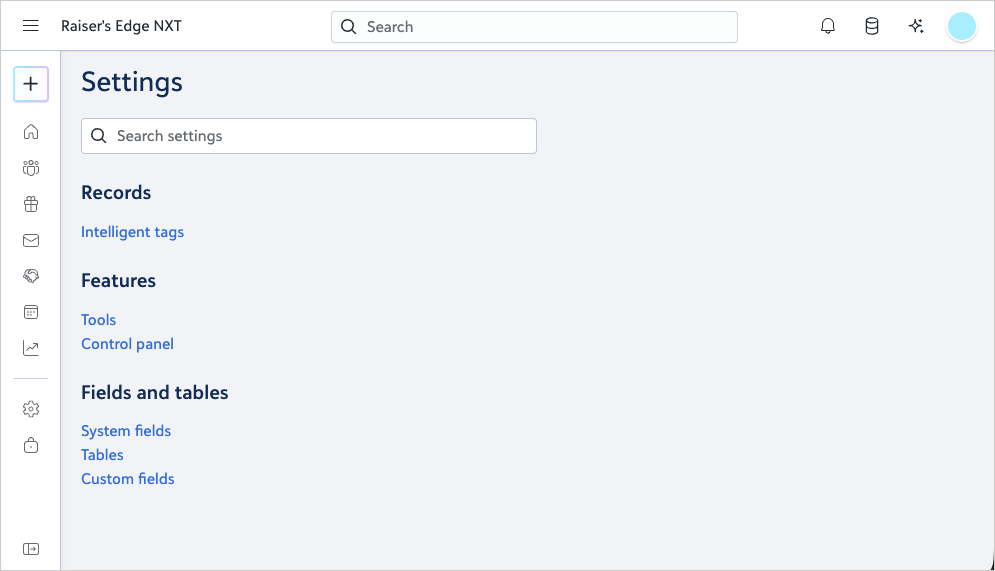
Settings
Settings navigation is simpler — and easier to search
March 10, 2026
We’ve simplified the Settings experience so you can spend less time navigating and more time getting things done. Instead of opening a dropdown and knowing which page to choose, selecting Settings in the left navigation now takes you straight to the main Settings page. Once you’re there, a new built‑in search helps you find the setting you want to update.
This update is designed to make Settings more intuitive, more flexible, and more future‑ready. Previously, Settings were spread across multiple sub‑menus, which meant you had to understand the structure before you could make a change. This release begins a broader consolidation of Settings into a single, easier‑to‑scan destination that’s built to grow. You’ll see more settings move here over time, and new settings will land on this page in future releases, making it the central place to find, manage, and update everything you need.
Shape the donor insights that drive your fundraising with Intelligent tags
March 10, 2026
Intelligent tags — previously known as Tags in Raiser’s Edge NXT — are now managed directly in Settings, giving organizations more control over which donor insights appear throughout their fundraising workflows. These insights highlight key donor behaviors such as recent giving, lapsing activity, event participation, wealth changes, and personal milestones. They appear across the product, including constituent records, lists, Work Center, and prospect outreach recommendations in Chat for Blackbaud AI.
With this update, admins control which insights appear, so teams are guided by consistent, strategy‑aligned signals that support confident, results‑driven fundraising. By managing intelligent tags and displaying only the ones that matter to your organization, fundraisers see the most relevant donor insights when they work in Raiser’s Edge NXT.
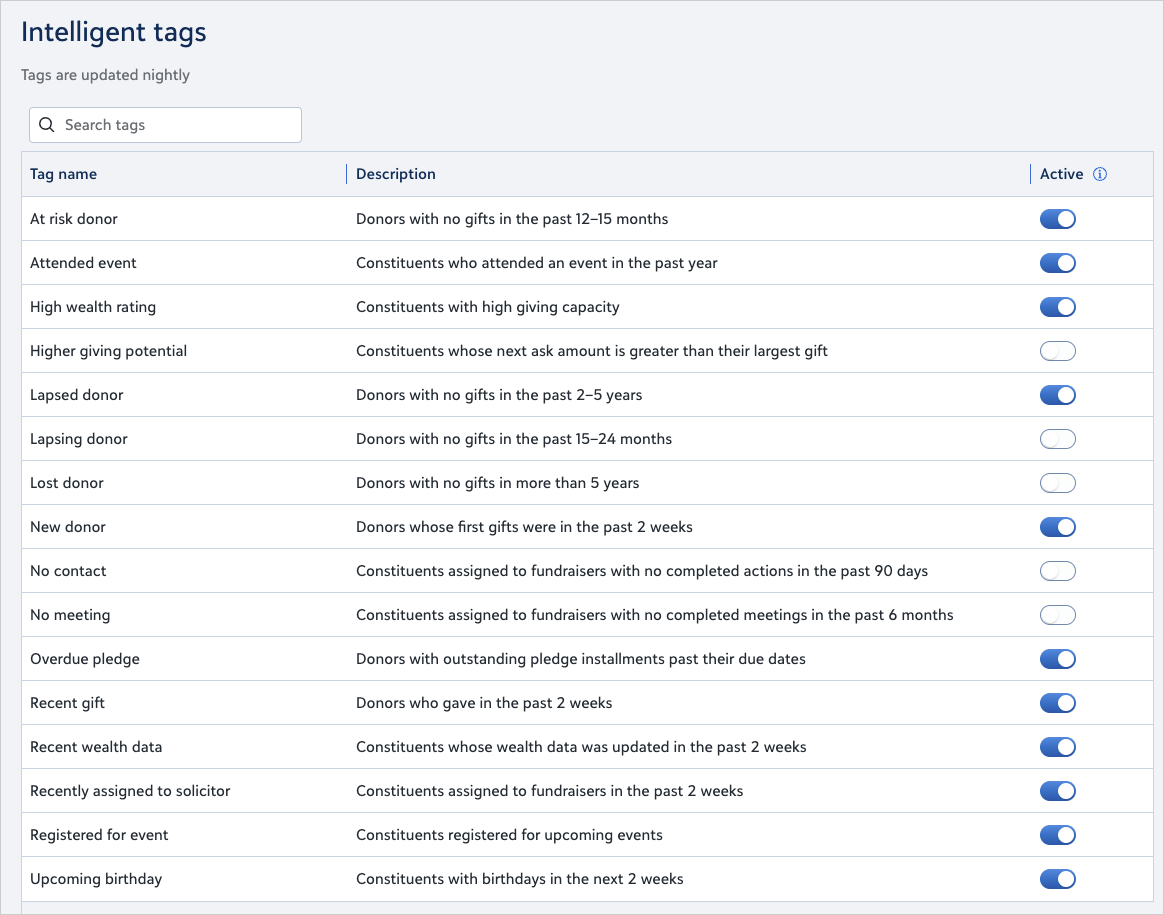
Admins can turn individual intelligent tags on or off in Settings, Intelligent tags. A new Manage intelligent tags permission in Security, Role management, Settings determines who can adjust which insights appear.
This enhancement strengthens organizational governance, improves the relevance of insights fundraisers rely on, and creates a foundation for a more unified settings experience.
Standard Reports
Statistical Reports now available in Raiser's Edge NXT
May 5, 2026
You can now access Statistical Reports in Raiser's Edge NXT to get a single-period snapshot of constituent counts, gift activity, and total giving grouped by key fields like constituency, fund, campaign, or appeal. As in database view, this report is found under Demographic and Statistical Reports and offers a familiar way to summarize giving — similar to Comparisons and Summaries, but focused on a single period rather than multi-period analysis.
Explore alumni giving with a new Standard report
April 7, 2026
You can now analyze alumni giving trends by graduating class, degree program, and major with the new Alumni Class Analysis report. Use this report to compare class-level performance or review individual gift detail to better understand alumni engagement and fundraising opportunities over time.
For more information, see Standard Reports.
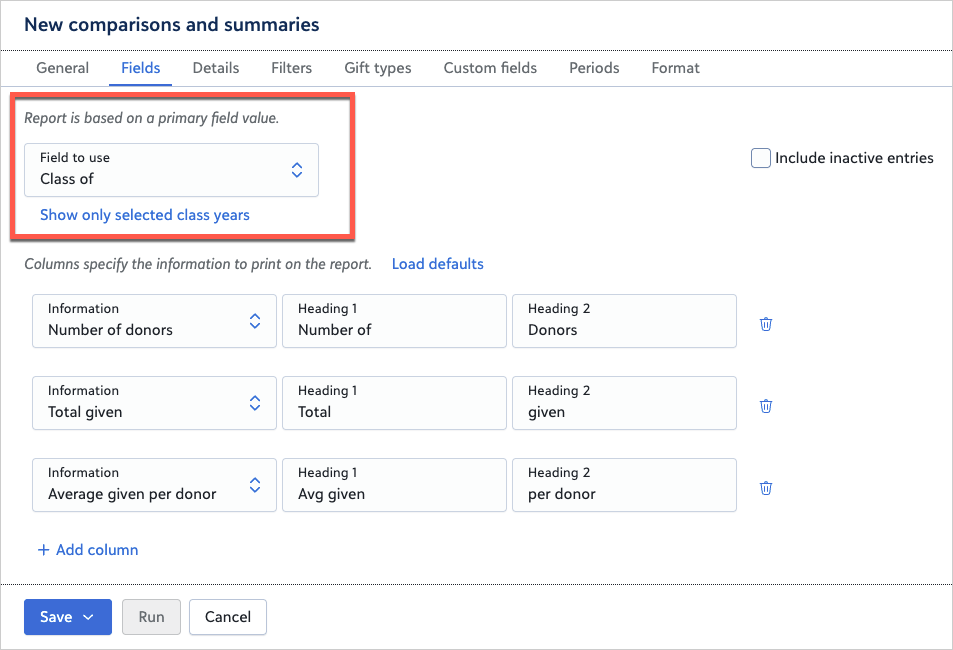
Class of field now available in Comparison and Summaries reports
March 10, 2026
In response to your feedback, Comparison and Summaries reports in Standard reports now support the Class of field, allowing you to run reports broken down by class years. You can apply this field from the Fields tab when building or editing a report. Previously, class year data was only available in database view.
Greater flexibility for constituent name formatting in Standard reports
January 7, 2026
In response to your feedback, we’ve added a new way to customize how constituent names appear in Standard reports. Previously, you could only choose Individual’s name or Individual’s record as the name source. Now, you can select From configuration for even greater flexibility. This enhancement allows you to apply any name format defined in Configuration, Addressees/Salutations in database view. For example, you can include a constituent’s ID in the name format — helping you tailor reports to your organization’s needs. When you add or edit a Standard report, on the Formats tab, under Constituent, select From configuration and choose a name format from your configuration settings. This update gives you more control over how names display in reports, ensuring consistency and alignment with your organization’s standards.